[TUTORIAL] Proxmox LXC iGPU passthrough

Mamiya_

New Member
Oct 14, 2022
4
5
3

Proxmox LXC iGPU passthrough​

I couldn't find any tutorial that worked out for me so i create my own.
Code was executed at Lenovo M720q, i5-8500T, Proxmox 8.1.3


Full step by step guide for passthrough intel iGPU for jellyfin and Intel CPU's gen7+
It seems like Firefox has some problems with transcoding movies. It’s recommended to stick with chromium based browsers.

Install the required drivers on the Proxmox host.​

Code:
apt install -y intel-opencl-icd

Edit grub
Code:
nano /etc/default/grub

Find the line that starts with GRUB_CMDLINE_LINUX_DEFAULT and change to following:
Code:
GRUB_CMDLINE_LINUX_DEFAULT="quiet intel_iommu=on i915.enable_gvt=1"

Execute command:
Code:
update-grub

reboot host​


Validate changes. It showed IOMMU enabled
Code:
dmesg | grep -e DMAR -e IOMMU


Edit etc modules
Code:
nano /etc/modules
Code:
    # Modules required for PCI passthrough
    vfio
    vfio_iommu_type1
    vfio_pci
    vfio_virqfd
    # Modules required for Intel GVT
    kvmgt
    exngt
    Vfio-mdev

Execute command:
Code:
update-initramfs -u -k all

Your VGA card should be visible with command
Code:
lspci -nnv | grep VGA

Enable GUC
Code:
echo "options i915 enable_guc=3" >> /etc/modprobe.d/i915.conf


Create LXC container as plivilaged and add parameters to configuration
Code:
nano /etc/pve/lxc/<container number>.conf
Code:
lxc.cgroup2.devices.allow: c 226:0 rwm
lxc.cgroup2.devices.allow: c 226:128 rwm
lxc.mount.entry: /dev/dri/renderD128 dev/dri/renderD128 none bind,optional,create=file


On LXC container


Update and upgrade system
Code:
apt update && apt upgrade -y


Install ffmpeg
Code:
apt install ffmpeg -y

Install software-properties-common
Code:
apt-get install software-properties-common -y

Install curl and gnupg
Code:
apt install curl gnupg -y

On Ubuntu (and derivatives) only, enable the Universe repository to obtain all the FFmpeg dependencies
Code:
add-apt-repository universe


Download the GPG signing key (signed by the Jellyfin Team) and install it
Code:
mkdir -p /etc/apt/keyrings
curl -fsSL <https://repo.jellyfin.org/jellyfin_team.gpg.key> | sudo gpg --dearmor -o /etc/apt/keyrings/jellyfin.gpg

Add a repository configuration at
Code:
/etc/apt/sources.list.d/jellyfin.source

Code:
export VERSION_OS="$( awk -F'=' '/^ID=/{ print $NF }' /etc/os-release )"
export VERSION_CODENAME="$( awk -F'=' '/^VERSION_CODENAME=/{ print $NF }' /etc/os-release )"
export DPKG_ARCHITECTURE="$( dpkg --print-architecture )"
cat <<EOF | tee /etc/apt/sources.list.d/jellyfin.sources
Types: deb
URIs: <https://repo.jellyfin.org/${VERSION_OS}>
Suites: ${VERSION_CODENAME}
Components: main
Architectures: ${DPKG_ARCHITECTURE}
Signed-By: /etc/apt/keyrings/jellyfin.gpg
EOF

Update your APT repositorie
Code:
apt update

Install the Jellyfin metapackage, which will automatically fetch the various sub-packages:
Code:
apt install jellyfin -y

Add user jellyfin to needed groups
Code:
usermod -a -G video jellyfin
usermod -a -G render jellyfin
usermod -a -G input jellyfin
usermod -a -G ssl-cert jellyfin

install ffmpeg for jellyfin because for some reason jellyfin ffmpeg doesn't install with in jellyfin install with cause error trying to transcode HEVC
Code:
apt install jellyfin-ffmpeg -y


these are setting for transcoding in jellyfin (i5-8500T)
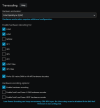
Untitled.png
 
Last edited:
Can you please get in more details after the On Ubuntu (and derivatives) only, enable the Universe repository to obtain all the FFmpeg dependencies?

after executing sudo gpg --dearmor -o /etc/apt/keyrings/jellyfin.gpg nothing happens.
 
Hi, thanks for your tutorial.
For some reason I could only get it working after I did this as well:

Code:
chmod 0666 /dev/dri/renderD128

And to make it permanent:

nano /etc/udev/rules.d/59-igpu-chmod666.rules

and add the content:

KERNEL=="renderD128", MODE="0666"

Is your system still working without any changes to your tutorial?
 
The guide works perfectly on Debian 12 (Bookworm) LXC containers.
On Debian 12, the "universe" repository does not exist, so don't worry if you get an error.
Proceed to the next step and follow the guide as indicated:
so --> Download the GPG signing key (signed by the Jellyfin Team) and install it:

I didn't need the script that releases the jellyfin.sources file.
Here is the syntax of my jellyfin.list file that worked:

deb [signed-by=/etc/apt/keyrings/jellyfin.gpg] https://repo.jellyfin.org/debian bookworm main


I also set my NAS on fstab to fetch movies and TV series. Edit the fstab file:
sudo nano /etc/fstab
// IP / remote_folder {TAB} /mnt {TAB} cifs {TAB} username=user,password=password,iocharset=utf8 {TAB} 0 {TAB} 0

Set permissions in the dri folder
sudo chmod -R 0666 /dev/dri/*
and make it permanet as said by @senseo


Ensure the command:
ls /dev/dri
Returns the value render128 (or another number depending on your VGA).

Install Intel vainfo: ( if do you have Intel cpu with integrated vga)
sudo apt install intel-gpu-tools

You can also check the supported codecs of the VGA using:
vainfo

And check if your VGA is functioning correctly with:
intel_gpu_top
 
  • Like
Reactions: mithrandir
Hi, thanks for your tutorial.
For some reason I could only get it working after I did this as well:

Code:
chmod 0666 /dev/dri/renderD128

And to make it permanent:

nano /etc/udev/rules.d/59-igpu-chmod666.rules

and add the content:

KERNEL=="renderD128", MODE="0666"

Is your system still working without any changes to your tutorial?
So I followed this tutorial and I also had to add the chmod 0666. I also added the line to the file as you described above but this doesn't work after a reboot, any ideas?
 
Hello, I have the same hardware and am trying to configure Windows 10 with HDMI pass-through (iGPU). Unfortunately I can only do this with Ubuntu 24, does anyone have any experience with this? The graphics are recognized under Windows 10, GPU acceleration works (GPU stress test with vnc). It simply does not recognize a connected monitor, or rather there is no PnP device. Any ideas?
 
Thanks to all who have contributed to this thread, finally go this to work following the advice here using an i5-8500T on jellyfin on a debian 12 LXC on proxox 8.2.

One piece that was missing from this thread to get it working for me was something I found in a youtube comment:
After checking the permissions of the GPU, in "ls -l /dev/dri/" I noticed renderD128 was owned by sgx. Idk what sgx is, but switching it to the render group fixed it.
> chgrp render /dev/dri/renderD128
New Jellyfin docs will recommend adding to render group. However if you didn't do that, you can add jellyfish user to it:
> usermod -a -G render jellyfin
 
  • Like
Reactions: cmoss
I got as far as:

Bash:
mkdir -p /etc/apt/keyrings
curl -fsSL <https://repo.jellyfin.org/jellyfin_team.gpg.key> | sudo gpg --dearmor -o /etc/apt/keyrings/jellyfin.gpg

but that returns:

Bash:
-bash: syntax error near unexpected token `|'

My LXC is running Ubuntu 24.04 LTS, so I don't know why this doesn't work

I'm also using a Lenovo M270q, but I have /dev/dri/card1 rather than card0, and 'stat /dev/dri/card1' showed me that I should use:

Bash:
lxc.cgroup2.devices.allow: c 226:1 rwm

in my lxc.conf.
 
Last edited:
  • Like
Reactions: Grumble65
Just wanted to comment and that the original post resolved my iGPU > LXC > Docker > Frigate transcoding permission issues.

Will say that instead of using cgroups in the config, I passed the gpu/google coral through via the web UI in 8.2.7 (Resources > Device Passthrough) with mode=0666 and the uid/gid.
did you passthrough /dev/dri/card0 and /dev/dri/renderD128 or something else? Wich exact uid/gid?

Thanks a lot
 
Last edited:

About

The Proxmox community has been around for many years and offers help and support for Proxmox VE, Proxmox Backup Server, and Proxmox Mail Gateway.
We think our community is one of the best thanks to people like you!

Get your subscription!

The Proxmox team works very hard to make sure you are running the best software and getting stable updates and security enhancements, as well as quick enterprise support. Tens of thousands of happy customers have a Proxmox subscription. Get yours easily in our online shop.

Buy now!