[TUTORIAL] How to run PVE 7 on a Raspberry Pi

Tux_1024

Member
Mar 7, 2021
21
24
8
32
Germany
Disclaimer:

!!! This is NOT ment for production use and is NOT official supported !!!

and​

Huge Thanks to Tim Wilkinson who made this possible!

more details and sources can be found @ https://github.com/pimox

I will devide this Tutorial in 2 Parts. The first part will only cover a very basic and fast step by step instalation just to show it is running.
In the second part I will show you a more feature ritch advanced instalation and tell you about some tipps and tricks.


Okay lets start right away with the first bit, what you need:
- Raspberry Pi ( 4B recommended )
- SD Card ( USB-SSD recommended )
- Ethernet connection
- RPi-OS-64bit ( https://downloads.raspberrypi.org/r...5-28/2021-05-07-raspios-buster-arm64-lite.zip )
- knowledge how to flash this Image (Win: RasPiImager, balenaetcher, Win32DiskImager Linux: dd)...
- knowledge how to connect to your RPi via ssh.
- around 30min - 2h ( depending on the RPi type, clock, disk and network speed )

The first step after booting up the Raspberry Pi should be as always get it up to date and install the needed dependencies and some tools if needed, whitch can be done with the following command:
Bash:
sudo apt update && sudo apt upgrade -y  && sudo apt install -y gnupg curl #nmon #screen

I've you have taken a close look to the terminal you've seen that we are still on debian 10 buster. Lets take care of that first by removing all extra repolists, just type:
Bash:
sudo rm /etc/apt/sources.list.d/*.list

Okay add the new Debian 11 bullseye repos and while we are at it, add all the other needed repos. Use your favorite editor to do this, I do this with:
Bash:
sudo nano /etc/apt/sources.list

Delete everthing in this file and make sure it conatins the following:
Code:
# Raspberry Pi Bullseye Repo
deb http://archive.raspberrypi.org/debian/ bullseye main
# Pimox7 Repo
deb https://raw.githubusercontent.com/pimox/pimox7/master/ dev/
# Debian Reop
deb http://deb.debian.org/debian bullseye main contrib non-free
# Security Updates
deb http://security.debian.org/debian-security bullseye-security main contrib non-free

Since we have added the Pimox7 repo we allso need to get the key witch can be done with:
Bash:
curl https://raw.githubusercontent.com/pimox/pimox7/master/KEY.gpg | sudo apt-key add -

Now we are ready to update to Debian 11 bullseye and all so get the matching kernel headers afterwards:
Bash:
sudo apt update && sudo apt dist-upgrade -y && sudo apt install -y raspberrypi-kernel-headers

No we are not ready yet... We have to assing a static IP address to the RPi, witch we will do by editing the interfaces file, again I do this with nano:
Bash:
sudo nano /etc/network/interfaces

Delete everything and make sure it contains the following (of course addjust the IP to your needs):
Code:
 auto lo
iface lo inet loopback
auto eth0
iface eth0 inet static
address 192.168.xxx.xxx/24
gateway 192.168.xxx.1

Okay the IP configuration is done lets move on with the hostname configuration:
Bash:
sudo hostnamectl set-hostname RPi4-PVE-01

Check if everything worked well and disable all IPv6, since we don't need it, lets open the hosts file:
Bash:
sudo nano /etc/hosts

Delete all lines IPv6 related and you should be left with, if not correct it:
Bash:
192.168.xxx.xxx RPi4-PVE-01
127.0.0.1       localhost

We will get a static IP next time the network is reset or the Pi is rebooted, so we will uninstall the dhcpclient and while we are at it we remove all unessesary left over:
Code:
sudo apt purge -y dhcpcd5 && sudo apt autoremove -y

Before we are going to install PVE on the RPi it is now a good time to set a root password type in:
Bash:
sudo -u root passwd

Finaly we are ready to install PVE on the RPi. I run the installation process inside a screen so it dosen't mather if the network is reset or disconnected during instalation:
Bash:
screen -S pveinst sudo apt install -y proxmox-ve && sudo systemctl reboot

Yes you will see some errors but there are fine, since some services might not run during instalation or some symlinks are not pressent on the RPiOS.

When your RPi is finished it should reboot automaticaly and you can browse to your PVE instance via a web browser, login as root.
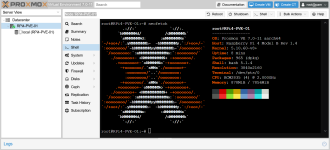
RPi4PVE.PNG

Bonus
You are really, really lazy follow the 10 steps for the RPiOS64 autoinstallation and enjoy your free time. https://github.com/TuxfeatMac/pimox7
 
Last edited:
Here comes the Advanced Instalation

After flashing the SD Card (I recommend a SSD via USB 3.0) and before the first boot, I edit some files on the /boot partition of the sd card.

1. Add a plain file called "ssh" to enable ssh automaticaly.

2. I fit a good heatsink on my RPi and give it a overclock, since I like it to be a bit snappier. I disable the BT/WiFi, since not needed. And I like to reduce the GPU memory so that there is a littel more RAM avaiable. To do this add this to the config.txt:
Stable overclock RPi 4BHigh overclock RPi 4B ( !!! warrenty void !!! ) but snappier
#### RPi 4 Overclock
arm_freq=2000
over_voltage=6

#### Disable Bluetooth / WiFi
dtoverlay=disable-wifi
dtoverlay=disable-bt
#### GpuMem
gpu_mem=32
hdmi_force_hotplug=1
#### RPi 4 Overclock
force_turbo=1
arm_freq=2200
over_voltage=8
#### Disable Bluetooth / WiFi
dtoverlay=disable-wifi
dtoverlay=disable-bt
#### GpuMem
gpu_mem=32
hdmi_force_hotplug=1

3. Edit the cmdline.txt as follows:
remove at the end:add at the end:
quiet init=/usr/lib/raspi-config/init_resize.sh cgroup_enable=cpuset cgroup_enable=memory cgroup_memory=1
so you should be left with:
Code:
console=serial0,115200 console=tty1 root=PARTUUID=c0799831-02 rootfstype=ext4 elevator=deadline fsck.repair=yes rootwait cgroup_enable=cpuset cgroup_enable=memory cgroup_memory=1

This serves 3 purposes, first of all I like to see on boot what happens (quiet), second I don't want to have room for other partitions (init_resize.sh) and 3rd fixes some CT statistics not showing up in the PVE Web GUI.

Okay lets go, boot up the RPi and repartition it:
Bash:
sudo fdisk /dev/sda
Bash:
sudo fdisk /dev/sda

Command (m for help): i
Partition number (1,2, default 2):2

         Device: /dev/sda2
          Start: 532480                   <------------------- note down
            End: 3547135
        Sectors: 3014656
      Cylinders: 23553
           Size: 1.4G
             Id: 83
           Type: Linux
    Start-C/H/S: 1023/3/32
      End-C/H/S: 1023/3/32

Command (m for help): d
Partition number (1,2, default 2): 2

Partition 2 has been deleted.

Command (m for help): n
Partition type
   p   primary (1 primary, 0 extended, 3 free)
   e   extended (container for logical partitions)
Select (default p): p
Partition number (2-4, default 2): 2
First sector (532480-234441647, default 589815): 532480 <------------------- insert here
Last sector, +/-sectors or +/-size{K,M,G,T,P} (532480-234441647, default 234441647): +24G    <--------- choose your "root / OS partition size"

Created a new partition 2 of type 'Linux' and of size 24 GiB.
Partition #2 contains a ext4 signature.

Do you want to remove the signature? [Y]es/[N]o: n

Command (m for help): n                                    <---------------- add a second partition for e.g. data, nfs, zfs or ceph
Partition type
   p   primary (2 primary, 0 extended, 2 free)
   e   extended (container for logical partitions)
Select (default p): p
Partition number (3-4, default 3): 3
First sector (50855160-234441647, default 589815): 50855160
Last sector, +/-sectors or +/-size{K,M,G,T,P} (532480-62533295, default 62533295): +80G          <---------- depends on your disk size and your needs
Created a new partition 3 of type 'Linux' and of size 80 GiB.

Command (m for help): w
The partition table has been altered.
Syncing disks.

Now we need to extend the file system on the second partition that it fits the partition size:
Bash:
sudo resize2fs /dev/sda2

The RPiOS comes default with the dphys-swapfile service enabled. I like to uninstall this service since in my opinion it is not a good idea swapping to a file, so I run:
Bash:
apt purge dphys-swapfile -y

We all so have the option to use a real swap space on a extra partition if you want to. However I tend to use the zram-tools:
Bash:
sudo apt install zram-tools

You can leave it default or configure it to your needs / likings under:
Bash:
sudo nano /etc/default/zramswap

At this point is a good time to perform a reboot, to see if everything went well. (could be skipped, if confident)
Bash:
sudo reboot

After the reboot, if everything is fine, I just follow the basic instalatioin steps, like discribed above.

If they all went well and I can access the PVE Web GUI, the first thing I do is go to the Network Settings and delete the eth0 settings and create a new bridge for the VM's / CT's.

After that I create a very simple zfs pool (I know we can tune this even more...):
Bash:
sudo zpool create sdpool /dev/sda3

Thats it, we have a zfs pool, we can now add it via the PVE Web GUI as Storage.

Since PVE is running on a RPi and as default zfs could eat up, up to 50% Ram I like to change the limit. To do so add a file under (reboot required):
Bash:
sudo nano /etc/modprobe.d/zfs.conf

and for e.g. 1GB, add:
Code:
options zfs zfs_arc_max=1024000000


Thats it! =D I've added mine to my Test Cluster:
PVE-armint.PNG
 
Last edited:
This is absolutely awesome, thank you sir!

Curious if you are able to get the RPi to mount ceph mounts/rbds ? Thinking of setting up LXCs/dockers for RPi in a proxmox cluster.
 
Last edited:
First thank you @Tux_1024, I get it to also works on Apple m1 MacBook using UTM (apparmor didn't helped...)

screenshot-1-png.30663
 

Attachments

  • Screenshot 1.png
    Screenshot 1.png
    204.9 KB · Views: 851
Last edited:
Great, I successfully installed Pimox7 on my RPI4.
Has anybody else this messages? Are they critical?
Code:
/usr/sbin/ksmtuned: line 61: /sys/kernel/mm/ksm/run: No such file or directory
...
QEMU/KVM cannot detect CPU flags on ARM (aarch64)

Another question: is USB passthru possible? I tried and could configure it under Pimox7, but device does not show up in VM.
 
Hi,
what do you think, is this a valuable third vote node in a 2-Node x86-Cluster.
Thinking about using this as replacement for some 2-Node-Hyper-V-S2D Systems which currently use Cloud-Witness.... :D
 
@sunnyboy, it appears you are using a 'aarch64' architecture not the 'arm64' one.
Use the latest image from here: https://downloads.raspberrypi.org/raspios_arm64/

Or use the one Tux_1024 posted: https://downloads.raspberrypi.org/r...5-28/2021-05-07-raspios-buster-arm64-lite.zip
I did a fresh installation exactly processing the steps from 1st post with the arm64-light image and still get the same message:
Oct 29 11:39:05 pve-rpi4 pvestatd[697]: QEMU/KVM cannot detect CPU flags on ARM (aarch64)
Oct 29 11:39:05 pve-rpi4 pvestatd[697]: CPU flag detection failed, will try again after delay

uname -a
Linux pve-rpi4 5.10.63-v8+ #1459 SMP PREEMPT Wed Oct 6 16:42:49 BST 2021 aarch64 GNU/Linux
uname -m
aarch64
 
Last edited:
Hi,
what do you think, is this a valuable third vote node in a 2-Node x86-Cluster.
Thinking about using this as replacement for some 2-Node-Hyper-V-S2D Systems which currently use Cloud-Witness.... :D
Hi ich betreibe einen 2 Node Cluster mit RasPi und Corosync Dienst als Quorum.
Funktioniert echt gut. ;)
PS, der RasPi war vorher auch mein Windows Cluster Quorum.
 
  • Like
Reactions: itNGO
Last edited:
@itNGO
for me yes, it is.
- Quorum is propperly working. HA is usable for my 2 main nodes, without a "power hungry" 3 Node.
- I use my RPi-Node to run scripts, to fetch for example the lates ISO's and save them automaticaly in the pve storage.
- It enables you to emulate arm64 VM's / CT's
- If you attatch a decent sized ssd you can use it as pure storage backup node, ether for zfs or ceph.
 
  • Like
Reactions: kenji and itNGO
I looked a little bit deeper in USB passthru.
On my PC ist shows (with another stick):
Code:
root@pve01:~# qm monitor 100
Entering Qemu Monitor for VM 100 - type 'help' for help
qm> info usb
  Device 0.2, Port 1, Speed 12 Mb/s, Product QEMU USB Tablet, ID: tablet
  Device 1.2, Port 1, Speed 12 Mb/s, Product slae.sh cc2652rb stick - slaesh, ID: usb0
qm>

On my pi4:
Code:
root@pve-rpi4:~# qm monitor 105
Entering Qemu Monitor for VM 105 - type 'help' for help
qm> info usb
  Device 0.2, Port 1, Speed 480 Mb/s, Product QEMU USB Tablet, ID: tablet
  Device 0.3, Port 2, Speed 480 Mb/s, Product QEMU USB Keyboard, ID: keyboard
  Device 0.0, Port 3, Speed 12 Mb/s, Product ConBee II, ID: usb0
qm>

Could the reason be the wrong numbering "Device 0.0" or is this a hard limitation of PI4 hardware?
 
Disclaimer:

!!! This is NOT ment for production use and is NOT official supported !!!

and​

Huge Thanks to Tim Wilkinson who made this possible!

more details and sources can be found @ https://github.com/pimox

I will devide this Tutorial in 2 Parts. The first part will only cover a very basic and fast step by step instalation just to show it is running.
In the second part I will show you a more feature ritch advanced instalation and tell you about some tipps and tricks.


Okay lets start right away with the first bit, what you need:
- Raspberry Pi ( 4B recommended )
- SD Card ( USB-SSD recommended )
- Ethernet connection
- RPi-OS-64bit ( https://downloads.raspberrypi.org/r...5-28/2021-05-07-raspios-buster-arm64-lite.zip )
- knowledge how to flash this Image (Win: RasPiImager, balenaetcher, Win32DiskImager Linux: dd)...
- knowledge how to connect to your RPi via ssh.
- around 30min - 2h ( depending on the RPi type, clock, disk and network speed )

The first step after booting up the Raspberry Pi should be as always get it up to date and install the needed dependencies and some tools if needed, whitch can be done with the following command:
Bash:
sudo apt update && sudo apt upgrade -y  && sudo apt install -y gnupg curl #nmon #screen

I've you have taken a close look to the terminal you've seen that we are still on debian 10 buster. Lets take care of that first by removing all extra repolists, just type:
Bash:
sudo rm /etc/apt/sources.list.d/*.list

Okay add the new Debian 11 bullseye repos and while we are at it, add all the other needed repos. Use your favorite editor to do this, I do this with:
Bash:
sudo nano /etc/apt/sources.list

Delete everthing in this file and make sure it conatins the following:
Code:
# Raspberry Pi Bullseye Repo
deb http://archive.raspberrypi.org/debian/ bullseye main
# Pimox7 Repo
deb https://raw.githubusercontent.com/pimox/pimox7/master/ dev/
# Debian Reop
deb http://deb.debian.org/debian bullseye main contrib non-free
# Security Updates
deb http://security.debian.org/debian-security bullseye-security main contrib non-free

Since we have added the Pimox7 repo we allso need to get the key witch can be done with:
Bash:
curl https://raw.githubusercontent.com/pimox/pimox7/master/KEY.gpg | sudo apt-key add -

Now we are ready to update to Debian 11 bullseye and all so get the matching kernel headers afterwards:
Bash:
sudo apt update && sudo apt dist-upgrade -y && sudo apt install -y raspberrypi-kernel-headers

No we are not ready yet... We have to assing a static IP address to the RPi, witch we will do by editing the interfaces file, again I do this with nano:
Bash:
sudo nano /etc/network/interfaces

Delete everything and make sure it contains the following (of course addjust the IP to your needs):
Code:
 auto lo
iface lo inet loopback
auto eth0
iface eth0 inet static
address 192.168.xxx.xxx/24
gateway 192.168.xxx.1

Okay the IP configuration is done lets move on with the hostname configuration:
Bash:
sudo hostnamectl set-hostname RPi4-PVE-01

Check if everything worked well and disable all IPv6, since we don't need it, lets open the hosts file:
Bash:
sudo nano /etc/hosts

Delete all lines IPv6 related and you should be left with, if not correct it:
Bash:
192.168.xxx.xxx RPi4-PVE-01
127.0.0.1       localhost

We will get a static IP next time the network is reset or the Pi is rebooted, so we will uninstall the dhcpclient and while we are at it we remove all unessesary left over:
Code:
sudo apt purge -y dhcpcd5 && sudo apt autoremove -y

Before we are going to install PVE on the RPi it is now a good time to set a root password type in:
Bash:
sudo -u root passwd

Finaly we are ready to install PVE on the RPi. I run the installation process inside a screen so it dosen't mather if the network is reset or disconnected during instalation:
Bash:
screen -S pveinst sudo apt install -y proxmox-ve && sudo systemctl reboot

Yes you will see some errors but there are fine, since some services might not run during instalation or some symlinks are not pressent on the RPiOS.

When your RPi is finished it should reboot automaticaly and you can browse to your PVE instance via a web browser, login as root.

View attachment 29229

Bonus
You are really, really lazy follow the 10 steps for the RPiOS64 autoinstallation and enjoy your free time. https://github.com/TuxfeatMac/pimox7

I did the optional part too and after reboot from main tutorial i get destination host unreachable
 
Hi guys,
congratulations on mr wilkison. i tested it largely sucessfull, but i really have problems to usb passthrough a usb3 hdd, passing it through with usb2 connectivity works, but always when i try usb3 i get an error message thats says didin´t found the pcie bus 0. pimox itself could handle usb3. is it a hard limit because there is only one controller? has someone installed it on a sd card and can test if then usb3 passthrough is possible?
I think it would work if there was a way to pass-through the host PCie bus, but it is only possible if the host CPU has an IOMMU that is only present on AMD-V or Intel-VT (?) I'm not sure, but that's my explanation from what I've read on the internet ...
I looked a little bit deeper in USB passthru.
On my PC ist shows (with another stick):
Code:
root@pve01:~# qm monitor 100
Entering Qemu Monitor for VM 100 - type 'help' for help
qm> info usb
  Device 0.2, Port 1, Speed 12 Mb/s, Product QEMU USB Tablet, ID: tablet
  Device 1.2, Port 1, Speed 12 Mb/s, Product slae.sh cc2652rb stick - slaesh, ID: usb0
qm>

On my pi4:
Code:
root@pve-rpi4:~# qm monitor 105
Entering Qemu Monitor for VM 105 - type 'help' for help
qm> info usb
  Device 0.2, Port 1, Speed 480 Mb/s, Product QEMU USB Tablet, ID: tablet
  Device 0.3, Port 2, Speed 480 Mb/s, Product QEMU USB Keyboard, ID: keyboard
  Device 0.0, Port 3, Speed 12 Mb/s, Product ConBee II, ID: usb0
qm>

Could the reason be the wrong numbering "Device 0.0" or is this a hard limitation of PI4 hardware?
I'm trying to get ConBeeII working on a Debian 11.2 arm64 VM on the Pi, but I can't get passthrough to work, it doesn't show any other USB device in the VM either.
 
  • Like
Reactions: beercarrier
Hi all,
First of all thank you verry much for this.
I have successfully installed proxmox on my rpi4 and nanopi-r4s.
I tried to create a vm with opnsense -amd64 but ii have a problem with the vCPU's. All cores are running in the same thread. and the machine is verry slow.
it's something that can be fixed from the vm options? Please help.
1642423012772.png

1642423146468.png
 
Last edited:
Absolutely awesome tutorial, easy to understand even for a non-professional and it works! Thanks very much! :)
 
Hi everyone, great tutorial. I'm currently trying to deploy containers to my RBD Storage (Ceph) on PIMOX7, but I don't really get it to work. I've read something about it and I think i have to customize my kernel-. Is that right? Can some one help me to get this done. I've already tried to crosscompile my own optimized kernel but it doesn't work with it.
 

About

The Proxmox community has been around for many years and offers help and support for Proxmox VE, Proxmox Backup Server, and Proxmox Mail Gateway.
We think our community is one of the best thanks to people like you!

Get your subscription!

The Proxmox team works very hard to make sure you are running the best software and getting stable updates and security enhancements, as well as quick enterprise support. Tens of thousands of happy customers have a Proxmox subscription. Get yours easily in our online shop.

Buy now!