To start off, i know there are few tutorials / blog posts out there but somehow none of them were exactly suitable for my configuration. Although this is expected, I still wanted to put this out hoping it may help some folks out there.
Apart from the VMs I created for media server and TrueNAS, I wanted to have another one for AI. Do some pet projects using ai agents, and have complete privacy on LLM interactions for my family.
Links that helped me a lot during setup:
My GPU does not support Virtual GPU as far as I can tell. NVIDIA has this link for you to check. If yours is on the list, you are luckier. You'd expect a brand new RTX 5090 to support it but well, here we are....So, there is no point of installing any drivers on the host machine. We just need to do some config for the passthrough. This is done via having VT-d support on your hardware, and IOMMU.
A WARNING before we go further:
When I installed my GPU, suddenly I had no network!!


Apparently the motherboard literally disables network from BIOS settings when i just plugged a new hardware to PCIe. why?? Its not even a NIC.
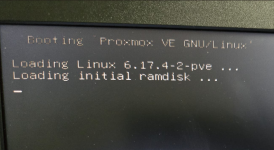
After plugging a monitor and keyboard to my server, i found out that I'm getting
Re-enabled the network from BIOS, of course now the bridge name changed (endp4s0 became endp5s0), so i had to update
You install a new RAM stick? forget about your BIOS settings, from fan settings to hot swap, ALL GONE!
(yes yes, you need to backup config, everyone does it daily right?)
You install a new PCIe card? network is disabled...
I'm not a hardware expert but if this is normal and expected, I respectfully disagree. It's actually a design flaw.
Anyway, enough bashing of wrongfully chosen motherboard, here we go...
For the passthrough to work, we need the host to ignore the GPU and use vifio drivers for this PCIe component.

If this happened to you as well, here is the trick:
Next step is to assign this PCI to the VM we created:
That's it! its done!
Now you can install ollama for instance and have FUN!
I hope this helps someone out there and saves their valuable time.
If i failed to explain some things in detail or used wrong terminology, my apologies as I'm still learning as I go.
Make sure you own your data and take control of your privacy,
Thank you proxmox for making this real for me and my family as well!
PEACE!
BACKSTORY
I have a fairly good config with lots of storage and RAM but probably what matters here are:- Motherboard: MSI MAG B660M MORTAR MAX WIFI DDR4 Micro ATX LGA1700
- CPU: Intel Core i5-12400F 2.5 GHz 6-Core
- GPU: NVIDIA Founders Edition GeForce RTX 5090 32 GB
- Proxmox Version: 8.4.9
Apart from the VMs I created for media server and TrueNAS, I wanted to have another one for AI. Do some pet projects using ai agents, and have complete privacy on LLM interactions for my family.
Links that helped me a lot during setup:
- proxmox wiki pci passthrough
- proxmox wiki gpu passthrough
- this blog post
TUTORIAL
First things first, this is not a vGPU tutorial. If that is what you are trying to do, this post is probably not suitable for you.My GPU does not support Virtual GPU as far as I can tell. NVIDIA has this link for you to check. If yours is on the list, you are luckier. You'd expect a brand new RTX 5090 to support it but well, here we are....So, there is no point of installing any drivers on the host machine. We just need to do some config for the passthrough. This is done via having VT-d support on your hardware, and IOMMU.
A WARNING before we go further:
When I installed my GPU, suddenly I had no network!!
Apparently the motherboard literally disables network from BIOS settings when i just plugged a new hardware to PCIe. why?? Its not even a NIC.
After plugging a monitor and keyboard to my server, i found out that I'm getting
bridge 'endp4s0' does not exist errors.Re-enabled the network from BIOS, of course now the bridge name changed (endp4s0 became endp5s0), so i had to update
/etc/netowrk/interfaces accordingly.You install a new RAM stick? forget about your BIOS settings, from fan settings to hot swap, ALL GONE!
(yes yes, you need to backup config, everyone does it daily right?)
You install a new PCIe card? network is disabled...
I'm not a hardware expert but if this is normal and expected, I respectfully disagree. It's actually a design flaw.
Anyway, enough bashing of wrongfully chosen motherboard, here we go...
Host Preparation:
You'd like to make sure you have the latest BIOS firmware and make sure your proxmox is up to date.- Download the BIOS flash drive according to your motherboard, install it.
- SSH to your host and
Code:apt-get update apt-get dist-upgrade - Now reboot your host machine and enter BIOS
- You need to disable secure boot.
You could probably still live with it but then you need to register a certificate called X.509, generated by the GPU, which then needs to be trusted otherwise its not working.
I don't know how to do that and I'm not in need to run a super secure environment at home so I disabled it. - Enable VT-d.
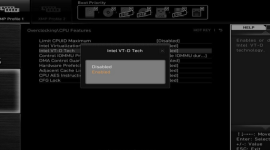
For MSI this is done via: Overclocking\CPU Features --> Intel VT-D Tech (may be different if you are using AMD)
- You need to disable secure boot.
- After saving settings, boot proxmox again. Now we need to deal with IOMMU
You'd want to change update the following line as below:Bash:nano /etc/default/grub
GRUB_CMDLINE_LINUX_DEFAULT="quiet intel_iommu=on"
For AMD you'll probably need to edit GRUB_CMDLINE_LINUX instead, please search for how its done. - Save and close, now run below and reboot again:
Bash:update-grub - after logging in, you should execute below to see if everything is working:
You want to spot few lines:Bash:dmesg | grep -e DMAR -e IOMMU
[ 0.075307] DMAR: IOMMU enabled
[ 0.420203] DMAR: Intel(R) Virtualization Technology for Directed I/O - We are done with preperation
GPU Passthrough:
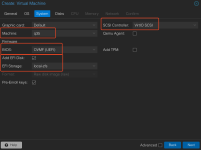
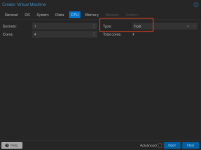
Obviously we'll need a VM to passthrough to. It's important that this VM is using OMVF (UEFI) Bios. I am using an ubuntu-server, your's might be different OS but here is the required config:

- Machine: q35
- SCSI Controller: VirtIO SCSI
- BIOS: OMVF (UEFI) which need EFI Storage
- CPU Type: host
For the passthrough to work, we need the host to ignore the GPU and use vifio drivers for this PCIe component.
- ssh into your proxmox again and append below lines to
/etc/modprobe.d/blacklist.conf
blacklist nouveau
blacklist nvidia - append below lines to
/etc/modules
vifio
vifio_iommu_type1
vifio_pci
vifio_virqfd - run below command for changes to take affect:
Bash:update-initramfs -u - Next step is to find the PCIe id of the GPU.
we are looking for the GPU. Mine shows as:Bash:lspci -v
01:00.0 - VGA compatible controller: NVIDIA Corporation Device 2b85
01:00.1 - Audio device: NVIDIA Corporation Device 22e8
Note the numbers shown at the beginning. - We also need the vendor Ids. This is done via:
copy the shown IDs. should be something like 10ba:2b85Bash:# write the ID you copied above step lspci -n -s 01:00 - now we need to assign the vfio driver to these bad boys:
and append below line according to the ids you copied:Bash:nano /etc/modprobe.d/vfio.conf
options vfio-pci ids=10ba:2b85,10de:22e8 disable_vga=1 - reboot
If this happened to you as well, here is the trick:
- i checked that network is not disabled but somehow i was seeing below in system logs:
Bash:systemd[1]: Starting ifupdown2-pre.service - Helper to synchronize boot up for ifupdown... systemd[1]: ifupdown2-pre.service: Main process exited, code=exited, status=1/FAILURE systemd[1]: ifupdown2-pre.service: Failed with result 'exit-code'. systemd[1]: Failed to start ifupdown2-pre.service - Helper to synchronize boot up for ifupdown. systemd[1]: networking.service: Job networking.service/start failed with result 'dependency'. - tried lots of things to bring it up but it didn't work. So i had to:
to disable it. Then things went fine. If anyone knows why this happened and how to do this without disabling, i'll appreciate your comment.Bash:systemctl mask ifupdown2-pre.service
lspci -v again. This time the NVIDIA card should be showing: Kernel driver in use: vfio-pciNext step is to assign this PCI to the VM we created:
- edit your vm config:
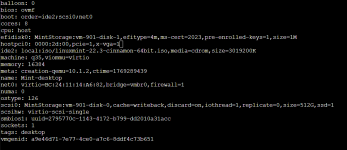
add below lines to the file while replacing the id to your id copied in other stepsBash:# replace XXX with your VM id. nano /etc/pve/qemu-server/XXX.conf
hostpci0: 01:00,x-vga=on,pcie=1 - you are DONE with the passthrough! start your VM and run lspci -v to see the GPU in the list.
Installing NVIDIA Drivers on ubuntu-server:
Adding these bonus steps because i had few issues here as well.- run below command to see the list of drivers suitable for your hardware:
Bash:sudo ubuntu-drivers list - Preferably, spot the latest version and choose the open source version. Otherwise
nvidia-smidoes not recognize the device and you'll getnvidia_uvm: module uses symbols from proprietary module nvidia, inheriting taint.errors in system logs. - As of this date of writing, I choose the v570 of the driver and ran below command to install the drivers:
Bash:sudo ubunt-drivers install nvidia:570-open - now nvidia-smi command should work (or maybe you might want to restart)
Bash:[*]+-----------------------------------------------------------------------------------------+ | NVIDIA-SMI 570.169 Driver Version: 570.169 CUDA Version: 12.8 | |-----------------------------------------+------------------------+----------------------+ | GPU Name Persistence-M | Bus-Id Disp.A | Volatile Uncorr. ECC | | Fan Temp Perf Pwr:Usage/Cap | Memory-Usage | GPU-Util Compute M. | | | | MIG M. | |=========================================+========================+======================| | 0 NVIDIA GeForce RTX 5090 Off | 00000000:01:00.0 Off | N/A | | 0% 38C P8 15W / 575W | 2MiB / 32607MiB | 0% Default | | | | N/A | +-----------------------------------------+------------------------+----------------------+ +-----------------------------------------------------------------------------------------+ | Processes: | | GPU GI CI PID Type Process name GPU Memory | | ID ID Usage | |=========================================================================================| | No running processes found | +-----------------------------------------------------------------------------------------+
That's it! its done!
Now you can install ollama for instance and have FUN!
I hope this helps someone out there and saves their valuable time.
If i failed to explain some things in detail or used wrong terminology, my apologies as I'm still learning as I go.
Make sure you own your data and take control of your privacy,
Thank you proxmox for making this real for me and my family as well!
PEACE!
Last edited:


