Proxmox Virtual Environment 9.0 released!

Thanks for the great update.
I found a small bug with Machine Version selection.
The sort order is wrong.
When I updated PVE to 9.0, I thought that there will be a new machine version.
When I looked into the list, it was already at the latest version. (Only Windows needs to change the version. Linux is always latest)
1754702234141.png

I scrolled down the complete list to see what is the oldest version.
1754702283209.png

And there I found 10.0. The list should be sorted by number desc and not as string.
 
Upgrade from 8 to 9 went smooth on an HP ED800G2i7 (1 HDD boot with EFI and lvm with ext4, 1 HDD data ZFS), an Intel NUC11TNHi7 (1 HDD EFI/ZFS) and an Intel NUC7i5BNH (1 HDD EFI/ZFS).
 
Great job Proxmox team. Upgraded my test host without issues!
One thing to report though, love the new mobile-friendly UI, it loads and work just fine in Chrome, but when using Firefox it loads the classic UI.
(Pixel 9 Pro XL, Android 16, Firefox 141.0.1)
Same issue here with the new mobile UI, It's loading fine on Chrome but old UI on Firefox.
Did you find any fix for it? Or just wait for an update to fix it?
 
Maybe I missed it. But a note about Trixie's new behaviour regarding /tmp would certainly be helpful.
50% RAM for tmpfs can ruin your day.

Most people will certainly find systemctl mask tmpfs helpful (followed by reboot).

Code:
# systemctl status tmp.mount
● tmp.mount - Temporary Directory /tmp
     Loaded: loaded (/usr/lib/systemd/system/tmp.mount; static)
     Active: active (mounted) (Result: exit-code) since Sat 2025-08-09 13:01:40 CEST; 12min ago
  
# systemctl cat tmp.mount | sed -ne '/Mount/,$ p'
[Mount]
What=tmpfs
Where=/tmp
Type=tmpfs
Options=mode=1777,strictatime,nosuid,nodev,size=50%%,nr_inodes=1m
 
Maybe I missed it. But a note about Trixie's new behaviour regarding /tmp would certainly be helpful.
50% RAM for tmpfs can ruin your day.

Most people will certainly find systemctl mask tmpfs helpful (followed by reboot).

Code:
# systemctl status tmp.mount
● tmp.mount - Temporary Directory /tmp
     Loaded: loaded (/usr/lib/systemd/system/tmp.mount; static)
     Active: active (mounted) (Result: exit-code) since Sat 2025-08-09 13:01:40 CEST; 12min ago
 
# systemctl cat tmp.mount | sed -ne '/Mount/,$ p'
[Mount]
What=tmpfs
Where=/tmp
Type=tmpfs
Options=mode=1777,strictatime,nosuid,nodev,size=50%%,nr_inodes=1m
Thanks. ChatGPT recommended doing this to mitigate it:

Code:
Short version: on Proxmox VE 9 (based on Debian 13 “Trixie”), /tmp is now a RAM-backed tmpfs by default. Its limit is 50% of system memory (allocated on demand). That’s great for speed, but if anything writes multi-GB files to /tmp, you can OOM a host fast.

Here’s what that means for you and what to do about it:

What changed

After upgrading/rebooting into Trixie, /tmp mounts as tmpfs. Default cap: 50% of RAM. You can change it or turn it off.
debian.org

Why this bites on Proxmox

Container/VM backups: vzdump can stage temp data; if that lands on /tmp, it now eats RAM instead of disk. You can point it elsewhere with tmpdir in /etc/vzdump.conf.
Proxmox VE

Uploads via GUI: ISO/backup/template uploads stage under /var/tmp/pveupload-* (disk), not /tmp, but note Trixie now cleans /var/tmp after 30 days of inactivity by default.

Keep tmpfs but cap it:

# cap /tmp to 2G (example)
systemctl edit tmp.mount

Put:

[Mount]
Options=mode=1777,nosuid,nodev,size=2G

Then reboot (safest) or mount -o remount /tmp.
 
  • Like
Reactions: Starrbuck
Maybe I missed it. But a note about Trixie's new behaviour regarding /tmp would certainly be helpful.
50% RAM for tmpfs can ruin your day.

Most people will certainly find systemctl mask tmpfs helpful (followed by reboot).

Code:
# systemctl status tmp.mount
● tmp.mount - Temporary Directory /tmp
     Loaded: loaded (/usr/lib/systemd/system/tmp.mount; static)
     Active: active (mounted) (Result: exit-code) since Sat 2025-08-09 13:01:40 CEST; 12min ago
 
# systemctl cat tmp.mount | sed -ne '/Mount/,$ p'
[Mount]
What=tmpfs
Where=/tmp
Type=tmpfs
Options=mode=1777,strictatime,nosuid,nodev,size=50%%,nr_inodes=1m
@Heisenberg , Thanks for pointing this out. ZFS' ARC cache is now set to use 95 percent of free RAM. I'm curious to see how the new RAM-based tempfs interacts with that.

Thanks for the great update.
I found a small bug with Machine Version selection.
The sort order is wrong.
When I updated PVE to 9.0, I thought that there will be a new machine version.
When I looked into the list, it was already at the latest version. (Only Windows needs to change the version. Linux is always latest)
View attachment 89171

I scrolled down the complete list to see what is the oldest version.
View attachment 89172

And there I found 10.0. The list should be sorted by number desc and not as string.
@0xDEADC0DE , Reported as bug 6648: https://bugzilla.proxmox.com/show_bug.cgi?id=6648

Do you have the "ballooning device" enabled in the advanced memory options? if not, then there is no way to get the detailed guest view infos and you are in the same boat as with the *BSDs ;)


See the above or https://forum.proxmox.com/threads/proxmox-virtual-environment-9-0-released.169258/page-7#post-789415 and https://forum.proxmox.com/threads/proxmox-virtual-environment-9-0-released.169258/page-5#post-788983

In general: if the Memory usage is the same as Host memory usage, then for one reason or another, we don't get detailed guest view mem usage infos and fall back to the host view, which is now accounted for more accurately and can be over 100% as it included overhead on the host as well.

Reasons for not getting detailed guest mem usage infos: the guest doesn't report back anything, or the communication channel (Ballooning device) is not enabled.

@aaron , Thanks for pointing this out. I kind of knew there was something weird about RAM usage reports and the ballooning device, but I hadn't quite figured it out yet.

Do you think it would be feasible to add a warning to the GUI when the ballooning device is disabled that RAM usage reports will no longer be accurate? I've got VMs that use PCIe passthrough, which means no ballooning device. When RAM reporting went sideways on those the first time, I spent some time double-checking everything because I thought I'd done something wrong.
 
Last edited:
I have upgraded both of my Proxmox VE (PVE) nodes to version 9. During the process, I received a warning about the systemd-boot meta-package, but I was unaware that it needed to be removed before rebooting. After the upgrade, running the pve8to9 script no longer displays the systemd-boot meta-package warning. However, I’m concerned that not removing the package prior to rebooting could cause issues with future upgrades, potentially risking system stability.

The current output of the pve8to9 script is:
INFO: systemd-boot used as bootloader and fitting meta-package installed.

Is there a way to remedy this?

Both nodes are running fine and humming along (I think)
 
@Stoiko Ivanov ,

Yes. That part was clear. I understood the problem--I just wasn't quite clear on how to deal with it. :)


This is the part that confused me a bit.

Looking at the wiki:

It was not clear to me just from reading this when the user should remove the package. This is my first in place upgrade (I always clean installed before.)

It also wasn't initially clear to me that during the upgrade process, the pve8to9 script will run again and tell you how to fix the bootloader and any other issues, which you'll then need to do manually before you reboot. I would suggest adding something to that effect to the Bootloader section of the wiki page, with an intra-page link to the warning to continously run the pve8to9 tool.

That's my fault. I wasn't ready to do the upgrade yet, so I didn't read the entire page, and missed the part about running the tool continuously. I just saw the discussion of the boot issue here in the thread and went a bit sideways. I'm sure I'm not the only person with the bad habit of jumping down directly to their potential issue in a long wiki page. A reminder on various parts of the page where not doing it might break your system's ability to boot to go back and read the warning about running the tool continuously would be really helpful.
I am in this bucket too sadly. How did you resolve it? or a clean install is required?
 
I've upgraded just fine, but my system would not boot correctly under new kernel 6.14.8-2-pve. Recovery mode showed many errors regarding PCI, so I though that `pci_aspm=off` was missing for the new kernel, but it was there, despite it it would not boot. Kernel 6.8.12-13-pve booted just fine, so I've pinned it.
 
I just did a update to Proxmox VE 9 via a reinstall.
Everything seems to go well, except one thing.

I boot into the ISO and select ZFS (RAID 1) as storage.
Then I selected 2 disks to use for the ZFS (RAID 1).
Then I filled in the rest of the info in and clicked install.
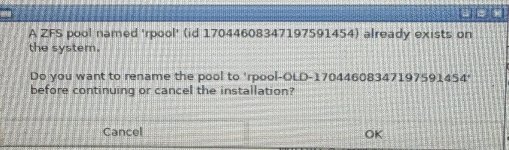
When it formatted the disks, it keeps complaining about finding an existing rpool. (Even though I already cleaned the disks and removed all partitions.)
I even tried different disks but I still keep getting the same warning. (And every time I opened GParted, it created a new rpool, so it might confuse the new rpool as existing?)

IMG_2882.jpeg
 
Last edited:
I am in this bucket too sadly. How did you resolve it? or a clean install is required?
I actually haven't tried the upgrade yet. But from my understanding, if you follow the procedure on the Wiki, after the install is completed (you are dropped back to a command prompt), but before restarting, if you run pve8to9, it will tell you what you need to do to fix the bootloader so your system will reboot.

Is your system not booting?
 
Since upgrading from 8 to 9 I've discovered a small handful of backup jobs against are now failing. It appears to only affect 3 specific templates, while others are baacking up just fine

Here's one such example:

Code:
135: 2025-08-10 02:48:30 INFO: Starting Backup of VM 135 (qemu)
135: 2025-08-10 02:48:30 INFO: status = stopped
135: 2025-08-10 02:48:30 INFO: backup mode: stop
135: 2025-08-10 02:48:30 INFO: ionice priority: 7
135: 2025-08-10 02:48:30 INFO: VM Name: Windows-Vista-x86-Template
135: 2025-08-10 02:48:30 INFO: include disk 'ide1' 'local-lvm:base-135-disk-0' 20G
135: 2025-08-10 02:48:30 INFO: creating Proxmox Backup Server archive 'vm/135/2025-08-09T16:48:30Z'
135: 2025-08-10 02:48:30 INFO: enabling encryption
135: 2025-08-10 02:48:30 INFO: starting kvm to execute backup task
135: 2025-08-10 02:48:31 ERROR: start failed: QEMU exited with code 1
135: 2025-08-10 02:48:31 INFO: aborting backup job
135: 2025-08-10 02:48:31 ERROR: VM 135 not running
135: 2025-08-10 02:48:31 ERROR: Backup of VM 135 failed - start failed: QEMU exited with code 1


I also see the following in journal logs
Code:
pvescheduler[1186293]: INFO: Starting Backup of VM 135 (qemu)
systemd[1]: Started 135.scope.
systemd[1]: 135.scope: Deactivated successfully.
pvescheduler[1186293]: VM 135 qmp command failed - VM 135 not running
pvescheduler[1186293]: VM 135 not running
pvescheduler[1186293]: ERROR: Backup of VM 135 failed - start failed: QEMU exited with code 1


While I have other templates that have no trouble being backed up, I've noticed that it's only those templates that are using SeaBIOS + pc-i440fx-9.0 that are failing (then again, I have other templates based on the same bios + machine type that work just fine, so definitely not conclusive)


If I clone this template, the resulting VM starts up just fine.. I'm not really sure what to make of this.

Here's the config for this template:

Code:
$ qm config 135
boot: order=ide1
cores: 1
cpu: x86-64-v2-AES
ide0: local:iso/virtio-win-0.1.262.iso,media=cdrom,size=708140K
ide1: local-lvm:base-135-disk-0,size=20G
ide2: local:iso/en_windows_vista_sp2_x86_dvd_342266.iso,media=cdrom,size=3167396K
machine: pc-i440fx-9.0
memory: 2048
meta: creation-qemu=9.0.2,ctime=1730623396
name: Windows-Vista-x86-Template
net0: virtio=BC:24:11:95:61:31,bridge=vmbr0,firewall=1
numa: 0
ostype: w2k8
scsihw: virtio-scsi-single
smbios1: uuid=9a34b906-faed-4ffe-a38b-9c07477d153d
sockets: 1
tags: windows
template: 1
vmgenid: 05b95dc7-1c04-4bda-914f-2ed451676ffc


I was unable to locate any recent task logs in /var/log/pve/tasks/
Is there anywhere else I should look to explain QEMU exited with code 1 ?
 
Since upgrading from 8 to 9 I've discovered a small handful of backup jobs against are now failing. It appears to only affect 3 specific templates, while others are baacking up just fine

Hmm.
Shortly after posting this I just received the following from the smartd daemon
Code:
Device: /dev/sda [SAT], ATA error count increased from 0 to 4

And manually running a long test seems to have aborted fairly quickly..

Code:
=== START OF READ SMART DATA SECTION ===
SMART Extended Self-test Log Version: 1 (1 sectors)
Num  Test_Description    Status                  Remaining  LifeTime(hours)  LBA_of_first_error
# 1  Extended offline    Completed: read failure       90%      3710         19091664


I don't know a great deal about this.. maybe this is just extremely poor timing and my drive is on the way out? (Not great if thats the case, after only 6 months :-/)

Then again.. if the backup/qemu against these templates was having trouble because of disk issues, then I'd expect such issues to extend to creating a VM from that template as well..

The backups have been failing for 3 days, while the smartd warning only just occurred today (after trying to use those templates per testing)
 
Since upgrading from 8 to 9 I've discovered a small handful of backup jobs against are now failing. It appears to only affect 3 specific templates, while others are baacking up just fine

Last update on this for now.. I've found that I can get addtional detail if I initiate a manual backup against one of the affected templates..

That permission error is telling..
kvm: <snipped> "filename":"/dev/pve/base-135-disk-0" <snipped>: The device is not writable: Permission denied

I guess these device symlinks are transient, as I couldn't find such a /dev/pve device..
The storage does exist however.. that's something

Code:
pvesm list local-lvm --vmid 135
Volid                     Format  Type             Size VMID
local-lvm:base-135-disk-0 raw     images    21474836480 135

Backup job output:
Code:
INFO: starting new backup job: vzdump 135 --mode snapshot --notification-mode notification-system --storage PBS_Primary --notes-template '{{guestname}}' --node femputer --remove 0
INFO: Starting Backup of VM 135 (qemu)
INFO: Backup started at 2025-08-10 14:09:58
INFO: status = stopped
INFO: backup mode: stop
INFO: ionice priority: 7
INFO: VM Name: Windows-Vista-x86-Template
INFO: include disk 'ide1' 'local-lvm:base-135-disk-0' 20G
INFO: creating Proxmox Backup Server archive 'vm/135/2025-08-10T04:09:58Z'
INFO: enabling encryption
INFO: starting kvm to execute backup task
kvm: -blockdev {"detect-zeroes":"on","discard":"ignore","driver":"throttle","file":{"cache":{"direct":true,"no-flush":false},"detect-zeroes":"on","discard":"ignore","driver":"raw","file":{"aio":"io_uring","cache":{"direct":true,"no-flush":false},"detect-zeroes":"on","discard":"ignore","driver":"host_device","filename":"/dev/pve/base-135-disk-0","node-name":"ed82a0747b40061c861200835773fe9","read-only":false},"node-name":"fd82a0747b40061c861200835773fe9","read-only":false},"node-name":"drive-ide1","read-only":false,"throttle-group":"throttle-drive-ide1"}: The device is not writable: Permission denied
ERROR: start failed: QEMU exited with code 1
INFO: aborting backup job
ERROR: VM 135 not running
VM 135 not running
ERROR: Backup of VM 135 failed - start failed: QEMU exited with code 1
INFO: Failed at 2025-08-10 14:09:58
INFO: Backup job finished with errors
INFO: notified via target `mail-to-root`
TASK ERROR: job errors
 
Last edited:
Hmm.
Shortly after posting this I just received the following from the smartd daemon
Code:
Device: /dev/sda [SAT], ATA error count increased from 0 to 4

And manually running a long test seems to have aborted fairly quickly..

Code:
=== START OF READ SMART DATA SECTION ===
SMART Extended Self-test Log Version: 1 (1 sectors)
Num  Test_Description    Status                  Remaining  LifeTime(hours)  LBA_of_first_error
# 1  Extended offline    Completed: read failure       90%      3710         19091664


I don't know a great deal about this.. maybe this is just extremely poor timing and my drive is on the way out? (Not great if thats the case, after only 6 months :-/)

Then again.. if the backup/qemu against these templates was having trouble because of disk issues, then I'd expect such issues to extend to creating a VM from that template as well..

The backups have been failing for 3 days, while the smartd warning only just occurred today (after trying to use those templates per testing)
This disk is dying. Replace it ASAP. I have no idea how to do that safely. What does your underlying PVE storage look like?

I'm only guessing, but the fact that specific VMs in the backup job are failing suggests that there's a specific physical area of the disk that's going bad, and data associated with those jobs lives there.

In the meantime, check your backup destination (is it PBS?) and make sure it doesn't prune your last verified good backup of the impacted VM(s).
You'll need to restore from those.
 
I actually haven't tried the upgrade yet. But from my understanding, if you follow the procedure on the Wiki, after the install is completed (you are dropped back to a command prompt), but before restarting, if you run pve8to9, it will tell you what you need to do to fix the bootloader so your system will reboot.

Is your system not booting?
The thing is, I rebooted immediately after it finished upgrading. So have not removed systemd-boot and since I have rebooted, my window to remove it is now gone.

The node reboots and restarts fine and all VM's are running normally but

When I run pve8to9 (now, post install and reboot) I get this:

INFO: Checking bootloader configuration...
INFO: systemd-boot used as bootloader and fitting meta-package installed.

And when I run Proxmox-boot-tools status:

root@pve:~# proxmox-boot-tool status
Re-executing '/usr/sbin/proxmox-boot-tool' in new private mount namespace..
E: /etc/kernel/proxmox-boot-uuids does not exist.


Some more info that might help:

Code:
root@pve:~# efibootmgr
BootCurrent: 0000
Timeout: 1 seconds
BootOrder: 0000,0004,0003,0001,0002
Boot0000* proxmox       HD(2,GPT,ac77b0d5-c289-4e79-b2b2-6c152b465d82,0x800,0x200000)/File(\EFI\PROXMOX\SHIMX64.EFI)
Boot0001* UEFI: PXE IPv4 Intel(R) Ethernet Controller (3) I225-V        PciRoot(0x0)/Pci(0x1c,0x6)/Pci(0x0,0x0)/MAC(88aedd61a160,1)/IPv4(0.0.0.00.0.0.0,0,0)0000424f
Boot0002* UEFI: PXE IPv6 Intel(R) Ethernet Controller (3) I225-V        PciRoot(0x0)/Pci(0x1c,0x6)/Pci(0x0,0x0)/MAC(88aedd61a160,1)/IPv6([::]:<->[::]:,0,0)0000424f
Boot0003* UEFI OS       HD(2,GPT,ac77b0d5-c289-4e79-b2b2-6c152b465d82,0x800,0x200000)/File(\EFI\BOOT\BOOTX64.EFI)0000424f
Boot0004* Linux Boot Manager    HD(2,GPT,ac77b0d5-c289-4e79-b2b2-6c152b465d82,0x800,0x200000)/File(\EFI\SYSTEMD\SYSTEMD-BOOTX64.EFI)
root@pve:~# bootctl status
System:
      Firmware: n/a (n/a)
 Firmware Arch: x64
   Secure Boot: disabled (unknown)
  TPM2 Support: yes
  Measured UKI: no
  Boot into FW: supported

Current Boot Loader:
      Product: GRUB 2.12-9+pmx2
     Features: ✗ Boot counting
               ✗ Menu timeout control
               ✗ One-shot menu timeout control
               ✗ Default entry control
               ✗ One-shot entry control
               ✗ Support for XBOOTLDR partition
               ✗ Support for passing random seed to OS
               ✗ Load drop-in drivers
               ✗ Support Type #1 sort-key field
               ✗ Support @saved pseudo-entry
               ✗ Support Type #1 devicetree field
               ✗ Enroll SecureBoot keys
               ✗ Retain SHIM protocols
               ✗ Menu can be disabled
               ✗ Multi-Profile UKIs are supported
               ✓ Boot loader set partition information
    Partition: /dev/disk/by-partuuid/ac77b0d5-c289-4e79-b2b2-6c152b465d82

Random Seed:
 System Token: set
       Exists: yes

Available Boot Loaders on ESP:
          ESP: /boot/efi (/dev/disk/by-partuuid/ac77b0d5-c289-4e79-b2b2-6c152b465d82)
         File: ├─/EFI/systemd/systemd-bootx64.efi (systemd-boot 257.7-1)
System:
      Firmware: n/a (n/a)
 Firmware Arch: x64
   Secure Boot: disabled (unknown)
  TPM2 Support: yes
  Measured UKI: no
  Boot into FW: supported

Current Boot Loader:
      Product: GRUB 2.12-9+pmx2
     Features: ✗ Boot counting
               ✗ Menu timeout control
               ✗ One-shot menu timeout control
               ✗ Default entry control
               ✗ One-shot entry control
               ✗ Support for XBOOTLDR partition
               ✗ Support for passing random seed to OS
               ✗ Load drop-in drivers
               ✗ Support Type #1 sort-key field
               ✗ Support @saved pseudo-entry
               ✗ Support Type #1 devicetree field
               ✗ Enroll SecureBoot keys
               ✗ Retain SHIM protocols
               ✗ Menu can be disabled
               ✗ Multi-Profile UKIs are supported
               ✓ Boot loader set partition information
    Partition: /dev/disk/by-partuuid/ac77b0d5-c289-4e79-b2b2-6c152b465d82

Random Seed:
 System Token: set
       Exists: yes

Available Boot Loaders on ESP:
          ESP: /boot/efi (/dev/disk/by-partuuid/ac77b0d5-c289-4e79-b2b2-6c152b465d82)
         File: ├─/EFI/systemd/systemd-bootx64.efi (systemd-boot 257.7-1)
               ├─/EFI/BOOT/fbx64.efi
               ├─/EFI/BOOT/grubx64.efi
               ├─/EFI/BOOT/mmx64.efi
               └─/EFI/BOOT/BOOTx64.efi (systemd-boot 257.7-1)

root@pve:~# cat /etc/fstab
# <file system> <mount point> <type> <options> <dump> <pass>
/dev/pve/root / ext4 errors=remount-ro 0 1
UUID=E2AC-2BE0 /boot/efi vfat defaults 0 1
/dev/pve/swap none swap sw 0 0
proc /proc proc defaults 0 0
root@pve:~#

 
I reinstalled the first cluster node with 9.0.3 and it worked pretty well.

I had only those problems:

Setup > Graphical Installer -> ZFS Raid1

- /etc/apt/sources.list was empty after install. Needed to fill it with Trixie stuff
- The new one was local and local-zfs because of the setup. The other nodes hat local-lvm. While joining the local-zfs was removed and a local-lvm - unavailable on this node - was added. needed manualy fix in the store setup of the cluster

I used delnode to remove that node from the cluster. This worked pretty fine, except the ssh keys was keeped from the old node. This needed some work because the reinstalled node has the same name.

Otherwise, really cool, thank you for the great work.
 
Last edited:
* run proxmox-boot-tool reinit

I was unable to boot after an upgrade:

Code:
error: file `/grub/x86_64-efi/bli.mod' not found.

bli.mod is present in /boot/grub/x86_64-efi/bli.mod , but was absent from /boot/efi/grub/x86_64-efi/bli.mod

and running "proxmox-boot-tool reinit" fixed my boot error. Thanks.
 
Last edited:
I also noticed that after installing via the ISO, dnsmasq did not get installed.
I configured a simple SDN and enabled DHCP but when I clicked apply I got:
WARN: please install the 'dnsmasq' package in order to use the DHCP feature!
TASK ERROR: Could not run before_regenerate for DHCP plugin dnsmasq cannot reload with missing 'dnsmasq' package

And in previous ISO versions dnsmasq was also installed since the SDN was introduced.
 
I upgraded 6 different hosts I have. Every one of them was smooth. A few VMs didn't start because it said "TASK ERROR: KVM virtualisation configured, but not available. Either disable in VM configuration or enable in BIOS.", so I had to uncheck the option for "KVM hardware virtualization".

On those exact same VMs, the network was also not working with:

"Error: Unknown device type.
can't create interface fwln101i0 - command '/sbin/ip link add name fwln101i0 mtu 1500 type veth peer name fwpr101p0 mtu 1500' failed: exit code 2

kvm: -netdev type=tap,id=net0,ifname=tap101i0,script=/usr/libexec/qemu-server/pve-bridge,downscript=/usr/libexec/qemu-server/pve-bridgedown: network script /usr/libexec/qemu-server/pve-bridge failed with status 512
TASK ERROR: start failed: QEMU exited with code 1"

My fix there was to copy the mac address of the existing network. Delete the network card from the hardware and add a new one back with the same mac address.

That seems to work fine.