New Import Wizard Available for Migrating VMware ESXi Based Virtual Machines

Hi all,
I only use thin disk on my ESXi. Is the import wizard converting that in a way that the disks will be still thin provisioned?

Thanks
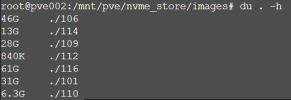
I just imported three VMs overnight. While it looked like it was going to import them as thick-provisioned disks, when I looked in the folder the images sizes were small, indicating they were provisioned as thin drives. Each of these is a 256 GB thin-provisioned drive, but here is a screenshot of the actual sizes on disk:
1711726678617.png

Hope that helps!
 
  • Like
Reactions: ksb
Hi all,
I only use thin disk on my ESXi. Is the import wizard converting that in a way that the disks will be still thin provisioned?

Thanks
That depends on your Target Datastore. When you have thin enabled on your ZFSPool or migrate to Ceph or LVM-Thin, then is the target Disk thin.
 
  • Like
Reactions: ksb
This is an absolutely fantastic feature. I just imported a Win2019 VM and the transfer rate was 800Mbit/s vs 120Mbit/s with the ovftool or the VMware GUI export, which both have a built-in rate throttling.

I am not yet convinced that it is possible to make the on-the-fly-exchange of the VirtIO Disk driver work reliably, but it did work on my first text migration.

Congratulations to the programmers, this is a huge step forward!!
I was able to mount the VirtIO ISO in Windows before the migration, and went into the following directories one at a time, right clicked on the .inf file and chose "install":

Code:
F:\viostor\w10\amd64
F:\vioscsi\w10\amd64
F:\Balloon\w10\amd64
F:\sriov\w10\amd64
F:\NetKVM\w10\amd64

Once I did that, I rebooted the VM to make sure I didn't hose anything. Then I shut it down and migrated it. I did get a warning during import about EFI, but I just ignored it and once the migration was complete, the Windows 10 VM booted perfectly. I will be trying a Windows Server 2022 VM today.

One caveat: I forgot to uninstall the VMware Tools before migrating and it wouldn't let me uninstall from the program menu in control panel, or from the mounted VMware tools CD. So I had to manually remove the folders and registry settings. Lesson learned.
 
This is slow, if you boot live the machine is slow and larger machines will be very slow for a long time. Isn't it better to do like most backup software do?
1. Using API, do snapshot.
2. Get files from ESXi
3. Poweroff machine using API
4. Get last data
5. Poweron

This will make the machine quick while running in Vmware, and quick once booted on proxmox. No slow time that can take a loong time on larger machines.
 
Hey there.
We are looking at replacing Vmware with ProxMox, and I tested migration with the new tool you provided.
I didnt have any disconnect issues, and the import seems to have worked, but it was extremely slow.
I did not go thru a vCenter, but made a direct connection to a esxi server.
Migrating a 220G VM took 10 hours, 22 minutes. I think that works out to like 22Mbit a second? maybe my math is off, but it seems pretty slow.
Certainly not suitable for migrataing our 1145 VMs when the time comes. :)

I have a 10gb connection for the management port on both the proxmox server and the esxi server.
nvme FC storage on the ESXi side, and the ProxMox server has SSD FC storage.
On the Proxmox side, we are using shared LVM over FC.

Is there anything you guys can think of that I can do to speed things up?
Thanks!

Jason
You could try to mount the ESX-storage over sshfs and check if it's faster. You need to do it manually, but there are just a few steps:
1. "apt update && apt install sshfs" on Proxmox Server
2. Enable SSH on the ESX-Server
3. Mount the storage on Proxmox "mkdir /mnt/sshfs && sshfs -o allow_other,default_permissions root@[ESX-IP]:/vmfs/volumes/[storagename] /mnt/sshfs/"
4. Import storage on Proxmox "qm disk import [VM-ID] [VM].vmdk [proxmox-storage]"

Maybe the developers of Proxmox can add the sshfs-option in future releases as an additional option instead using the API.
 
Everything works and is awesome! as long as you understand the
Config.HostAgent.vmacore.soap.maxSessionCount VMware timeouts. Our ESXi 7 servers are easy, the 6.7 is difficult(requires VI). PG5 has examples on how to do this.

The overall copy is very slow and took about 30mins to copy 64GB over 10GBe.

We will most likely perform the "Attach Disk & Move Disk" and move method due to our large .vmdk size requirements with minimal down time.
https://pve.proxmox.com/wiki/Migrate_to_Proxmox_VE#Attach_Disk_.26_Move_Disk_.28minimal_downtime.29
 
That has been my approach in recent years ;)

Then tell me what trick you used to teach Windows to use the driver for booting. I have already set the bootable flag in the registry, but it is gone again after a reboot.
VMware SCSI > PVE SATA to bring the VM up, then you can deal with the VirtIO change changes. Even with this new conversion method going ESXi DS direct, I still have to manually cut from Sata/SCSI to VirtIO after ripping VMware out.
 
You could try to mount the ESX-storage over sshfs and check if it's faster. You need to do it manually, but there are just a few steps:
1. "apt update && apt install sshfs" on Proxmox Server
2. Enable SSH on the ESX-Server
3. Mount the storage on Proxmox "mkdir /mnt/sshfs && sshfs -o allow_other,default_permissions root@[ESX-IP]:/vmfs/volumes/[storagename] /mnt/sshfs/"
4. Import storage on Proxmox "qm disk import [VM-ID] [VM].vmdk [proxmox-storage]"

Maybe the developers of Proxmox can add the sshfs-option in future releases as an additional option instead using the API.
I was able to do a 56GB VM (16GB main and 40GB data) in 9 minutes. That was pulling off of a ME5 iSCSI all flash SAN and pushing to a different volume on the same ME5 iSCSI+LVM. The utility was slightly faster, but I think that was more because it did drive 0 and drive 1 at the concurrently. With the ssh method I had to do the drives one at a time.
Also instead of qm disk import, I used the method to:

edit /etc/pve/storage.cfg and add:
dir: vm8ssh
path /mnt/vm8/iSAN8R10V2
content iso,vztmpl,images
(make sure you don't name the dir: the same as what gets named for the utility if testing both...)
create the vm by hand with 1gb disks and then cp-n-edit the vmdk files as outlined in bottom half of https://pve.proxmox.com/wiki/Migrate_to_Proxmox_VE#Attach_Disk_.26_Move_Disk_.28minimal_downtime.29

At least for me the utility was slightly faster, but ssh may be better for those that are being slow.
As you can click the "live migration", it will power-on the vm at the start of the process. 10 hours might not be so bad if the performance is acceptable while it's being migrated and the vm is live during the 10 hours. ie: Near 24x7 uptime (you do have to power down, so need at least a few minutes downtime) over the weekend may be more important than the migration taking a day.

Some suggestions to speed up the migration of vmware to proxmox:
1. Storage vmotion to a vmware host with local SSD
2. Have target be local SSD to a proxmox node (you can then migrate to SAN or ceph shared storage later)
3. Make sure proxmox and vmware hosts are on the same subnet and their management are both high speed. Some people have 10+gbe for their vms, but gb management interfaces, not realizing some management tasks like this could use a lot of bandwidth...
 
Soo.. Has anyone imported from VMs using Equallogic iSCSI storage luns on the VMware side? I tried and failed. Looks like the import tool really likes local storage on the VMware side, correct?

And for you all connecting to vCenter, what admin login did you use to add it as a storage device in Proxmox? admin@System-Domain, administrator@vsphere.local? or AD account?
Our vCenter is the VCSA Appliance VM.
 
Last edited:
Soo.. Has anyone imported from VMs using Equallogic SCSI storage luns on the VMware side? I tried and failed. Looks like the import tool really likes local storage on the VMware side, correct?

And for you all connecting to vCenter, what admin login did you use to add it as a storage device in Proxmox? admin@System-Domain, administrator@vsphere.local? or AD account?
Our vCenter is the VCSA Appliance VM.
It likes vmfs volumes.

If you have luns per vm, then I would recommend you unmap the lun from vmware and map it to proxmox for the vm. (or use something like ghost to convert them). The advantage of remapping raw luns is at least you don't have to transfer... this disadvantage is that is generally a lot more complicated to manage.

Looks like this talks about using raw luns in proxmox: https://forum.proxmox.com/threads/using-iscsi-lun-directly.119369/
Alrighty, Thanks. I will check out mapping directly to Proxmox then.
 
It likes vmfs volumes.

If you have luns per vm, then I would recommend you unmap the lun from vmware and map it to proxmox for the vm. (or use something like ghost to convert them). The advantage of remapping raw luns is at least you don't have to transfer... this disadvantage is that is generally a lot more complicated to manage.

Looks like this talks about using raw luns in proxmox: https://forum.proxmox.com/threads/using-iscsi-lun-directly.119369/
So we have large VMFS iSCSI luns that multiple VMs share if that makes sense.
 
We have close to 30 vlans. Here is a simple script to import vlans from vmware to proxmox: (then after removing any already in proxmox, add the entries to /etc/network/interfaces and ifdown -a ; ifup -a ).

esxcfg-vswitch -l | awk '{ print $2 " " $1 }' | grep "^[1-9]" | sort -n |
awk '{ print "auto vmbr"$1"\niface vmbr"$1" inet manual\n\tbridge-ports bond10."$1"\n\tbridge-stp off\n\tbridge-fd 0\n#"$2"\n" }'

The Script works with ESXi 8, haven't tried older versions, and assumes bond called bond10, so replace bond10 with whatever you called your bond/nic.

The reason why I am mentioning this here, is... it would be nice if the converter defaulted the vlans to match what the vm has. This script creates the name as the comment in proxmox so it shows in the gui the same as it does in vmware, so the converter could automatically match them up if they are the same...

Looking at over 900 vms if we decide to switch to proxmox... so every bit of automation helps...
 
If anyone has been able to get this to work on ESXI 6.7 U3, how big were your disks? Like super tiny or normal?

I have tried the settings given by mram, but the best I could get is it failing with the session error after 15GB out of 120GB. Tried bigger numbers for maxSessionCount/lower numbers for sessionTimeout but it didnt matter.

Code:
grep -wns '<soap>' /etc/vmware/hostd/config.xml -A 4
159:   <soap>
160-    <sessionTimeout>0</sessionTimeout>
161-    <maxSessionCount>0</maxSessionCount>
162-   </soap>
163-   <ssl>

[root@r720:~] grep -wns '<soap>' /etc/vmware/vpxa/vpxa.cfg -A 4
52:    <soap>
53-      <maxSessionCount>6000</maxSessionCount>
54-      <sessionTimeout>1440</sessionTimeout>
55-    </soap>
56-    <ssl>

I am hitting same issue as you and I have also updated the files as shown above as well as Config.HostAgent.vmacore.soap.maxSessionCount option (under Host -> Manage -> System -> Advanced Settings).

My esxi is version 6.7.0 Update 3 (Build 14320388)

I have a tried a few unsuccessful attempts to move a couple different vms.
They usually fail around same area:
transferred 15.2 GiB of 76.0 GiB (20.05%)
qemu-img: error while reading at byte 16609440256: Input/output error

Anyone have any suggestions to try?
 
If anyone has been able to get this to work on ESXI 6.7 U3, how big were your disks? Like super tiny or normal?

I have tried the settings given by mram, but the best I could get is it failing with the session error after 15GB out of 120GB. Tried bigger numbers for maxSessionCount/lower numbers for sessionTimeout but it didnt matter.

Code:
grep -wns '<soap>' /etc/vmware/hostd/config.xml -A 4
159:   <soap>
160-    <sessionTimeout>0</sessionTimeout>
161-    <maxSessionCount>0</maxSessionCount>
162-   </soap>
163-   <ssl>

[root@r720:~] grep -wns '<soap>' /etc/vmware/vpxa/vpxa.cfg -A 4
52:    <soap>
53-      <maxSessionCount>6000</maxSessionCount>
54-      <sessionTimeout>1440</sessionTimeout>
55-    </soap>
56-    <ssl>
I did see one example with maxSessionCount as high as 50,000. Not sure if you went that high. It's worth a shot.
 

About

The Proxmox community has been around for many years and offers help and support for Proxmox VE, Proxmox Backup Server, and Proxmox Mail Gateway.
We think our community is one of the best thanks to people like you!

Get your subscription!

The Proxmox team works very hard to make sure you are running the best software and getting stable updates and security enhancements, as well as quick enterprise support. Tens of thousands of happy customers have a Proxmox subscription. Get yours easily in our online shop.

Buy now!