I previously wrote up a HOWTO for configuring Proxmox 8-x.x Wifi with SNAT and am now providing a HOWTO for Wifi with a routed configuration. The reason why I ditched the SNAT configuration is because I simply wanted full routing capabilities between VMs/containers hosted with Proxmox over Wifi and the rest of my network devices. Specifically, I wanted to use barrier to share my mouse and keyboard with my Windows VM that runs iGPU passthrough for my Ryzen 7840HS w/ Radeon 780M iGPU. Unfortunately barrier wouldn't work with SNAT even with iptables port forwarding rules so I needed a fully routed networking setup. The routed configuration is preferred over SNAT because you will have full networking capabilities without the hassle of dealing with port forwarding if you want to access network devices that are only reachable via the Wifi interface on your Proxmox server.
I came across a lot of posts that openly discourage people from using Wifi with Proxmox and that argument makes zero sense to me. I've been using Proxmox over Wifi for months now and have NEVER had any problems. In fact, I game on a Windows 11 VM w/ GPU passthrough on Proxmox and consistently ping <25ms to servers.
Note: If you want to add DHCP capabilities, refer to https://pve.proxmox.com/wiki/Setup_Simple_Zone_With_SNAT_and_DHCP. When configuring DHCP for the subnet, DO NOT check the SNAT box since you'll be using a routed configuration and there's no need for SNAT.
Note2: If your router cannot support the addition of specific static routes this setup will not work.
Prerequisites:
NOTE: You can also gather up the files required to install wpasupplicant so that next time you install you don't need to be connected to a wired ethernet configuration. The commands are as follows:
- This will gather up the wpasupplicant package and dependencies for offline install:
- Install with the following:
1) Wired ethernet connection - this is required to install wpasupplicant unless you already have the packages handy as per the note above.
2) Configure your wifi router to route to networks that will be associated with wifi adapter. Example for /24 network:
Destination = 192.168.3.0
Netmask = 255.255.255.0
Gateway = 192.168.1.100 (specify IP address of wifi adapter)
If your router cannot support the addition of specific static routes this setup will not work.
Setup:
1) Connect ethernet cable.
2) Install Proxmox 8-x.x.
3) After the install completes and the system has rebooted, install wpasupplicant (and install vim while you're at it):
4) Configure wpasupplicant:
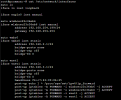
5) Determine wireless adapter device name:
6) Create /etc/systemd/system/wpa_supplicant.service and add configuration (specify YOUR wireless interface on the ExecStart line):
7) Enable wpasupplicant service:
8) Configure /etc/network/interfaces:
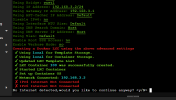
9) Restart wpa_supplicant and networking services to connect wireless adapter to wifi network:
10) Remove subscription nag message (optional):
LINK
11) Log into proxmox web interface:
12) Create SDN config (Datacenter --> SDN):
Zones: Simple, ID = Zone1 (use any name you like for ID)
Vnet: Name = vnet1 (use any name you like for Name), Zone = Zone1 (must match Zone ID)
Subnet: Subnet = 192.168.3.0/24, Gateway = 192.168.3.1
13) Apply config: SDN --> Apply
14) Edit /etc/network/interfaces. The
15) Restart network service:
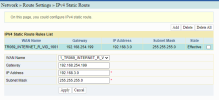
16) If your Wifi router does not push static routes to DHCP clients (mine doesn't) you will also need to configure your other network devices to communicate with the private network on the vnet via static routes. Instructions for MacOS are included below. Instructions for Windows are at link. The process for Linux is different depending on which distro you are using so do a web search for '<os_distribution> configure persistent static route'. RHEL and Debian howto link.
MacOS instructions for persistent static route:
- Open terminal
- Determine network service name:
- Add static route:
17) Done. Profit.
I came across a lot of posts that openly discourage people from using Wifi with Proxmox and that argument makes zero sense to me. I've been using Proxmox over Wifi for months now and have NEVER had any problems. In fact, I game on a Windows 11 VM w/ GPU passthrough on Proxmox and consistently ping <25ms to servers.
Note: If you want to add DHCP capabilities, refer to https://pve.proxmox.com/wiki/Setup_Simple_Zone_With_SNAT_and_DHCP. When configuring DHCP for the subnet, DO NOT check the SNAT box since you'll be using a routed configuration and there's no need for SNAT.
Note2: If your router cannot support the addition of specific static routes this setup will not work.
Prerequisites:
NOTE: You can also gather up the files required to install wpasupplicant so that next time you install you don't need to be connected to a wired ethernet configuration. The commands are as follows:
- This will gather up the wpasupplicant package and dependencies for offline install:
Code:
apt install apt-rdepends && mkdir /tmp/wpasupplicant && chown _apt /tmp/wpasupplicant && cd /tmp/wpasupplicant
apt-get download $(apt-rdepends wpasupplicant | grep -v "^ " | sed 's/debconf-2.0/debconf/g')
tar czf /path/to/destination.file.tar.gz /tmp/wpasupplicant
- Install with the following:
Diff:
tar zxf wpasupplicant.tar.gz
<cd to directory where files were extracted>
dpkg -i *
1) Wired ethernet connection - this is required to install wpasupplicant unless you already have the packages handy as per the note above.
2) Configure your wifi router to route to networks that will be associated with wifi adapter. Example for /24 network:
Destination = 192.168.3.0
Netmask = 255.255.255.0
Gateway = 192.168.1.100 (specify IP address of wifi adapter)
If your router cannot support the addition of specific static routes this setup will not work.
Setup:
1) Connect ethernet cable.
2) Install Proxmox 8-x.x.
3) After the install completes and the system has rebooted, install wpasupplicant (and install vim while you're at it):
Code:
apt update && apt install wpasupplicant vim
systemctl disable wpa_supplicant
4) Configure wpasupplicant:
Code:
wpa_passphrase SSIDNAME PASSWORD >> /etc/wpa_supplicant/wpa_supplicant.conf5) Determine wireless adapter device name:
Code:
root@px1:~# dmesg | grep wlp
[    4.374531] iwlwifi 0000:04:00.0 wlp4s0: renamed from wlan0
6) Create /etc/systemd/system/wpa_supplicant.service and add configuration (specify YOUR wireless interface on the ExecStart line):
touch /etc/systemd/system/wpa_supplicant.service
Code:
[Unit]
Description=WPA supplicant
Before=network.target
After=dbus.service
Wants=network.target
IgnoreOnIsolate=true

[Service]
Type=dbus
BusName=fi.w1.wpa_supplicant1
ExecStart=/sbin/wpa_supplicant -u -s -c /etc/wpa_supplicant/wpa_supplicant.conf -i wlp4s0
Restart=always

[Install]
WantedBy=multi-user.target
Alias=dbus-fi.w1.wpa_supplicant1.service
7) Enable wpasupplicant service:
systemctl enable wpa_supplicant8) Configure /etc/network/interfaces:
Code:
auto lo
iface lo inet loopback

iface enp1s0 inet manual

auto wlp4s0
iface wlp4s0 inet static
    address 192.168.1.100/24
    gateway 192.168.1.1

auto vmbr0
iface vmbr0 inet static
    address 192.168.2.1/24
    bridge-ports none
    bridge-stp off
    bridge-fd 0

source /etc/network/interfaces.d/*
9) Restart wpa_supplicant and networking services to connect wireless adapter to wifi network:
systemctl restart wpa_supplicant && systemctl restart networking10) Remove subscription nag message (optional):
LINK
11) Log into proxmox web interface:
https://<ip_of_your_wifi_adapter>:800612) Create SDN config (Datacenter --> SDN):
Zones: Simple, ID = Zone1 (use any name you like for ID)
Vnet: Name = vnet1 (use any name you like for Name), Zone = Zone1 (must match Zone ID)
Subnet: Subnet = 192.168.3.0/24, Gateway = 192.168.3.1
13) Apply config: SDN --> Apply
14) Edit /etc/network/interfaces. The
hwaddress setting forces the bridge to report a consistent MAC address. If you leave it out Proxmox will change the MAC address of the vnet1 adapter after every reboot, which can be annoying because OS's like Windows rename the network every time they detect a new gateway MAC address since it uses the MAC to determine if devices are connected to public/private networks.
Code:
auto lo
iface lo inet loopback

iface enp1s0 inet manual

auto wlp4s0
iface wlp4s0 inet static
               address 192.168.1.100/24
               gateway 192.168.1.1

auto vmbr0
iface vmbr0 inet static
               address 192.168.2.1/24
               bridge-ports none
               bridge-stp off
               bridge-fd 0

auto vnet1
iface vnet1 inet static
               address 192.168.3.1/24
               bridge-ports none
               bridge-stp off
               bridge-fd 0
               hwaddress f6:c7:43:09:0b:45
               post-up echo 1 > /proc/sys/net/ipv4/ip_forward
               post-up iptables -A FORWARD -i wlp4s0 -j ACCEPT
               post-up iptables -A FORWARD -o wlp4s0 -j ACCEPT
               post-up iptables -A FORWARD -i vnet1 -j ACCEPT
               post-up iptables -A FORWARD -o vnet1 -j ACCEPT


source /etc/network/interfaces.d/*
15) Restart network service:
systemctl restart networking16) If your Wifi router does not push static routes to DHCP clients (mine doesn't) you will also need to configure your other network devices to communicate with the private network on the vnet via static routes. Instructions for MacOS are included below. Instructions for Windows are at link. The process for Linux is different depending on which distro you are using so do a web search for '<os_distribution> configure persistent static route'. RHEL and Debian howto link.
MacOS instructions for persistent static route:
- Open terminal
- Determine network service name:
Code:
user@macos ~ % networksetup -listallnetworkservices
An asterisk (*) denotes that a network service is disabled.
Thunderbolt Bridge
Wi-Fi
- Add static route:
networksetup -setadditionalroutes 'Wi-Fi' 192.168.3.0 255.255.255.0 192.168.1.10017) Done. Profit.
Last edited:

")