[TUTORIAL] How to setup PBS as a VM in Unraid and uses Virtiofs to passthrough shares

kevinkok

New Member
Dec 11, 2022
2
23
3
Just wanted to share my experience with installing Promox Backup Server as a VM in Unraid as I encountered some problems that I wasn't able to find any answers on the internet.

My setup is a baremetal Unraid 6.11.5, another baremetal Proxmox VE, with a HP Aruba Instant On 1930 8G 2SFP Switch (JL680A) in between them.
  1. Go to VMs tab in your Unraid dashboard, then click the "Add VM" button.
  2. Then, in my case, I selected Debian as the OS.
  3. I left most options as it is other than the following:
    • Initial memory: 4096 MB (this is the value I got from PBS site, but you may set it to more or less base on your use case)
    • OS Install ISO: Point this to the location of your ISO. (The ISO path is set in Unraid dashboard -> Settings -> VM Manager -> Default ISO storage path)
    • Primary vDisk Size: 32G (again, this is the value I got from PBS site)
    • Unraid Share Mode: Choose 9p mode for now so that you can save. (IMPORTANT: You'll need to set this to Virtiofs mode after creating the VM)
    • Unraid Share/Unraid Source Path: Choose the share that you want to use to store the backups, or type in the path manually.
    • Unraid Mount Tag: This is just a String to identify your source path in the VM. If you have chosen a share in "Unraid Share", then this is populated automatically. Else, you can just type in some easily identifiable name for your source path.
  4. Uncheck "Start VM after creation".
  5. Click the "Create" button.
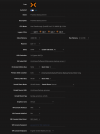
  6. My VM setup at a glance.
    • 1672392215197.png
  7. For more details for VM setup, you can visit the following links:
  1. If you have followed the steps above to install PBS as a VM, or you have an existing PBS VM, then you can proceed.
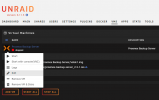
  2. Make sure your PBS VM is not running, then edit your VM.
    • 1672394534207.png
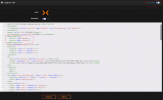
  3. Click the toggle at the top right of the page to show "XML view".
    • 1672395202994.png
  4. From my screenshot above, you should see that there is a red circle around the memoryBacking block. You'll need to change your VM settings as shown in my screenshot for Virtiofs to work. You can refer to libvirt's "Sharing files with Virtiofs" page for more info.
    • XML:
        <memoryBacking>
          <source type='memfd'/>
          <access mode='shared'/>
        </memoryBacking>
  5. Now, click the "Update" button to save the changes.
  6. Repeat step 2 to edit your VM. Ensure your page is in "Form view" instead of "XML view".
  7. Now, we can go to change our Unraid Share Mode to Virtiofs Mode. You can also add more Virtiofs shares at this point.
  8. Now, click the "Update" button again to save your changes.
  9. Repeat step 2 to edit your VM again. Ensure your page is in "XML view" instead of "Form view".
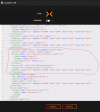
  10. Look for filesystem in your VM's XML, you should see something like this:
    • 1672396069757.png
  11. For my case, although I'm able to access the share in PBS like this, but for some reason, both CT and VM failed to backup. So, I did the following change and it works for me:
    • XML:
          <filesystem type='mount' accessmode='passthrough'>
            <driver type='virtiofs' queue='1024'/>
            <binary path='/usr/libexec/virtiofsd' xattr='on'>
              <cache mode='always'/>
              <sandbox mode='chroot'/>
              /// remove this line <lock posix='on' flock='on'>
            </binary>
            <source dir='/mnt/user/backup_proxmox'/>
            <target dir='backup_proxmox_virtiofs'/>
            <address type='pci' domain='0x0000' bus='0x01' slot='0x00' function='0x0'/> /// don't replace this line in your XML with mine
          </filesystem>
  12. Click the "Update" button again to save your changes, and we are done. (Do note that if you update your VM settings again in the future in "Form view", the changes made to the filesystem in "XML view" may get overwritten, and so, you'll need to perform step 11 again)
  13. Start your VM! (If this is your first startup, then complete your PBS installation first)
  14. Go to your PBS dashboard, then navigate to Administration -> Shell page.
  15. Create a directory so that we can mount the share that we passthrough from Unraid. In my case, I created the following directory: mkdir /mnt/backup_proxmox.
  16. Now we can mount our share to the directory that was created previously with the following line: mount -t virtiofs backup_proxmox_virtiofs /mnt/backup_proxmox
    • Note that you should change my backup_promox_virtiofs to the value that you have configured as the tag/target dir in your VM setting.
    • Note that you should change my /mnt/backup_proxmox to the directory that you have created for your share.
  17. Once you are done mounting, check if you can create and read files from your share.
  18. If you are able to do that, then type the following in your shell: cat /etc/mtab. You should be able to see a line that corresponds to your mounts. In my case, it is backup_proxmox_virtiofs /mnt/backup_proxmox virtiofs rw,relatime 0 0
  19. If you would like to have your share mounted automatically on start, then copy the line(s) from what you have found in step 18 in /etc/mtab and paste them into /etc/fstab. In my case, it looks like this:
    • 1672397494524.png
  20. Restart PBS and try to check again to see if your share is mounted automatically.
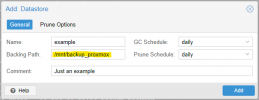
  21. If everything is ok, you can now add a datastore in your share. In my case, it looks like this:
    • 1672397679573.png
  22. Once the datastore is created, you can now try to backup your CT, VM, or whatever you like to Unraid with PBS!

Hope it helps whoever that is struggling with this!
 
I just made this now since the docker container I was using on unraid didn't end up working for me due to permissions issues. Thanks again for this guide!
 
Thanks! Followed these steps for a new VM on Unraid.

At step 13, i cant install PBS because it says "harddisk '/dev/vda' too small (0GB)".
It also gave no options to format a partition on this Target Harddisk indicated as "/dev/vda (0MiB)".

Going to try again but installing PBS before updating XML, will report back here.
if you get the /dev/vda too small error, you forgot to add the 'G' or 'T' at the end of the size you want the vidsk to be. You probably put something like 32 in there instead of 32G.
 
  • Like
Reactions: barrystaes
hi,
First of all thanks for the post, this really helped.

I am facing an issue when I initiate my backups to this pbs. Logs from the failed backup are atteached-
Code:
2023-06-11T01:15:39+05:30: starting new backup on datastore 'pve_backups': "vm/103/2023-06-10T19:45:37Z"
2023-06-11T01:15:39+05:30: download 'index.json.blob' from previous backup.
2023-06-11T01:15:39+05:30: register chunks in 'drive-efidisk0.img.fidx' from previous backup.
2023-06-11T01:15:39+05:30: download 'drive-efidisk0.img.fidx' from previous backup.
2023-06-11T01:15:39+05:30: created new fixed index 1 ("vm/103/2023-06-10T19:45:37Z/drive-efidisk0.img.fidx")
2023-06-11T01:15:39+05:30: register chunks in 'drive-sata0.img.fidx' from previous backup.
2023-06-11T01:15:39+05:30: download 'drive-sata0.img.fidx' from previous backup.
2023-06-11T01:15:39+05:30: created new fixed index 2 ("vm/103/2023-06-10T19:45:37Z/drive-sata0.img.fidx")
2023-06-11T01:15:39+05:30: register chunks in 'drive-tpmstate0-backup.img.fidx' from previous backup.
2023-06-11T01:15:39+05:30: download 'drive-tpmstate0-backup.img.fidx' from previous backup.
2023-06-11T01:15:39+05:30: created new fixed index 3 ("vm/103/2023-06-10T19:45:37Z/drive-tpmstate0-backup.img.fidx")
2023-06-11T01:15:39+05:30: add blob "/mnt/backup_proxmox/vm/103/2023-06-10T19:45:37Z/qemu-server.conf.blob" (541 bytes, comp: 541)
2023-06-11T01:15:39+05:30: POST /fixed_chunk: 400 Bad Request: inserting chunk on store 'pve_backups' failed for 66e4ebee2e39e7e01018dfe8e5ad3c4b5ac29f0178436967ad83b6f1cce91724 - fchmod "/mnt/backup_proxmox/.chunks/66e4/66e4ebee2e39e7e01018dfe8e5ad3c4b5ac29f0178436967ad83b6f1cce91724.tmp_Tm4UPr" failed: ESTALE: Stale file handle
2023-06-11T01:15:39+05:30: backup failed: connection error: connection reset
2023-06-11T01:15:39+05:30: removing failed backup
2023-06-11T01:15:39+05:30: POST /fixed_chunk: 400 Bad Request: error reading a body from connection: connection reset
2023-06-11T01:15:39+05:30: TASK ERROR: removing backup snapshot "/mnt/backup_proxmox/vm/103/2023-06-10T19:45:37Z" failed - Directory not empty (os error 39)

When I restart pbs vm on unraid, backups occur perfectly, but like after 12 -18 hours all backups fail with similar eror.
if anyone knows how to fix this, please let me know.
Thank You
 
Thank you for the guide. The backup works great.

.. but unfortunately unraid mover stopped working. When mover moves backup chunks from cache to main array, it takes forever - 3-4 chunks a minute with the thousands of chunks to move.

I figured, if I were to shutdown proxmox backup server VM, the mover will pick up normal pace. It must have to do with the open files VM keeps on disk, and mover doesn’t work well with open files.

It maybe a solution for one-of backups, but for nightly backups it definitively not an option.

Did anyone find a workaround or a fix for that?
 
Another thank you!

@mavor I found that it was best to bypass the mover by using a /mnt/diskN path and writing directly to a single disk - though that may be leftover from a workaround with 9p (that worked for CTs but not VMs). It's probably best to avoid the mover due to (yeah) open files and disable caching for the share that you link to PBS.
 
Backups suddenly stopped working after I upgraded to Unraid 6.12.4 and switched to zfs cache pool.

TASK ERROR: update atime failed for chunk/file "/mnt/backup_proxmox/ .... "
- EACCES: Permission denied

After some research I found that PBS requires mounts to have atime support, however all Unraid shares are mounted with "noatime" options.
Perhaps that is the reason for the failure. You can check mounts by running "mount" command in shell.

I couldn't find a way to make Unraid to mount shares differently.

This essentially makes Proxmox Backup Server incompatible with Unraid period.

I would appreciate if some has some ideas on how to solve it.
 
@mavor I'm on Unraid 6.12.4 and PBS 3 with no problems. I bypass the Unraid filesystems and write directly to a /mnt/diskX subdirectory, though I haven't tried anything in /mnt/user since switching from 9p to virtio.
 
@mavor I am experiencing the same problem after switching to a ZFS cache pool. I have been writing directly to /mnt/diskX before that, so this may not be the cause. I am also very much interested in a solution.
 
Thank you good sir! Followed this guide and it worked flawlessly.
Useful information I will use with other VMs as well!
 
This guide is amazing - I appreciate the time you took to write this up. For anyone having trouble using an Unraid share to backup VMs, this is for you (it was driving me nuts being able to easily backup containers but not VMs).

This post is project-level wiki worthy. I joined the forums to say all of this.
 
Hi, I just tried many time to follow this but I have an issue. Basically after VM creation when i try to web login i see message in firefox for connection timeout? Any hint?

Below my XML file:

Code:
<?xml version='1.0' encoding='UTF-8'?>
<domain type='kvm'>
  <name>Proxmox Backup Server</name>
  <uuid>ba182579-02a1-71b0-b3e4-a922dc43fd8c</uuid>
  <metadata>
    <vmtemplate xmlns="unraid" name="Debian" icon="debian.png" os="debian"/>
  </metadata>
  <memory unit='KiB'>4194304</memory>
  <currentMemory unit='KiB'>4194304</currentMemory>
  <memoryBacking>
    <source type='memfd'/>
    <access mode='shared'/>
  </memoryBacking>
  <vcpu placement='static'>2</vcpu>
  <cputune>
    <vcpupin vcpu='0' cpuset='0'/>
    <vcpupin vcpu='1' cpuset='1'/>
  </cputune>
  <os>
    <type arch='x86_64' machine='pc-q35-7.2'>hvm</type>
    <loader readonly='yes' type='pflash'>/usr/share/qemu/ovmf-x64/OVMF_CODE-pure-efi.fd</loader>
    <nvram>/etc/libvirt/qemu/nvram/ba182579-02a1-71b0-b3e4-a922dc43fd8c_VARS-pure-efi.fd</nvram>
  </os>
  <features>
    <acpi/>
    <apic/>
  </features>
  <cpu mode='host-passthrough' check='none' migratable='on'>
    <topology sockets='1' dies='1' cores='2' threads='1'/>
    <cache mode='passthrough'/>
  </cpu>
  <clock offset='utc'>
    <timer name='rtc' tickpolicy='catchup'/>
    <timer name='pit' tickpolicy='delay'/>
    <timer name='hpet' present='no'/>
  </clock>
  <on_poweroff>destroy</on_poweroff>
  <on_reboot>restart</on_reboot>
  <on_crash>restart</on_crash>
  <devices>
    <emulator>/usr/local/sbin/qemu</emulator>
    <disk type='file' device='disk'>
      <driver name='qemu' type='raw' cache='writeback'/>
      <source file='/mnt/user/domains/Proxmox Backup Server/vdisk1.img'/>
      <target dev='hdc' bus='virtio'/>
      <serial>vdisk1</serial>
      <boot order='1'/>
      <address type='pci' domain='0x0000' bus='0x04' slot='0x00' function='0x0'/>
    </disk>
    <disk type='file' device='cdrom'>
      <driver name='qemu' type='raw'/>
      <source file='/mnt/user/isos/proxmox-backup-server_3.1-1.iso'/>
      <target dev='hda' bus='sata'/>
      <readonly/>
      <boot order='2'/>
      <address type='drive' controller='0' bus='0' target='0' unit='0'/>
    </disk>
    <controller type='sata' index='0'>
      <address type='pci' domain='0x0000' bus='0x00' slot='0x1f' function='0x2'/>
    </controller>
    <controller type='pci' index='0' model='pcie-root'/>
    <controller type='pci' index='1' model='pcie-root-port'>
      <model name='pcie-root-port'/>
      <target chassis='1' port='0x10'/>
      <address type='pci' domain='0x0000' bus='0x00' slot='0x02' function='0x0' multifunction='on'/>
    </controller>
    <controller type='pci' index='2' model='pcie-root-port'>
      <model name='pcie-root-port'/>
      <target chassis='2' port='0x11'/>
      <address type='pci' domain='0x0000' bus='0x00' slot='0x02' function='0x1'/>
    </controller>
    <controller type='pci' index='3' model='pcie-root-port'>
      <model name='pcie-root-port'/>
      <target chassis='3' port='0x12'/>
      <address type='pci' domain='0x0000' bus='0x00' slot='0x02' function='0x2'/>
    </controller>
    <controller type='pci' index='4' model='pcie-root-port'>
      <model name='pcie-root-port'/>
      <target chassis='4' port='0x13'/>
      <address type='pci' domain='0x0000' bus='0x00' slot='0x02' function='0x3'/>
    </controller>
    <controller type='pci' index='5' model='pcie-root-port'>
      <model name='pcie-root-port'/>
      <target chassis='5' port='0x14'/>
      <address type='pci' domain='0x0000' bus='0x00' slot='0x02' function='0x4'/>
    </controller>
    <controller type='pci' index='6' model='pcie-root-port'>
      <model name='pcie-root-port'/>
      <target chassis='6' port='0x15'/>
      <address type='pci' domain='0x0000' bus='0x00' slot='0x02' function='0x5'/>
    </controller>
    <controller type='virtio-serial' index='0'>
      <address type='pci' domain='0x0000' bus='0x03' slot='0x00' function='0x0'/>
    </controller>
    <controller type='usb' index='0' model='ich9-ehci1'>
      <address type='pci' domain='0x0000' bus='0x00' slot='0x07' function='0x7'/>
    </controller>
    <controller type='usb' index='0' model='ich9-uhci1'>
      <master startport='0'/>
      <address type='pci' domain='0x0000' bus='0x00' slot='0x07' function='0x0' multifunction='on'/>
    </controller>
    <controller type='usb' index='0' model='ich9-uhci2'>
      <master startport='2'/>
      <address type='pci' domain='0x0000' bus='0x00' slot='0x07' function='0x1'/>
    </controller>
    <controller type='usb' index='0' model='ich9-uhci3'>
      <master startport='4'/>
      <address type='pci' domain='0x0000' bus='0x00' slot='0x07' function='0x2'/>
    </controller>
    <filesystem type='mount' accessmode='passthrough'>
      <driver type='virtiofs' queue='1024'/>
      <binary path='/usr/libexec/virtiofsd' xattr='on'>
        <cache mode='always'/>
        <sandbox mode='chroot'/>
      </binary>
      <source dir='/mnt/user/backup/Proxmox/'/>
      <target dir='backup_proxmox'/>
      <address type='pci' domain='0x0000' bus='0x01' slot='0x00' function='0x0'/>
    </filesystem>
    <interface type='bridge'>
      <mac address='52:54:00:a4:3a:70'/>
      <source bridge='virbr0'/>
      <model type='virtio-net'/>
      <address type='pci' domain='0x0000' bus='0x02' slot='0x00' function='0x0'/>
    </interface>
    <serial type='pty'>
      <target type='isa-serial' port='0'>
        <model name='isa-serial'/>
      </target>
    </serial>
    <console type='pty'>
      <target type='serial' port='0'/>
    </console>
    <channel type='unix'>
      <target type='virtio' name='org.qemu.guest_agent.0'/>
      <address type='virtio-serial' controller='0' bus='0' port='1'/>
    </channel>
    <input type='tablet' bus='usb'>
      <address type='usb' bus='0' port='1'/>
    </input>
    <input type='mouse' bus='ps2'/>
    <input type='keyboard' bus='ps2'/>
    <graphics type='vnc' port='-1' autoport='yes' websocket='-1' listen='0.0.0.0' keymap='it'>
      <listen type='address' address='0.0.0.0'/>
    </graphics>
    <audio id='1' type='none'/>
    <video>
      <model type='qxl' ram='65536' vram='65536' vgamem='16384' heads='1' primary='yes'/>
      <address type='pci' domain='0x0000' bus='0x00' slot='0x01' function='0x0'/>
    </video>
    <memballoon model='virtio'>
      <address type='pci' domain='0x0000' bus='0x05' slot='0x00' function='0x0'/>
    </memballoon>
  </devices>
</domain>

please notice that in default debian template I did not had to do step 11
 
Last edited:
hi,
First of all thanks for the post, this really helped.

I am facing an issue when I initiate my backups to this pbs. Logs from the failed backup are atteached-
Code:
2023-06-11T01:15:39+05:30: starting new backup on datastore 'pve_backups': "vm/103/2023-06-10T19:45:37Z"
2023-06-11T01:15:39+05:30: download 'index.json.blob' from previous backup.
2023-06-11T01:15:39+05:30: register chunks in 'drive-efidisk0.img.fidx' from previous backup.
2023-06-11T01:15:39+05:30: download 'drive-efidisk0.img.fidx' from previous backup.
2023-06-11T01:15:39+05:30: created new fixed index 1 ("vm/103/2023-06-10T19:45:37Z/drive-efidisk0.img.fidx")
2023-06-11T01:15:39+05:30: register chunks in 'drive-sata0.img.fidx' from previous backup.
2023-06-11T01:15:39+05:30: download 'drive-sata0.img.fidx' from previous backup.
2023-06-11T01:15:39+05:30: created new fixed index 2 ("vm/103/2023-06-10T19:45:37Z/drive-sata0.img.fidx")
2023-06-11T01:15:39+05:30: register chunks in 'drive-tpmstate0-backup.img.fidx' from previous backup.
2023-06-11T01:15:39+05:30: download 'drive-tpmstate0-backup.img.fidx' from previous backup.
2023-06-11T01:15:39+05:30: created new fixed index 3 ("vm/103/2023-06-10T19:45:37Z/drive-tpmstate0-backup.img.fidx")
2023-06-11T01:15:39+05:30: add blob "/mnt/backup_proxmox/vm/103/2023-06-10T19:45:37Z/qemu-server.conf.blob" (541 bytes, comp: 541)
2023-06-11T01:15:39+05:30: POST /fixed_chunk: 400 Bad Request: inserting chunk on store 'pve_backups' failed for 66e4ebee2e39e7e01018dfe8e5ad3c4b5ac29f0178436967ad83b6f1cce91724 - fchmod "/mnt/backup_proxmox/.chunks/66e4/66e4ebee2e39e7e01018dfe8e5ad3c4b5ac29f0178436967ad83b6f1cce91724.tmp_Tm4UPr" failed: ESTALE: Stale file handle
2023-06-11T01:15:39+05:30: backup failed: connection error: connection reset
2023-06-11T01:15:39+05:30: removing failed backup
2023-06-11T01:15:39+05:30: POST /fixed_chunk: 400 Bad Request: error reading a body from connection: connection reset
2023-06-11T01:15:39+05:30: TASK ERROR: removing backup snapshot "/mnt/backup_proxmox/vm/103/2023-06-10T19:45:37Z" failed - Directory not empty (os error 39)

When I restart pbs vm on unraid, backups occur perfectly, but like after 12 -18 hours all backups fail with similar eror.
if anyone knows how to fix this, please let me know.
Thank You
Did you manage to solve this problem?
 
Just wanted to thank you for posting this! This is exactly what I needed. THANK YOU!
 

About

The Proxmox community has been around for many years and offers help and support for Proxmox VE, Proxmox Backup Server, and Proxmox Mail Gateway.
We think our community is one of the best thanks to people like you!

Get your subscription!

The Proxmox team works very hard to make sure you are running the best software and getting stable updates and security enhancements, as well as quick enterprise support. Tens of thousands of happy customers have a Proxmox subscription. Get yours easily in our online shop.

Buy now!