I was installing VE 7.2 on my brand new host box... first ran into black screen after install begins -- see separate thread on that.
Then, install failed, with the X server conking out before anything graphical happened. Here's the generic solution:
1) Hit ctrl-alt-F2 to see the error screen from the install (and ctrl-alt-F1 to get back to the console") )
)
My particular error was:
2) (Most likely your video device is not being properly handled) Here's how to find it and force generic VGA support..
This should show the vga compatible display device. If not, just look at lspci. (If you see no device, look elsewhere for help. This thread won't do it.) For me, my nVidia card is 01:00.0
3) Create a driver description file in
Like this: (I called mine
4) Then restart X
A couple of blinks and the first install script was on my screen! (EULA accept box)
Then, install failed, with the X server conking out before anything graphical happened. Here's the generic solution:
1) Hit ctrl-alt-F2 to see the error screen from the install (and ctrl-alt-F1 to get back to the console
)My particular error was:
Cannot run in framebuffer mode. Please specify busIDs for all framebuffer devices2) (Most likely your video device is not being properly handled) Here's how to find it and force generic VGA support..
# lspci| grep -i vga
This should show the vga compatible display device. If not, just look at lspci. (If you see no device, look elsewhere for help. This thread won't do it.) For me, my nVidia card is 01:00.0
(NOTE for newbies: Linux/Unix cares about upper/lower case in filenames etc! Type everything exactly as shown.)
3) Create a driver description file in
/usr/share/X11/xorg.conf.d/Like this: (I called mine
driver-nvidia.conf)
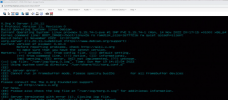
Code:
Section "Device"
    Identifier "Card0"
    Driver "fbdev"
    BusID "pci0:01:0:0:"
EndSection
4) Then restart X
# xinit -- -dpi 96 >/dev/tty2 2>&1
A couple of blinks and the first install script was on my screen! (EULA accept box)
Last edited:

")