[SOLVED] Enable secure boot on Windows 10 VM

PizzaYolo

New Member
Jun 18, 2023
6
1
3
Hello everyone,

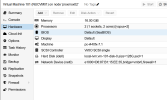
I am trying to enable secure boot on a Windows 10 pro VM in order to upgrade it to Windows 11 (requierement of PC health check app for the upgrade).
This is what I am doing :

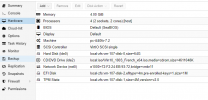
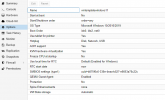
- Adding a EFI Disk (efitype=4m, pre-enrolled-keys)1, size=1M) to the VM.
- Changing the BIOS from SeaBIOS (Default) to OVMF (UEFI)
- Starting the VM, in boot menu check that secure boot is enabled ==> yes.
- Save, exit and reboot the VM

But when the boot sequence starts, it can not start on the VM disk (first choice in boot order), but it can start on the other choices (CD/DVD, PXE...).
As soon as I change again the BIOS parameter from OVMF (UEFI) to SeaBIOS, then the VM boots up again correctly but Windows doesn't seem to detect the parameter "secure boot".

Any idea of what I am doing wrong ?

Thanks,
 
you can't easily switch existing Windows install between SeaBIOS / OVMF (UEFI) like on real hardware.
Because boot loader differ and partitionning too.
it can be done, but it's out of the scope of proxmox ve.
Perhaps some Windows forums has tuto to do it.

bypass requirements for Windows 11 will be more easy.
 
Last edited:
  • Like
Reactions: Dunuin
you can't easily switch existing Windows install between SeaBIOS / OVMF (UEFI) like on real hardware.
Because boot loader differ and partitionning too.
it can be done, but it's out of the scope of proxmox ve.
Perhaps some Windows forums has tuto to do it.

bypass requirements for Windows 11 will be more easy.

So would it be better to choose OVMF (UEFI) BIOS when I create my VM and not changing it afterward maybe ?
Before trying bypassing Windows 11 requierements I want at least to try to fullfill them, but thanks I will keep that in mind if I dont find a solution.
 
Hello again,

it worked, thanks for your help ! :D
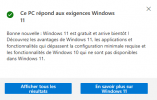
Now I am just wondering why Windows update doesn't offer to download and install the Windows 11 upgrades (even after a reboot) since all the requierements are good now.
Maybe there is some kind of delay ?

1689980290375.png
 
Hello again,

it worked, thanks for your help ! :D
Now I am just wondering why Windows update doesn't offer to download and install the Windows 11 upgrades (even after a reboot) since all the requierements are good now.
Maybe there is some kind of delay ?

View attachment 53333

In case someone is wondering, if PC Health Check is saying that everything is OK with the requierements but Windows update doesn't allow to upgrade then just use this workaround, it worked for me :

https://www.itechlounge.net/2022/07...equirement-but-windows-update-says-it-dosent/
 
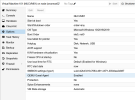
Can anybody direct me in what to do when I have a Win10 VM which wont update to 11. What do I need to do in Proxmox?

1718096479835.png

1718096506588.png
 
And like said above, you would need to switch from SeaBIOS to OVMF and add stuff like an EFI disk and TPM but then your Windows won'T boot any longer as it was installed with legacy BIOS and not UEFI. Probably easier to just create a new Win11 VM.
 
So there's no "easy" solution?
Even though some time has passed, I'm posting this for whoever might stumble into the same situation (ie modifying a non-UEFI-based Windows boot to UEFI-based). You can do this in two steps, in less than 1-2 hours. The procedure involves (a) migrating first the MBR disk contents to a GPT partitioning scheme and then (b) converting the BIOS startup to UEFI. Do take a full VM backup before starting!!! Steps:


0. (NEEDED IF DISK IS NOT IDE) If and only if the disk is not connected via IDE (e.g. it might be connected via Virtio SCSI), shutdown, detach the disk and connect it again as IDE. This will allow the disk to be visible to Windows recovery command prompt in the next step. Go to options -> Boot order, enable ide0 and set it as the first boot device.

1. Boot windows and enter recovery. Select command prompt in the advanced settings.

2. Once in command prompt execute diskpart. Do a "list disk". Normally disk 0 will correspond to the VM boot hard disk. Note the number (zero in this case). Press exit.

3. Give the following command that will convert the disk from MBR to GPT:

Code:
mbr2gpt /convert /disk:<number>

where <number> is the disk number from the previous step. For example, if that's 0, then the command to be issued would be:

Code:
mbr2gpt /convert /disk:0

4. Shutdown the system now. Add an EFI disk first and then change BIOS to OVMF. Reboot. If all things went fine, you have now a working UEFI system with a GPT disk (with an IDE disk).

5. (NEEDED IF DISK WAS NOT ORIGINALLY IDE) Once you are in your Windows box, open an administrative command prompt and enter the following command:
bcdedit /set {current} safeboot minimal

Immediately afterwards shutdown the system and do the reverse step from step 0: detach the disk and double-click to connect it again as SCSI (Virtio). Go to options -> Boot order, enable scsi0 and set it as the first boot device. Make sure to delete any references to non-existent drives (say ide0). Reboot. This time you'll be brought into safe mode. Open a command prompt and enter:
bcdedit /deletevalue {current} safeboot

Reboot again. If all things went fine, you have now a working UEFI system with a GPT disk, this time with the disk set up as Virtio SCSI.

That's all. If you want to continue from here add a TPM device. This way you'll be able to upgrade to Windows 11.
 
Last edited:

About

The Proxmox community has been around for many years and offers help and support for Proxmox VE, Proxmox Backup Server, and Proxmox Mail Gateway.
We think our community is one of the best thanks to people like you!

Get your subscription!

The Proxmox team works very hard to make sure you are running the best software and getting stable updates and security enhancements, as well as quick enterprise support. Tens of thousands of happy customers have a Proxmox subscription. Get yours easily in our online shop.

Buy now!