[SOLVED] Anti-Cheat KVM Settings

jgab12

New Member
Jan 6, 2023
2
1
1
Hello everyone!

As you may know some games that use EasyAntiCheat such as New World don't allow running the game from a VM because it caused a bot problem within the game. Now that sucks because I've setup a gaming VM with GPU Passthrough, everything is working flawlessly and I was a bit disapointed when I tried to fire up the game.

Now I've made quite a bit of research to find some info on proxmox and also some other people were able to make it work through Unraid. Here's what I found :

Unraid: https://forums.unraid.net/topic/127...aunch-error-cannot-run-under-virtual-machine/
under <os> put
<smbios mode='host'/>
directly below that put this under <features>
<kvm>
<hidden state='on'/>
</kvm>
under <cpu mode ='host-passthrough'....... put
<feature policy='disable' name='hypervisor'/>
and i also deleted any lines pertaining to hyper-v
Proxmox:https://forum.proxmox.com/threads/how-do-i-hide-the-fact-to-windows-that-it-runs-in-a-vm.115627/
For Everyone in the Future with Anticheat Problem: args: -cpu host,-hypervisor,kvm=off + SCSI Controller = LSI + MAC Address to Real Intel Vendor ID. Also Delete whole Registry with all EasyAntiCheat Entrys. Delete C:/User/USERNAME/Roaming/EasyAntiCheat. Reinstall EasyAntiCheat Service Via Steamapp Folder. Change Bios Vendor String in VM Options.

Now I've tried to apply those settings to the VM without success, I am what you could called a newbie to the Hypervisor world and I was wondering if you had any idea how to apply those settings and essentially hide the fact that Windows is a VM.

Here's my VM conf:
args: -cpu 'host,+kvm_pv_unhalt,+kvm_pv_eoi,hv_vendor_id=NV43FIX,kvm=off',-hypervisor,hv_vapic,hv_stimer,+invtsc
bios: ovmf
boot: order=ide2;scsi0;net0;ide0
cores: 12
cpu: host,hidden=1,flags=+pcid
cpuunits: 1024
efidisk0: WinStore:vm-100-disk-0,efitype=4m,pre-enrolled-keys=1,size=4M
hostpci0: 0000:02:00,pcie=1
ide2: none,media=cdrom
machine: pc-q35-7.1
memory: 24576
meta: creation-qemu=7.1.0,ctime=1673644266
name: WinMain
net0: virtio=3A:89:03:C9:1D:DA,bridge=vmbr0,firewall=1
numa: 1
onboot: 1
ostype: win10
scsi0: WinStore:vm-100-disk-1,iothread=1,size=250G,ssd=1
scsi1: NAS1:vm-100-disk-0,iothread=1,size=1000G
scsi2: NAS2:vm-100-disk-0,iothread=1,size=1000G
scsihw: virtio-scsi-single
smbios1: uuid=9a06ff3e-9394-4844-8a03-8ea92640a21a
sockets: 1
startup: order=2
vmgenid: e1fc4102-a958-4921-9703-c6615a76363c

Thank you very much!
 
  • Like
Reactions: postchen
For now, comment out your -args line like so: # args: -cpu 'host,+kvm_pv_unhalt,+kvm_pv_eoi,hv_vendor_id=NV43FIX,kvm=off',-hypervisor,hv_vapic,hv_stimer,+invtsc and just paste args: -cpu host,-hypervisor,kvm=off under that line for now, you can try reverting back to your first args line once you have the vm+anticheat working.

You also didn't set SCSI Controller = LSI. Change scsihw: virtio-scsi-single to scsihw: lsi. Alternatively, you can also do this from the web interface by clicking on your vm -> hardware -> scsi controller and then selecting an LSI controller.

For getting a real MAC address, check the second link you posted. Once you have a MAC address, you can replace the MAC address 3A:89:03:C9:1D:DA in net0: virtio=3A:89:03:C9:1D:DA,bridge=vmbr0,firewall=1 or by going into the web interface, clicking you vm -> hardware -> network device and pasting the MAC address in there.

I have no Idea if this works, though. That is just how to apply the settings you wanted to set from the second link
 
  • Like
Reactions: Thorvi and jsterr
Can I change an existing virtual machine from VirtIO SCSI controller to LSI after the fact? If I just change the type, my VM is missing the driver and my hard drives aren't recognized. What driver do you use for LSI? Do you have a specific URL?
 
Have you tried leaving it on the virtio scsi controller for now and just doing the second part, replacing the MAC address? I suspect this is more important
 
Yes, I tried this. I only changed my MAC from 00:50:56.... to "a real MAC". But Sniper Elite starts again with a "Cannot run under Virtual Machine.". Graphic card is passthrouged ( hostpcie0 ) and Bluetooth- and keyboard-dongle ( usb0 and usb2 ).

My vmid.conf is:

Code:
agent: 1
args: -cpu host,-hypervisor,kvm=off
bios: ovmf
boot: order=virtio0;net0;ide0
cores: 4
cpu: host
efidisk0: local-lvm:vm-130-disk-0,efitype=4m,pre-enrolled-keys=1,size=4M
hostpci0: 0000:03:00,pcie=1
ide0: none,media=cdrom
machine: pc-q35-7.2
memory: 16384
meta: creation-qemu=6.2.0,ctime=1656872262
name: vmWin10
net0: virtio=3A:89:03:C9:1D:DA,bridge=vmbr0,firewall=1
numa: 0
onboot: 1
ostype: win10
scsi1: local-lvm:vm-130-disk-1,cache=writeback,size=320G
scsihw: virtio-scsi-pci
smbios1: uuid=6ad91a2f-aff3-419a-a1fc-f669693a4589
sockets: 2
tpmstate0: local-lvm:vm-130-disk-2,size=4M,version=v2.0
usb0: host=0b05:190e,usb3=1
usb2: host=046d:c52b,usb3=1
vga: none
virtio0: local-lvm:vm-130-disk-3,size=240G
 
config looks good at a first glance.

I also couldn't get windows 10 or 11 to boot with the LSI controller, nor could I find any drivers newer than for windows 2000. However, I could get Windows (I only tried Windows 10, my guess is 111 works too) to boot with the MegaRAID controller, maybe try that. My guess is that if Sniper Elite sees a "real" SCSI controller instead of the VirtIO one that it won't recognize you are playing in a VM.

Best of luck
 
What specific MegaRAID controller are you referring to? And where do you get the driver from? I am having trouble configuring such a controller for Windows 10.
 
I set up a new Windows 10 VM like here [1]. After configuring the VM and before booting I set the SCSI controller to "MegaRAID SAS 8708EM2" in the web interface hardware tab. The drivers were already loaded in the windows 10 iso I used ("Win10_22H2")

Edit: as an addendum, could be that even with all this anticheat will detect you and won't let you play or, even worse, that they detect you, let you play for a couple of months and then ban you. I take no responsibility for any of that

[1]: https://pve.proxmox.com/wiki/Windows_10_guest_best_practices
 
Last edited:
What specific MegaRAID controller are you referring to? And where do you get the driver from? I am having trouble configuring such a controller for Windows 10.
Hi, you can boot with the LSI controller by changing your drive from scsi to SATA connection type.
 
Thank you Noel that worked!
How did you manage to make it work? I have done every step @noel. said, including changing the virtio scsi to LSI, MAC address change (i think), but Star Citizen EAC still says it cant run on vm.
Update: managed to make it work, editing smbios was the problem, don't forget about that. You can also grab the host bios settings and dump them in
 
Last edited:
edited : sata vdisk type is ok because use Microsoft ahci inbox driver.
scsi controller must be changed because even if no vdisk is set to scsi, the controller is installed.
 
Last edited:
Update: managed to make it work, editing smbios was the problem, don't forget about that. You can also grab the host bios settings and dump them in
Could it be possible to post the content of your vmxxx .conf file ? It will help to see what the controller effect and cpu args you set at to have it work. thanks
 
Could it be possible to post the content of your vmxxx .conf file ? It will help to see what the controller effect and cpu args you set at to have it work. thanks
Unfortunately i dont have that specific config anymore,l what is the problem you are having? maybe i can help
 
While i do see the need to change the controller scsihw: to LSI 935.. or Lsi 810 wasn't it give slower performance as well ?
In the smbios, is putting like: given by O.E.M at sku or at model is needed / help ?

I will try to play with the setting : balloon: 0 if any help as affecting memory ..
 
While i do see the need to change the controller scsihw: to LSI 935.. or Lsi 810 wasn't it give slower performance as well ?
In the smbios, is putting like: given by O.E.M at sku or at model is needed / help ?

I will try to play with the setting : balloon: 0 if any help as affecting memory ..
Well since you are trying to game on a VM, i dont think that using LSI will have much of impact in performances.
Speaking of smbios, yes, it was necessary to put valid informations in there, you can dump your host data and paste them there.
 
Hello everyone!

As you may know some games that use EasyAntiCheat such as New World don't allow running the game from a VM because it caused a bot problem within the game. Now that sucks because I've setup a gaming VM with GPU Passthrough, everything is working flawlessly and I was a bit disapointed when I tried to fire up the game.

Now I've made quite a bit of research to find some info on proxmox and also some other people were able to make it work through Unraid. Here's what I found :

Unraid: https://forums.unraid.net/topic/127...aunch-error-cannot-run-under-virtual-machine/

Proxmox:https://forum.proxmox.com/threads/how-do-i-hide-the-fact-to-windows-that-it-runs-in-a-vm.115627/


Now I've tried to apply those settings to the VM without success, I am what you could called a newbie to the Hypervisor world and I was wondering if you had any idea how to apply those settings and essentially hide the fact that Windows is a VM.

Here's my VM conf:


Thank you very much!
it still work? tried but maybe i'm missing something, what do you mean "Change Bios Vendor String in VM Options." ? i'm a bit newbie on proxmox

or can you share your xml setupw
 
Last edited:
I just went through and updated my Win10 vGPU setup to play Fortnite. The only settings I needed to change were the SMBIOS fields, and putting in a "real" MAC address. I have tweaked these machines with various other settings in the past, so YMMV. I have included my vm.conf file below for reference.

A few notes:
  1. Using the same MAC address as another machine on your network can cause issues, so don't do that. Instead, use the first three octets of a MAC on your network, and leave the last three with whatever Proxmox has. This _should_ ensure there are no duplicate MACs on your network, just be sure to double-check.
    1. Example: If the MAC for your physical machine is 1C:83:41:A1:B2:C3 and your Proxmox VM is B2:74:70:69:F3:A9. Change your VM MAC to be: 1C:83:41:69:F3:A9. You can verify this is a valid MAC by pasting it in a site like https://www.macvendorlookup.com
  2. For the SMBIOS fields, you can simply copy them straight from a physical machine on your network. I have several vGPU VMs, and I used the same info for all of them except for the UUID (just in case).
    1. Note: These fields are encoded to base64 text in the vm.conf file, but show as human-readable when edited in the Proxmox GUI.
    2. Interestingly, my Minisforum machine had several fields set to "Default string". This worked for me, but feel free to substitute as needed.
    3. If you have a Linux machine with root access, you can use the below dmidecode commands for the matching fields:
      1. UUID: dmidecode -s system-uuid
      2. Manufacturer: dmidecode -s system-manufacturer
      3. Product: dmidecode -s system-product-name
      4. Version: dmidecode -s system-version
      5. Serial: dmidecode -s system-serial-number
      6. SKU: dmidecode -s system-sku-number
      7. Family: dmidecode -s system-family
Here is one of my vm.conf files after all of this (some fields REDACTED to protect the innocent):
Code:
agent: 1,fstrim_cloned_disks=1
args: -uuid 00000000-0000-0000-0000-000000000501
balloon: 0
bios: ovmf
boot: order=ide2;sata0;net0
cores: 8
cpu: host
efidisk0: local-zfs:vm-501-disk-0,efitype=4m,pre-enrolled-keys=1,size=1M
hostpci0: 0000:02:00.0,mdev=nvidia-261
ide2: none,media=cdrom
machine: pc-q35-6.1
memory: 20480
meta: creation-qemu=6.1.1,ctime=1649086086
name: VDI-501
net0: virtio=1C:83:41:FF:FF:FF,bridge=vmbr1,firewall=1,tag=10
numa: 1
ostype: win10
sata0: datapool3:vm-501-disk-0,cache=writeback,discard=on,size=180G,ssd=1
sata1: local-zfs:vm-501-disk-1,size=500G
scsihw: virtio-scsi-single
smbios1: uuid=REDACTED,manufacturer=QkVTU1RBUiBURUNIIExJTUlURUQ=,product=SE04MA==,version=NS4xNg==,serial=RGVmYXVsdCBzdHJpbmc=,sku=RGVmYXVsdCBzdHJpbmc=,family=RGVmYXVsdCBzdHJpbmc=,base64=1
sockets: 1
vga: none
vmgenid: REDACTED

Hope this helps!
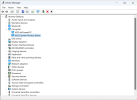
Well, I did everything you did, and it finally changed from QEMU Device to ASUS System Device. However, loading Halo Infinite still causes it to cancel out and close the game. I cannot activate "args: -cpu host,-hypervisor,kvm=off" as my computer gets stuck in the windows boot logo. Any other ideas I can try?

1702339655787.png
 

About

The Proxmox community has been around for many years and offers help and support for Proxmox VE, Proxmox Backup Server, and Proxmox Mail Gateway.
We think our community is one of the best thanks to people like you!

Get your subscription!

The Proxmox team works very hard to make sure you are running the best software and getting stable updates and security enhancements, as well as quick enterprise support. Tens of thousands of happy customers have a Proxmox subscription. Get yours easily in our online shop.

Buy now!