kenzim

New Member
Dec 26, 2020
11
8
3
29
Hi guys, I have gotten cloud init to work with windows with some modification to proxmox and a windows template. since all of the other threads regarding this don't work anymore, at least i couldn't get them to, i thought i would share what i did.

the part is making proxmox save windows passwords as plaintext, or else the template cannot read them. i did this by editing /usr/share/perl5/PVE/API2/Qemu.pm

old code, line 1022:
Perl:
if (defined(my $cipassword = $param->{cipassword})) {
    # Same logic as in cloud-init (but with the regex fixed...)
    $param->{cipassword} = PVE::Tools::encrypt_pw($cipassword)
        if $cipassword !~ /^\$(?:[156]|2[ay])(\$.+){2}/;
    }
new code, replace above:
Perl:
my $conf = PVE::QemuConfig->load_config($vmid);
my $ostype = $conf->{ostype};
if (defined(my $cipassword = $param->{cipassword})) {
    # Same logic as in cloud-init (but with the regex fixed...)
    if (!(PVE::QemuServer::windows_version($ostype))) {
        $param->{cipassword} = PVE::Tools::encrypt_pw($cipassword)
            if $cipassword !~ /^\$(?:[156]|2[ay])(\$.+){2}/;
    }
}

then i changed some code to edit the metadata passed to the VM
line 210 in 
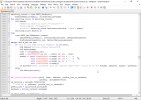
/usr/share/perl5/PVE/QemuServer/Cloudinit.pm replace the old configdrive2_metadata function with this:
Perl:
sub configdrive2_metadata {
        my ($conf, $vmid, $user, $network) = @_;
        my $uuid = Digest::SHA::sha1_hex($user.$network);
        my $password = $conf->{cipassword};
        my ($hostname, $fqdn) = get_hostname_fqdn($conf, $vmid);
        my $startConfig =  <<"EOF";
{
    "hostname": "$hostname",
    "uuid": "$uuid",
    "admin_pass": "$password",
EOF
        if (defined(my $keys = $conf->{sshkeys})) {
            $startConfig .= "     \"network_config\": { \"content_path\": \"/content/0000\" },\n";
            $keys = URI::Escape::uri_unescape($keys);
            $keys = [map { my $key = $_; chomp $key; $key } split(/\n/, $keys)];
            $keys = [grep { /\S/ } @$keys];
            $startConfig .= "     \"keys\": [\n";
            $startConfig .= "         {\n";

            my $keyCount = @$keys;
            for (my $i=0; $i < $keyCount; $i++) {
            #    $startConfig .= "  $keyCount   "
                if ($i == $keyCount-1){
                    $startConfig .= "           \"key-$i\": \"".$keys->[$i]."\"\n";
                } else {
                    $startConfig .= "           \"key-$i\": \"".$keys->[$i]."\",\n";
                }
            }

            $startConfig .= "         }\n";
            $startConfig .= "     ]\n";

        } else{
            $startConfig .= "     \"network_config\": { \"content_path\": \"/content/0000\" }\n";
        }
        $startConfig.= "}";
        return $startConfig;

}

this passes in hostname and ssh keys, i will get ssh keys working inside soon. it also adds the password here.
below this function, in generate_configdrive2 function, change:
Perl:
if (!defined($meta_data)) {
    $meta_data = configdrive2_gen_metadata($user_data, $network_data);
    }
to
Perl:
if (!defined($meta_data)) {
    $meta_data = configdrive2_metadata($conf, $vmid, $user_data, $network_data);
    }
this is because it needs some extra arguments now.

one last step here, on line 200 and 204 in this file, in the function configdrive2_network proxmox has a small typo for dns servers and search domain (search domain not working yet, i will be back soon). change the _ to - so it looks like this:
Perl:
    if ($nameservers && @$nameservers) {
    $nameservers = join(' ', @$nameservers);
    $content .= "        dns-nameservers $nameservers\n";
    }
    if ($searchdomains && @$searchdomains) {
    $searchdomains = join(' ', @$searchdomains);
    $content .= "        dns-search $searchdomains\n";
    }
without this dns will not set inside.

now we can start creating a windows template. download windows server iso and install, install qemu guest agent and virtio tools etc, normal stuff. you may want to snapshot now also in case you mess up some next steps or you want this clean image available as well.
next install cloudbase-init. make sure you have a serial port on your VM and you choose com1 during install for logging. pick Administrator as username during install. do not run sysprep or reboot afterwards. snapshot again if you like.
we will need to edit some cloudbase code to make things work better now. first edit is making the cloud init drive eject after cloudbase is done, so users cant see it for added security, especially since password is plaintext now. follow this guide to that https://ask.cloudbase.it/question/2939/how-to-umount-cd-drive-after-cloudbase-init-completed/
now we can edit cloud base config at C:\Program Files\Cloudbase Solutions\Cloudbase-Init\conf. you should read docs on what you can do here. you will want the configdrive meta data service, and inject password = no if you want to be able to rdp without changing pw over vnc. enable what plugins you would like here. below is example of mine
Code:
[DEFAULT]
username=Administrator
groups=Administrators
inject_user_password=no
config_drive_raw_hhd=true
config_drive_cdrom=true
config_drive_vfat=true
bsdtar_path=C:\Program Files\Cloudbase Solutions\Cloudbase-Init\bin\bsdtar.exe
mtools_path=C:\Program Files\Cloudbase Solutions\Cloudbase-Init\bin\
verbose=true
debug=true
logdir=C:\Program Files\Cloudbase Solutions\Cloudbase-Init\log\
logfile=cloudbase-init.log
default_log_levels=comtypes=INFO,suds=INFO,iso8601=WARN,requests=WARN
logging_serial_port_settings=COM1,115200,N,8
mtu_use_dhcp_config=false
ntp_use_dhcp_config=false
metadata_services=cloudbaseinit.metadata.services.configdrive.ConfigDriveService
local_scripts_path=C:\Program Files\Cloudbase Solutions\Cloudbase-Init\LocalScripts\
check_latest_version=true
plugins=cloudbaseinit.plugins.common.networkconfig.NetworkConfigPlugin,cloudbaseinit.plugins.common.mtu.MTUPlugin,cloudbaseinit.plugins.common.sethostname.SetHostNamePlugin,cloudbaseinit.plugins.windows.extendvolumes.ExtendVolumesPlugin,cloudbaseinit.plugins.common.sshpublickeys.SetUserSSHPublicKeysPlugin,cloudbaseinit.plugins.common.setuserpassword.SetUserPasswordPlugin

after, make sure the unattend conf matches the normal conf. then, run sysprep with commands below:
Code:
cd C:\Program Files\Cloudbase Solutions\Cloudbase-Init\conf

C:\Windows\System32\sysprep\sysprep.exe /generalize /oobe /unattend:Unattend.xml
then, convert to template, and try it out. open a serial console to see logging if things fail. post your errors here if its not working and I will try to help.
 
Last edited:
Thanks for the above guide, Just want to clarify some stuff.

In regards to your cloudinit conf:
Code:
...
inject_user_password=no
...

Should this be "no" or "false"?

Also, after installing Windows server 2019 with cloudinit as per above. I set the following:


Code:
qm set 9000  --ide2 local:cloudinit
qm set 9000 -citype configdrive2
qm set 9000 --boot c --bootdisk scsi0

and then set (in the Proxmox UI) the User to be Administrator and the password to be the same as the windows Administrator password I already had on the VM and the IP settings.

After I do sysprep and reboot, I seem to be locked out from logging in as Administrator, did I miss something?
 
Watch the serial port and see what it says there. If you put no for PW inject no then you won't have to change password on first login. Check cloudbase docs for more info.

Post serial port log and maybe I can help more
 
@yswery try to regenerate the cloudinit image and set the password again. Worked for me.

@kenzim Can you provide your configdrive.py file ? Im doing something wrong with this sintax

Also, im stuck at sysrep, the VM keeps rebooting. I will post the serial logs soon.
 
I've got this mostly working, however I can't get the user password or DNS to set.. even with the edits.
 
Last edited:
  • Like
Reactions: Bruno Garcia
Hi guys, sorry for my late reply. There was an error in my original post now that I look back. In cloudbase configuration, its not inject_user_password that should be no, its first_logon_behaviour that should be no. inject_user_password should be yes or True. inject_user_password=no means that you can login without being forced to change password as cloudbase will force a pw change if the pw is injected using cleartext.
@DemiNe0 can you post the network configuration that's generated on the configdrive and also the serial port logs? thanks
if anyone needs faster reply they can dm me on discord at Kenzi#1337
 
@kenzim When trying network settings like
IP: 10.0.0.2/24
GW: 10.0.0.1

things seem to work all ok, however when I try to do a /32 which is what I need like:

IP: 10.0.0.2/32
GW: 10.30.40.1

It just ends up setting the windows machine with blank IP addresses and blank GW, do you know anything about this?
 
Last edited:
@kenzim When trying network settings like
IP: 10.0.0.2/24
GW: 10.0.0.1

things seem to work all ok, however when I try to do a /32 which is what I need like:

IP: 10.0.0.2/32
GW: 10.30.40.1

It just ends up setting the windows machine with blank IP addresses and blank GW, do you know anything about this?
10.0.0.2/32 with 10.30.40.1 as gw?
you can't call /32 a network, with what does it communicate, itself? xD
 
10.0.0.2/32 with 10.30.40.1 as gw?
you can't call /32 a network, with what does it communicate, itself? xD
You can bro

I had this as well, using it with some server provider where gw was not on the same subnet. If you wade through the cloudbase python files, you can see where it uses the windows wmi interface to set the IP. if we catch the error windows spits at us for a gw outside of subnet - which is actually perfectly fine and accepted use, we can just use commands to set the IP which will not get angry at us. I attached a picture of the code edit I made, it was a while ago but I am pretty sure you just need to add the try clause for the IP set and then add the except part in which will add your ip.
 

Attachments

  • unknown (1).png
    unknown (1).png
    260.3 KB · Views: 186
  • Like
Reactions: yswery
i understand that you can do it in theory, but how does the server finds the route?
cause the gw is in another network, without a route to this network.
This can't work bro xD

It's like if you drive somewhere, but you don't know in which direction to drive xD

you need at least to define a route to your gw. but that doesn't work with /32 too xD
So in my head that doesn't makes sense, probably the script works as expected, but windows doesn't do it, because there is a check?
well its not like a computer needs to know the exact route to get there like I need the route to get to the supermarket, the computer is just sending a packet down the line addresses to that IP address. by giving it an gw outside of the ips subnet it just sends the packet there still and doesn't think any further about it. it trusts that you've put in an ip address that exists that someone else somewhere on the attached network will pick up. that's how it got explained to me at least. when you go to set a gateway like this in windows control panel it will give you a warning you have to confirm, but unfortunately the windows python package does not let you confirm this, perhaps it does but cloudbase has not done it.
 
You can bro

I had this as well, using it with some server provider where gw was not on the same subnet. If you wade through the cloudbase python files, you can see where it uses the windows wmi interface to set the IP. if we catch the error windows spits at us for a gw outside of subnet - which is actually perfectly fine and accepted use, we can just use commands to set the IP which will not get angry at us. I attached a picture of the code edit I made, it was a while ago but I am pretty sure you just need to add the try clause for the IP set and then add the except part in which will add your ip.
This try/catch solution worked perfectly! thank you so much for the help!

you need at least to define a route to your gw. but that doesn't work with /32 too xD
Windows (and linux) automatically sets up a static route and pushes everything through that IP address that is outside your subnet even when you set your netmask to /32 on ipv4. Windows does give you a popup warning telling you about it, but it does do the routing all fine
 
okay, i believe you both, i mean the packet probably get pushed out, but without a destination macaddress, since the computer doesn't know it. So there is no layer 2 on the pc itself. But probably the switch behind it does the correct job xD

however, with the cloudinit script, i believe there comes an error or warning, because the gw is outside the network and that's why it doesn't work. So you need probably to debug it and modify the script.
Check my attached image above bro
 
@kenzim I just wanted to say thank you for this!

I spent two days trying to get Windows deployment working on Proxmox after trying many of the suggestions mentioned and your solution fixed all these issues.

if proxmox staff could look into these changes and get them published, and a how to based on these instructions then this would save many a lot of time
 
@tuxis

I reached out to ModulesGarden and asked them how they were handling the deployment of Windows VM's and they advised that no changes are required to Proxmox as per this thread.

We're receiving a new server next and I'll test their suggestion / instructions and see if they work and if so update this thread.
 
@kenzim If this is stable and correct, can you please create a bugreport and patch on https://bugzilla.proxmox.com/ so Proxmox staff can work on it?
Ill take a look when I have some time

@tuxis

I reached out to ModulesGarden and asked them how they were handling the deployment of Windows VM's and they advised that no changes are required to Proxmox as per this thread.

We're receiving a new server next and I'll test their suggestion / instructions and see if they work and if so update this thread.
I use that plugin as well, and it has bugs. There's an option for windows VMs and I'm pretty sure it uses the guest agent to apply settings. Cloud init is preferable though because it works with any deployment method, and you don't need a separate product config for Window servers.
 
I use that plugin as well, and it has bugs. There's an option for windows VMs and I'm pretty sure it uses the guest agent to apply settings. Cloud init is preferable though because it works with any deployment method, and you don't need a separate product config for Window servers.
We are sorry to hear about your experience. If there are any bugs in our Proxmox modules, they should be fixed, with no doubt. Please reach out to our support team at https://www.modulesgarden.com/support/ticket/general-support so we can assist you further and hopefully eliminate any obstacles.

With reference to the cloud-init support, we would love to have this option working and available, but currently this is beyond our control. As soon as it available, we will definitely equip our modules with this feature. We have attempted to create some sort of workaround with utilization of qemu quest agent, until cloudbase-init becomes possible to implement.
 

About

The Proxmox community has been around for many years and offers help and support for Proxmox VE, Proxmox Backup Server, and Proxmox Mail Gateway.
We think our community is one of the best thanks to people like you!

Get your subscription!

The Proxmox team works very hard to make sure you are running the best software and getting stable updates and security enhancements, as well as quick enterprise support. Tens of thousands of happy customers have a Proxmox subscription. Get yours easily in our online shop.

Buy now!