ZFS mirror: replace bad disk

orosmannaro

Well-Known Member
Jan 6, 2013
54
3
48
I have read some posts on how to replace a bad disk of a ZFS mirror. But I have to work on an up and running production system, so I can't make any mistakes. This is my first time doing this, so I'm asking for help.

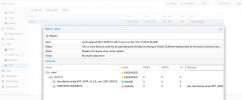
The damaged disk has already been replaced and the current state of Proxmox's disks is as shown in the attached screenshots.

Some other info:

Bash:
zpool status

Code:
  pool: rpool
 state: DEGRADED
status: One or more devices could not be used because the label is missing or
    invalid.  Sufficient replicas exist for the pool to continue
    functioning in a degraded state.
action: Replace the device using 'zpool replace'.
   see: https://openzfs.github.io/openzfs-docs/msg/ZFS-8000-4J
  scan: scrub repaired 0B in 00:00:37 with 0 errors on Sun Oct 10 00:24:38 2021
config:

    NAME                                                  STATE     READ WRITE CKSUM
    rpool                                                 DEGRADED     0     0     0
      mirror-0                                            DEGRADED     0     0     0
        ata-ATP_SATA_III_2.5_inch_SSD_005212000983-part3  ONLINE       0     0     0
        2358753571505409374                               UNAVAIL      0     0     0  was /dev/disk/by-id/ata-ATP_SATA_III_2.5_inch_SSD_005212001210-part3


Bash:
ls -l /dev/disk/by-id/

Code:
lrwxrwxrwx 1 root root  9 Nov  9 10:47 ata-ATP_SATA_III_2.5_inch_SSD_005212000983 -> ../../sda
lrwxrwxrwx 1 root root 10 Nov  9 10:47 ata-ATP_SATA_III_2.5_inch_SSD_005212000983-part1 -> ../../sda1
lrwxrwxrwx 1 root root 10 Nov  9 10:47 ata-ATP_SATA_III_2.5_inch_SSD_005212000983-part2 -> ../../sda2
lrwxrwxrwx 1 root root 10 Nov  9 10:47 ata-ATP_SATA_III_2.5_inch_SSD_005212000983-part3 -> ../../sda3
lrwxrwxrwx 1 root root  9 Nov  9 10:47 ata-KINGSTON_SA400S37120G_50026B7784331526 -> ../../sdb
lrwxrwxrwx 1 root root  9 Nov  9 10:47 wwn-0x502b2a201d1c1b1a -> ../../sdb
lrwxrwxrwx 1 root root  9 Nov  9 10:47 wwn-0x5141357010019399 -> ../../sda
lrwxrwxrwx 1 root root 10 Nov  9 10:47 wwn-0x5141357010019399-part1 -> ../../sda1
lrwxrwxrwx 1 root root 10 Nov  9 10:47 wwn-0x5141357010019399-part2 -> ../../sda2
lrwxrwxrwx 1 root root 10 Nov  9 10:47 wwn-0x5141357010019399-part3 -> ../../sda3

Can you suggest me how to proceed?

Thank you very much.
 

Attachments

  • PVE_ZFS.png
    PVE_ZFS.png
    91.3 KB · Views: 33
  • PVE_disk.png
    PVE_disk.png
    66.5 KB · Views: 33
Last edited:
But I have to work on an up and running production system, so I can't make any mistakes. This is my first time doing this, so I'm asking for help.
I'd recommend installing a test PVE with ZFS inside of PVE itself with two virtual disks, so that you can test any ZFS related thing before running it in your production environment.

Can you suggest me how to proceed?
Do you know which disk is the defect one and replaced that physically already?
 
Do you know which disk is the defect one and replaced that physically already?

Yes: /dev/sda is the good disk and /dev/sdb is the new installed disk. I have already do this (copy partitioning layout and assign a new GUID):

Bash:
sgdisk /dev/sda -R /dev/sdb
sgdisk -G /dev/sdb

Now I'm checking the correct way to run zpool replace command (I have some doubts about the correct ID for the <old ZFS partition>: 2358753571505409374 or /dev/disk/by-id/ata-ATP_SATA_III_2.5_inch_SSD_005212001210-part3
 
Bash:
ls -l /dev/disk/by-id/

Code:
total 0
lrwxrwxrwx 1 root root  9 Nov 10 17:52 ata-ATP_SATA_III_2.5_inch_SSD_005212000983 -> ../../sda
lrwxrwxrwx 1 root root 10 Nov 10 17:52 ata-ATP_SATA_III_2.5_inch_SSD_005212000983-part1 -> ../../sda1
lrwxrwxrwx 1 root root 10 Nov 10 17:52 ata-ATP_SATA_III_2.5_inch_SSD_005212000983-part2 -> ../../sda2
lrwxrwxrwx 1 root root 10 Nov 10 17:52 ata-ATP_SATA_III_2.5_inch_SSD_005212000983-part3 -> ../../sda3
lrwxrwxrwx 1 root root  9 Nov 10 17:53 ata-KINGSTON_SA400S37120G_50026B7784331526 -> ../../sdb
lrwxrwxrwx 1 root root 10 Nov 10 17:53 ata-KINGSTON_SA400S37120G_50026B7784331526-part1 -> ../../sdb1
lrwxrwxrwx 1 root root 10 Nov 10 17:53 ata-KINGSTON_SA400S37120G_50026B7784331526-part2 -> ../../sdb2
lrwxrwxrwx 1 root root 10 Nov 10 17:53 ata-KINGSTON_SA400S37120G_50026B7784331526-part3 -> ../../sdb3
lrwxrwxrwx 1 root root  9 Nov 10 17:53 wwn-0x502b2a201d1c1b1a -> ../../sdb
lrwxrwxrwx 1 root root 10 Nov 10 17:53 wwn-0x502b2a201d1c1b1a-part1 -> ../../sdb1
lrwxrwxrwx 1 root root 10 Nov 10 17:53 wwn-0x502b2a201d1c1b1a-part2 -> ../../sdb2
lrwxrwxrwx 1 root root 10 Nov 10 17:53 wwn-0x502b2a201d1c1b1a-part3 -> ../../sdb3
lrwxrwxrwx 1 root root  9 Nov 10 17:52 wwn-0x5141357010019399 -> ../../sda
lrwxrwxrwx 1 root root 10 Nov 10 17:52 wwn-0x5141357010019399-part1 -> ../../sda1
lrwxrwxrwx 1 root root 10 Nov 10 17:52 wwn-0x5141357010019399-part2 -> ../../sda2
lrwxrwxrwx 1 root root 10 Nov 10 17:52 wwn-0x5141357010019399-part3 -> ../../sda3

So, based on the data I posted earlier, the command should be:

Bash:
zpool replace -f rpool 2358753571505409374 ata-KINGSTON_SA400S37120G_50026B7784331526-part3

Quite right?
 
  • Like
Reactions: takeokun

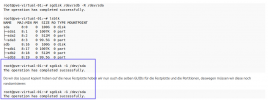
Maybe I'm wrong, but I struggle to trust the documentation as it contains gross errors like the one shown in the attached screenshot, because I have the feeling that things have been written with little care ...

Also the zpool replace command uses the entire path of the devices (/dev/disk/by-id/ ...), while it seems to me that the correct syntax only requires the IDs of the devices ...
 

Attachments

  • Screenshot from 2021-11-10 23-59-07.png
    Screenshot from 2021-11-10 23-59-07.png
    82.9 KB · Views: 39
Last edited:

About

The Proxmox community has been around for many years and offers help and support for Proxmox VE, Proxmox Backup Server, and Proxmox Mail Gateway.
We think our community is one of the best thanks to people like you!

Get your subscription!

The Proxmox team works very hard to make sure you are running the best software and getting stable updates and security enhancements, as well as quick enterprise support. Tens of thousands of happy customers have a Proxmox subscription. Get yours easily in our online shop.

Buy now!