Virtualizing PFSense through proxmox (plus how to install tar.gz file?)

Your mainboard doesn't got onboard NICs? Wasn't able to see another NIC beside the dual 10Gbit one.

So your NIC is "03:00" with the functions "03:00.0" and "03:00.1":
Code:
03:00.0 Ethernet controller: Broadcom Limited NetXtreme II BCM57810 10 Gigabit Ethernet (rev 10)
03:00.1 Ethernet controller: Broadcom Limited NetXtreme II BCM57810 10 Gigabit Ethernet (rev 10)

And the NIC got it's own group "31" which no other device is using...
Code:
/sys/kernel/iommu_groups/31/devices/0000:03:00.0
/sys/kernel/iommu_groups/31/devices/0000:03:00.1
...but both functions are in the same group. So you should be able to pass the NIC to a pfsense VM but I think only both functions together. So you would need to pass both ports to the VM at the same time.

If you don'T got another onboard NIC that could be problematic, because as soon as you passthrough the complete NIC with both ports to the VM your host woulnd't have any NIC left, so you wouldn't be able to use the PVE webUI/SSH anymore and your host would be offline.
And yes, if you blacklist the driver of your only NIC PVE can't use it anymore, so you locked yourself out of the host. You could attach a display/keyboard or use a BMS to undo the driver blacklisting to get access again.
 
Last edited:
There's an official 'how to' here

https://docs.netgate.com/pfsense/en/latest/recipes/virtualize-proxmox-ve.html

I think trying to do pci pass-through here is unhelpful and un-necessary
yeah i followed that guide for the setup as well, but once i get in to the web gui, create my firewall rules to allow traffic, set up dhcp server etc... then boot my isp router into bridge mode i lose all connection to my network and have no way of getting back into the isp modem/router settings to turn bridge mode off without doing a factory reset

thats why i assumed (along with everything i've searched up through forums and what everyone has told me) that i need to do pci passthrough. thats why im getting so confused haha. its like 15 things say i need passthrough, which isnt working, then 2 things say i dont, which gets me a little further, but in the end doesnt work either. its driving me nuts haha
 
Your Mainboards doesn't got onboard NICs? Wasn't able to see another NIC beside the dual 10Gbit one.

So your NIC is "03:00" with the functions "03:00.0" and "03:00.1":
Code:
03:00.0 Ethernet controller: Broadcom Limited NetXtreme II BCM57810 10 Gigabit Ethernet (rev 10)
03:00.1 Ethernet controller: Broadcom Limited NetXtreme II BCM57810 10 Gigabit Ethernet (rev 10)

And the NIC got it's own group...
Code:
/sys/kernel/iommu_groups/31/devices/0000:03:00.0
/sys/kernel/iommu_groups/31/devices/0000:03:00.1
...but both functions are in the same group. So you should be able to pass the NIC to a pfsense VM but I think only both functions together. So you would need to pass both ports to the VM at the same time.

If you don'T got another onboard NIC that could be problematic, because as soon as you passthrough the complete NIC with both ports to the VM your host woulnd't have any NIC left, so you wouldn't be able to use the PVE webUI/SSH anymore and your host would be offline.
i still have the old 1gb 4 port nic that the server came with. as i said when i posted the pictures, i can plug it in on the opposite side of the bracket of the 10g nic, but it sits about 2" back from the back of the server. like the port plug is recessed quite a bit further, so i wasnt sure if that was meant for something else or if i could still plug it in?

whats your thoughts? i can plug in that other nic as well to try. then what? do i need to plug in an ethernet cord to that 1gb nic? will the 10g nic only be able to be utilized by pfsense vm? or would i just need to add that pci device to each vm?

sorry again, probably simple questions, but just trying to wrap my head around this
 
If you passthrough a device using PCI passthrough (atleast without SR-IOV) this device can't be used anymore by the host itself nor any other VM. So yes, if you passthrough that NIC to pfsense neither the host nor any other VM would have any internet/network access if you don't got another NIC for the host itself, that you don't passthrough.
If that NIC supports SR-IOV the physical NIC could be split up into several virtual functions and you could passthrough the function to different NICs or use it with the host. So in your case passthrough would only make sense if your NIC would support SR-IOV.
 
Last edited:
If you passthrough a device using PCI passthrough (atleast without SR-IOV) this device can't be used anymore by the host itself nor any other VM. So yes, if you passthrough that NIC to pfsense neither the host nor any other VM would have any internet/network access if you don't got another NIC for the host itself, that you don't passthrough.
If that NIC supports SR-IOV the physical NIC could be split up into several virtual functions and you could passthrough the function to different NICs or use it with the host. So in your case passthrough would only make sense if your NIC would support SR-IOV.
i have sr-iov enabled and i followed the instructions to passthrough with sr-iov as well.

  • The second, more generic, approach is using the sysfs. If a device and driver supports this you can change the number of VFs on the fly. For example, to setup 4 VFs on device 0000:01:00.0 execute:
    # echo 4 > /sys/bus/pci/devices/0000:01:00.0/sriov_numvfs
    To make this change persistent you can use the ‘sysfsutils` Debian package. After installation configure it via /etc/sysfs.conf or a `FILE.conf’ in /etc/sysfs.d/.

did some searching and says to change the number to echo 64 for this nic, then added file to /etc/sysfs.d/ - "echo 64 > /sys/bus/pci/devices/0000:03:00.0/sriov_numvfs" is what i used
 
Last edited:
If you passthrough a device using PCI passthrough (atleast without SR-IOV) this device can't be used anymore by the host itself nor any other VM. So yes, if you passthrough that NIC to pfsense neither the host nor any other VM would have any internet/network access if you don't got another NIC for the host itself, that you don't passthrough.
If that NIC supports SR-IOV the physical NIC could be split up into several virtual functions and you could passthrough the function to different NICs or use it with the host. So in your case passthrough would only make sense if your NIC would support SR-IOV.
do i NEED to use passthrough? is there not a way to just install and set it up as is without having to passthrough anything, so the host "router" is the server/pfsense vm, modem is connected to server sfp+ port 1, server to switch through sfp+ port 2?

i've legit had it running using that setup, but i get zero connectivity to anything connected to it once the isp modem gets switched to bridge mode. up to that point, i can make it to the web gui and play with the pfsense settings, but i get no connections aside from "pc can only talk to devices on the network". cant goto any websites aside from the pfsense gui and proxmox. made sure firewall rules were put into place to allow traffic, dns resolver was working properly, dhcp server working, ips were showing up for the devices that were connected through hardline, but still no connectivity. i thought maybe i was getting issues because the isp modem wasn't in bridge mode, but once i changed it i lost all connectivity completely with no way to get back into the isp modem settings without factory resetting it and starting over
 
do i NEED to use passthrough? is there not a way to just install and set it up as is without having to passthrough anything, so the host "router" is the server/pfsense vm, modem is connected to server sfp+ port 1, server to switch through sfp+ port 2?
There is an argument for passthrough from a security standpoint but, no you don't need to use passthrough - the performance loss is negligible and it's just another step that can go wrong.

I think it's just the networking setup that's getting you confused. Btw - are you british and on virginmedia by any chance?

do you have a seperate network switch or is everything still plugged into the isp router, again do you have alternate wifi provision as switching the isp router to 'bridge' mode will disable the wifi (at least it does on the Virginmedia ones here in the UK)
 
Last edited:
There is an argument for passthrough from a security standpoint but, no you don't need to use passthrough - the performance loss is negligible and it's just another step that can go wrong.

I think it's just the networking setup that's getting you confused. Btw - are you british and on virginmedia by any chance?

do you have a seperate network switch or is everything still plugged into the isp router, again do you have alternate wifi provision as switching the isp router to 'bridge' mode will disable the wifi (at least it does on the Virginmedia ones here in the UK)
no, i'm in canada on shaw internet

i've got 2 switches, but im only using one at the moment. i have the modem/router plugged into the server right now and server plugged into the switch.

i've got unifi access points, but as of right now, with the modem plugged into the server and not the switch, i have no network connectivity to any of my switch ports. i can only run off wifi on the isp router for connection. thats where my newest issue lies. if i start the pfsense setup in bridge mode, i get no connection and cant get to the web gui. but if i leave bridge mode off, i can get to the gui and change settings, but as soon as i turn it on everything drops
 
This how I suggest you proceed.

Download the pfsense ISO image onto a laptop.

On your server, plug the 10Gb LAN port into your switch, install proxmox on the server and give it an IP address of 192.168.100.252/24, gateway 192.168.100.254. Plug the laptop into the switch and give it an IP address of 192.168.100.100/24 with a gateway of 192.168.100.254. Dns settings should be something public like google's DNS servers at 8.8.8.8 or 8.8.4.4. Verify you can reach the proxmox gui at 192.168.100.252 and upload the pfsense iso onto the iso store in proxmox. At this point your proxmox host won't be able to reach the internet.

Create a second vmbr1 without an IP address on the second NIC (I'd probably use one of the original 4 port Gigabit nic's unless you happen to have really high speed internet - not all 10Gb cards will negotiate down to 1Gb) - label this as WAN on the proxmox host so you know which is which and plug this nic into a port on the ISP router.

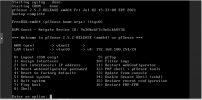
Create the VM for pfsense, with two nics - one on Vmbr0 and one on Vmbr1, using the Virtio network type, and install pfsense as per the defaults. Once the VM has rebooted, note which is the LAN port on Vmbr0 (probably will be net0) on the hardware page for the VM. Go back to the shell prompt for the VM and assign the IP address 192.168.100.254/24 to whichever was the LAN port - if it was net0 then pfsense will call it vtnet0. The WAN port (which will probably be vtnet1) should be left to auto-assign by dhcp.

You should now be able to sign into pfsense on 192.168.100.254 from your laptop. Two immediate changes need to be made
1. Navigate to System > Advanced, Networking tab / Locate the Networking Interfaces section / Check Disable hardware checksum offload /
Click Save
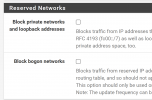
2. Navigate to Interfaces > WAN interface / Scroll down to Reserved Networks / Untick the option 'Block private networks and loopback addresses

Reboot pfsense, your laptop should now be able to ping an internet ip - i.e 8.8.8.8 or 1.1.1.1 and also should be able to display webpages etc. Your proxmox host should now be able to do updates as well.

You should now be able to setup a dhcp server in pfsense to hand out ip's in the same 192.168.100.x range with a default gateway of 192.168.100.254, then anything plugged into the switch should get an ip in that range and route via the pfsense VM. Equally, anything plugged into the router will continue to work as it did before.
 
Last edited:
This how I suggest you proceed.

Download the pfsense ISO image onto a laptop.

On your server, plug the 10Gb LAN port into your switch, install proxmox on the server and give it an IP address of 192.168.100.252/24, gateway 192.168.100.254. Plug the laptop into the switch and give it an IP address of 192.168.100.100/24 with a gateway of 192.168.100.254. Dns settings should be something public like google's DNS servers at 8.8.8.8 or 8.8.4.4. Verify you can reach the proxmox gui at 192.168.100.252 and upload the pfsense iso onto the iso store in proxmox. At this point your proxmox host won't be able to reach the internet.

Create a second vmbr1 without an IP address on the second NIC (I'd probably use one of the original 4 port Gigabit nic's unless you happen to have really high speed internet - not all 10Gb cards will negotiate down to 1Gb) - label this as WAN on the proxmox host so you know which is which and plug this nic into a port on the ISP router.

Create the VM for pfsense, with two nics - one on Vmbr0 and one on Vmbr1, using the Virtio network type, and install pfsense as per the defaults. Once the VM has rebooted, note which is the LAN port on Vmbr0 (probably will be net0) on the hardware page for the VM. Go back to the shell prompt for the VM and assign the IP address 192.168.100.254/24 to whichever was the LAN port - if it was net0 then pfsense will call it vtnet0. The WAN port (which will probably be vtnet1) should be left to auto-assign by dhcp.

You should now be able to sign into pfsense on 192.168.100.254 from your laptop. Two immediate changes need to be made
1. Navigate to System > Advanced, Networking tab / Locate the Networking Interfaces section / Check Disable hardware checksum offload /
Click Save
2. Navigate to Interfaces > WAN interface / Scroll down to Reserved Networks / Untick the option 'Block private networks and loopback addresses

Reboot pfsense, your laptop should now be able to ping an internet ip - i.e 8.8.8.8 or 1.1.1.1 and also should be able to display webpages etc. Your proxmox host should now be able to do updates as well.

You should now be able to setup a dhcp server in pfsense to hand out ip's in the same 192.168.100.x range with a default gateway of 192.168.100.254, then anything plugged into the switch should get an ip in that range and route via the pfsense VM. Equally, anything plugged into the router will continue to work as it did before.
I got it working!

But lost connection to proxmox web gui when I put the modem into bridge mode. Changed the IP address to the new network through command line in hosts and network interfaces, but typed the wrong gateway now I have no connection again lmao
 
This how I suggest you proceed.

Download the pfsense ISO image onto a laptop.

On your server, plug the 10Gb LAN port into your switch, install proxmox on the server and give it an IP address of 192.168.100.252/24, gateway 192.168.100.254. Plug the laptop into the switch and give it an IP address of 192.168.100.100/24 with a gateway of 192.168.100.254. Dns settings should be something public like google's DNS servers at 8.8.8.8 or 8.8.4.4. Verify you can reach the proxmox gui at 192.168.100.252 and upload the pfsense iso onto the iso store in proxmox. At this point your proxmox host won't be able to reach the internet.

Create a second vmbr1 without an IP address on the second NIC (I'd probably use one of the original 4 port Gigabit nic's unless you happen to have really high speed internet - not all 10Gb cards will negotiate down to 1Gb) - label this as WAN on the proxmox host so you know which is which and plug this nic into a port on the ISP router.

Create the VM for pfsense, with two nics - one on Vmbr0 and one on Vmbr1, using the Virtio network type, and install pfsense as per the defaults. Once the VM has rebooted, note which is the LAN port on Vmbr0 (probably will be net0) on the hardware page for the VM. Go back to the shell prompt for the VM and assign the IP address 192.168.100.254/24 to whichever was the LAN port - if it was net0 then pfsense will call it vtnet0. The WAN port (which will probably be vtnet1) should be left to auto-assign by dhcp.

You should now be able to sign into pfsense on 192.168.100.254 from your laptop. Two immediate changes need to be made
1. Navigate to System > Advanced, Networking tab / Locate the Networking Interfaces section / Check Disable hardware checksum offload /
Click Save
2. Navigate to Interfaces > WAN interface / Scroll down to Reserved Networks / Untick the option 'Block private networks and loopback addresses

Reboot pfsense, your laptop should now be able to ping an internet ip - i.e 8.8.8.8 or 1.1.1.1 and also should be able to display webpages etc. Your proxmox host should now be able to do updates as well.

You should now be able to setup a dhcp server in pfsense to hand out ip's in the same 192.168.100.x range with a default gateway of 192.168.100.254, then anything plugged into the switch should get an ip in that range and route via the pfsense VM. Equally, anything plugged into the router will continue to work as it did before.
so i had it working, screwed it up, did everything the same as before but now i cant get it to give me a connection outside of my network.
im going to try it following your steps, but should i be doing this with bridge mode enabled on the modem right from the start? as in, bridge mode>install proxmox>install pfsense? or can i flip it into bridge mode when everything is set up?
 
It shouldn't really matter but I would suggest you leave the modem in 'router' mode then the rest of your network and users can operate normally until you have proved the solution works. As far as pfsense and proxmox are concerned - it's just one extra 'hop' on the way to the internet.
 
  • Like
Reactions: sheebz
It shouldn't really matter but I would suggest you leave the modem in 'router' mode then the rest of your network and users can operate normally until you have proved the solution works. As far as pfsense and proxmox are concerned - it's just one extra 'hop' on the way to the internet.
i followed all your instructions, but im not getting a wan address on pfsense. is that normal? shouldnt i have to plug the modem into the server? can i just unplug it from the switch and plug it into the other server port?

1641170982416.png
 
2. Navigate to Interfaces > WAN interface / Scroll down to Reserved Networks / Untick the option 'Block private networks and loopback addresses
Did you make sure you did this?

Without it pfsense won't allow connections from private IP ranges on the WAN side (so a IP like 192.168.0.1 would be blocked and a router with NAT infront of your WAN wouldn't work).
 
Last edited:
Create a second vmbr1 without an IP address on the second NIC (I'd probably use one of the original 4 port Gigabit nic's unless you happen to have really high speed internet - not all 10Gb cards will negotiate down to 1Gb) - label this as WAN on the proxmox host so you know which is which and plug this nic into a port on the ISP router.
 
ok i got everything running finally! there was an issue with my isp modem where putting it into bridge mode, it would fluctuate between giving a router ip address and a modem ip address, so it was severely cutting off my connection.

that is all fixed now!

1 other question.... when i start making static ip's for my devices, i lose connection now? i left the server and proxmox alone, but as soon as i assign a static ip to my switches, aps, pc, etc... i drop connection completely? tried resetting everything, turning off the power bar/unplugging, pulled the power supplies out of the server for a few mins. everything pulls the proper static ip in pfsense and through unifi, but when i check the gateways on pfsense they have 100% packet loss and the connection is offline?

any insight on that? probably another small quirk im missing like before, but its super annoying lol


thank you again for helping me get this going!! greatly appreciate all the help!!
 

About

The Proxmox community has been around for many years and offers help and support for Proxmox VE, Proxmox Backup Server, and Proxmox Mail Gateway.
We think our community is one of the best thanks to people like you!

Get your subscription!

The Proxmox team works very hard to make sure you are running the best software and getting stable updates and security enhancements, as well as quick enterprise support. Tens of thousands of happy customers have a Proxmox subscription. Get yours easily in our online shop.

Buy now!