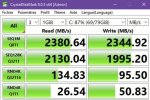
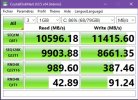
I took a backup with Veeam of a Windows Server 2022 VM from VMware and restore it to Proxmox.
Usually when I create a new Proxmox VM, I choose right away "VirtIO SCSI single" for the controller, and the Disks have the Bus/device at SCSI with "io thread" checked, and then at the installation of Windows I connect the drives drivers ISO and load the drivers. Performances are fast!
But when restoring to Proxmox, we can't change the Bus/device to SCSI.
And consequently, "io thread" is grey out.
Is there a way to do it?
I have included the steps I take after restoring the VM and FAIL
*********************************************************** Start
---- STEPS/ procedure below ----
Windows common after the initial setup:
*********************************************************** -FIN
Usually when I create a new Proxmox VM, I choose right away "VirtIO SCSI single" for the controller, and the Disks have the Bus/device at SCSI with "io thread" checked, and then at the installation of Windows I connect the drives drivers ISO and load the drivers. Performances are fast!
But when restoring to Proxmox, we can't change the Bus/device to SCSI.
And consequently, "io thread" is grey out.
Is there a way to do it?
I have included the steps I take after restoring the VM and FAIL
*********************************************************** Start
---- STEPS/ procedure below ----
- In Proxmox : Add the ISO CD/DVD file for the drivers.
- Start the VM.
- First boot. “Getting devices ready.” screen since it must be adjusting a lot of drivers and the network is not present.
- Remove VMware tools. If asked at the start of the uninstall, choose to reboot instead of the other option to close apps or your uninstall could be very long. After the uninstall, reboot the VM.
- We need to install the disk drivers, if we want to switch to a VirtIO more performing SCSI driver. You will need to browse for the disk drivers, go to the ISO in the vioscsi\(YOUROS)\amd64 folder, right clic the .INF file and choose install. Let’s test that right away, shutdown the VM, and in Proxmox change the Hardware for:
- SCSI Controller : VirtIO SCSI single.
- Machine : q35, version 9 (or latest), vIOMMU : Default.
- And start the VM again. “Applying computer settings” should be there for … a little time.
- Install Proxmox other features like VirtIO other drivers, networking, controller, Proxmox Agent, etc by following the “Windows common after the initial setup” section.
Windows common after the initial setup:
- After booting in Windows, go to your VirtIO drivers ISO, and run virtio-win-gt-x64. Reboot.
- You should now have your network adapter visible has “Red Hat VirtIO Ethernet Adapter”.
- If you need the network, now is the time to configure your network card/IP/etc.
- After that go to your VirtIO drivers ISO, folder \guest-agent\ and run qemu-ga-x86_64. Reboot.
- You should now have the QEMU Guest Agent running.
*********************************************************** -FIN
Last edited:


