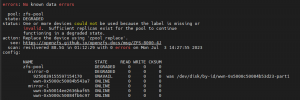
I have to replace 1 of the 2 NVME disk which compose the ZFS RAID1 on my server. How should I recreate the array?
You are using an out of date browser. It may not display this or other websites correctly.
You should upgrade or use an alternative browser.
You should upgrade or use an alternative browser.
Thanks, I'll try. What abouttry
sgdisk --replicate=/dev/sdb /dev/sda
the size must be the same.
/boot? Do I have to take care of it in some way?Thanks. What If the damaged drive is the bootable one and old one doesn't work anymore?Please see the official documentation.
Doc says:
Bash:
sgdisk <healthy bootable device> -R <new device>
sgdisk -G <new device>
zpool replace -f <pool> <old zfs partition> <new zfs partition>for zfs raid boot device the coplet sequence :
Replace the physical failed/offline drive i.e. /dev/sdc with new i.e. /dev/sda
wipefs --all --force /dev/sda* (clean operation)
sgdisk --replicate=/dev/sdb /dev/sda (replicate operation)
grub-install /dev/sdc (only if bootable)
zpool replace mypool /dev/sdc /dev/sda
zpool scrub
Replace the physical failed/offline drive i.e. /dev/sdc with new i.e. /dev/sda
wipefs --all --force /dev/sda* (clean operation)
sgdisk --replicate=/dev/sdb /dev/sda (replicate operation)
grub-install /dev/sdc (only if bootable)
zpool replace mypool /dev/sdc /dev/sda
zpool scrub
I'm using nvme (such asfor zfs raid boot device the coplet sequence :
Replace the physical failed/offline drive i.e. /dev/sdc with new i.e. /dev/sda
wipefs --all --force /dev/sda* (clean operation)
sgdisk --replicate=/dev/sdb /dev/sda (replicate operation)
grub-install /dev/sdc (only if bootable)
zpool replace mypool /dev/sdc /dev/sda
zpool scrub
nvme0n1 and nvme1n1) and the drive I already replaced was the nvme0n1. How can I run this?
Bash:
zpool replace mypool /dev/sdc /dev/sdayou have to change /dev/sdc and /dev/sda with your drives. Find the exact path of you drive. The /dev/sdc and /dev/sda are only an exaples.
Thanks, but my question is what should I replace /dev/sdc with since the old faulty disk is no longer installed.you have to change /dev/sdc and /dev/sda with your drives. Find the exact path of you drive. The /dev/sdc and /dev/sda are only an exaples.
Sorry, yes you have to do the replace command. Probably if you list your zfs raid you will see the broken nvme like not present (in the examples sdc).
ps. I do a mistake: replace grub-install /dev/sdc with grub-install /dev/sda
For example:

wwn-0x50014ee2b8c15f36 = code/PATH of the NEW DISK (use the commad lsblk -o +MODEL,SERIAL,WWN to get it)
9250839155597154170 = OLD DISK
Command:
zpool replace zfs-pool 9250839155597154170 /dev/disk/by-id/wwn-0x50014ee2b8c15f36
ps. I do a mistake: replace grub-install /dev/sdc with grub-install /dev/sda
For example:

wwn-0x50014ee2b8c15f36 = code/PATH of the NEW DISK (use the commad lsblk -o +MODEL,SERIAL,WWN to get it)
9250839155597154170 = OLD DISK
Command:
zpool replace zfs-pool 9250839155597154170 /dev/disk/by-id/wwn-0x50014ee2b8c15f36
Last edited:
Just removed the old device from my pool:
now I'm in this state:
I'd like to add the
Bash:
root@srv1:~# zpool status -v
  pool: rpool
 state: ONLINE
  scan: resilvered 1.33G in 00:00:02 with 0 errors on Fri Jul 14 16:15:48 2023
config:

    NAME                                               STATE     READ WRITE CKSUM
    rpool                                              ONLINE       0     0     0
      nvme-eui.34333730526111070025384300000001-part3  ONLINE       0     0     0

errors: No known data errors
now I'm in this state:
Bash:
root@srv1:~# lsblk -o NAME,FSTYPE,SIZE,MOUNTPOINT
NAME        FSTYPE       SIZE MOUNTPOINT
sr0                     1024M
nvme0n1                894.3G
nvme1n1     zfs_member 894.3G
├─nvme1n1p1             1007K
├─nvme1n1p2 vfat           1G
└─nvme1n1p3 zfs_member 893.3G
I'd like to add the
nvme0n1 to the rpool and recover the mirror.seem that right now you do not have a mirror.
You have to create a mirror from existing drive
prepare the new disk! And then something like
sudo zpool attach YourPool /path/to/your/existingdisk /path/to/your/newdisk
You have to create a mirror from existing drive
prepare the new disk! And then something like
sudo zpool attach YourPool /path/to/your/existingdisk /path/to/your/newdisk
How should I create a new mirror preserving the existing disk?seem that right now you do not have a mirror.
You have to create a mirror from existing drive
prepare the new disk! And then something like
sudo zpool attach YourPool /path/to/your/existingdisk /path/to/your/newdisk
Like already told, first clone the partition table from nvme1n1 to nvme0n1, then sync the bootloader from nvme1n1p2 to nvme0n1p2 and then use the zpool attach command to add nvme0n1p3 to your existing pool so you get a mirror again.How should I create a new mirror preserving the existing disk?
Like alread told, see paragraph "Changing a failed bootable device": https://pve.proxmox.com/wiki/ZFS_on_Linux
Just instead of replcing partition 3 you now need to attach it.
Last edited:
Here an example for the zpool attach command:
Find your pool with
zpool status
- probably your pool is rpool
Note: be sure the new disk is clean (or formatted)
I do not know with NVME, but you have to find your disk. For example with wwn
lsblk -o +MODEL,SERIAL,WWN
find the new disk and the online disk in the wwn colon
then
sudo zpool attach rpool existinghdd newblankhdd
an example with wwn
zpool attach rpool /dev/disk/by-id/wwn-0x50014eef01ab7ebc /dev/disk/by-id/wwn-0x57c35481d1efc9ba

