[SOLVED] Proxmox GPU Passthrough Not Boot

ilbeypoy

New Member
Jul 5, 2024
3
1
1
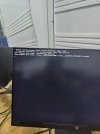
When I followed these steps and restarted the server, the server did not start and I physically went to the server and checked the moniter, it stays as shown in the image and there is no progress.

My GPU 1050ti
Code:
Step by Step tasks:

Step 1: Edit GRUB 
  Execute: nano /etc/default/grub
     Change this line from
   GRUB_CMDLINE_LINUX_DEFAULT="quiet"
     to
   GRUB_CMDLINE_LINUX_DEFAULT="quiet intel_iommu=on iommu=pt pcie_acs_override=downstream,multifunction nofb nomodeset video=vesafb:off,efifb:off"
  Save file and exit the text editor 
  
Step 2: Update GRUB 
  Execute the command: update-grub
  
Step 3: Edit the module files   
  Execute: nano /etc/modules
     Add these lines:
   vfio
   vfio_iommu_type1
   vfio_pci
   vfio_virqfd
  Save file and exit the text editor 
  
Step 4: IOMMU remapping 
 a) Execute: nano /etc/modprobe.d/iommu_unsafe_interrupts.conf
     Add this line:
   options vfio_iommu_type1 allow_unsafe_interrupts=1
     Save file and exit the text editor 
 b) Execute: nano /etc/modprobe.d/kvm.conf
     Add this line:
   options kvm ignore_msrs=1
  Save file and exit the text editor 
  
Step 5: Blacklist the GPU drivers 
  Execute: nano /etc/modprobe.d/blacklist.conf
     Add these lines:
   blacklist radeon
   blacklist nouveau
   blacklist nvidia
   blacklist nvidiafb
  Save file and exit the text editor 
  
Step 6: Adding GPU to VFIO 
 a) Execute: lspci -v
     Look for your GPU and take note of the first set of numbers
 b) Execute: lspci -n -s (PCI card address)
   This command gives you the GPU vendors number.
 c) Execute: nano /etc/modprobe.d/vfio.conf
     Add this line with your GPU number and Audio number:
   options vfio-pci ids=(GPU number,Audio number) disable_vga=1
  Save file and exit the text editor 
  
Step 7: Command to update everything and Restart 
 a) Execute: update-initramfs -u
 b) Then restart the your Proxmox Node

WhatsApp Image 2024-07-05 at 04.54.24.jpeg
 
I only left the main ssd plugged in to test it. that's why it says "recovering journal". It doesn't say that when the SSDs and HDD are plugged in.
 
Title: [GUIDE] How to Revert GPU Passthrough Settings on Proxmox Using Ubuntu Live USB

Hello everyone,

If you've encountered issues with GPU Passthrough on your Proxmox server and need to revert the changes, this step-by-step guide will help you. We'll use an Proxmox Live USB to make the necessary adjustments.

Requirements:​

  • Proxmox Live USB
  • Proxmox installed on an SSD

Step-by-Step Guide​

Step 1: Boot from Ubuntu Live USB​

  1. Power off your computer.
  2. Insert the Proxmox Live USB.
  3. Power on your computer and enter the BIOS/UEFI menu to boot from the USB.
  4. Select "Try Proxmox" to boot into the live environment.

Step 2: Mount the Proxmox SSD​

  1. Open Terminal:Press Ctrl+Alt+T to open the terminal.
  2. Identify the Proxmox SSD:List all connected disks and partitions with:

    Code:
    lsblk
    Identify your Proxmox SSD. It will typically be something like /dev/sda1.
  3. Create a Mount Point:

    Code:
    sudo mkdir /mnt/proxmox
  4. Mount the Proxmox SSD:Replace /dev/pve/root with the appropriate device name if different.

    Code:
    mount /dev/pve/root /mnt/proxmox
  5. Verify the Mount:

    Code:
    ls /mnt/proxmox
    You should see the Proxmox file system contents.

Step 3: Bind Necessary Directories​

  1. Bind /dev, /proc, and /sys:

    Code:
    mount --bind /dev /mnt/proxmox/dev
    mount --bind /proc /mnt/proxmox/proc
    mount --bind /sys /mnt/proxmox/sys
  2. Enter the Chroot Environment:

    Code:
    chroot /mnt/proxmox

Step 4: Edit Configuration Files​

  1. Edit GRUB Configuration:

    Code:
    nano /etc/default/grub
    Change:

    Code:
    GRUB_CMDLINE_LINUX_DEFAULT="quiet intel_iommu=on iommu=pt pcie_acs_override=downstream,multifunction nofb nomodeset video=vesafb:off,efifb:off"
    to:

    Code:
    GRUB_CMDLINE_LINUX_DEFAULT="quiet"
    Save and exit (Ctrl+X, then Y, then Enter).
  2. Update GRUB:

    Code:
    update-grub
  3. Edit /etc/modules:

    Code:
    nano /etc/modules
    Remove the following lines:

    Code:
    vfio
    vfio_iommu_type1
    vfio_pci
    vfio_virqfd
    Save and exit.
  4. Edit IOMMU Remapping Configurations:a. iommu_unsafe_interrupts.conf:

    Code:
    nano /etc/modprobe.d/iommu_unsafe_interrupts.conf
    Remove the line:

    Code:
    options vfio_iommu_type1 allow_unsafe_interrupts=1
    Save and exit.
    b. kvm.conf:

    Code:
    nano /etc/modprobe.d/kvm.conf
    Remove the line:

    Code:
    options kvm ignore_msrs=1
    Save and exit.
  5. Edit Blacklist Configuration:

    Code:
    nano /etc/modprobe.d/blacklist.conf
    Remove the following lines:

    Code:
    blacklist radeon
    blacklist nouveau
    blacklist nvidia
    blacklist nvidiafb
    Save and exit.
  6. Edit VFIO Configuration:

    Code:
    nano /etc/modprobe.d/vfio.conf
    Remove the line:

    Code:
    options vfio-pci ids=(GPU number,Audio number) disable_vga=1
    Save and exit.

Step 5: Update Initramfs and Reboot​

  1. Update Initramfs:
    Code:
    update-initramfs -u
  2. Exit Chroot and Unmount:

    Code:
    exit
    sudo umount /mnt/proxmox/dev
    sudo umount /mnt/proxmox/proc
    sudo umount /mnt/proxmox/sys
    sudo umount /mnt/proxmox
  3. Reboot:

    Code:
    reboot
By following these steps, you can revert the GPU Passthrough settings on your Proxmox server. If you encounter any issues, feel free to ask for help in the forum.

Good luck!
 
Last edited:
  • Like
Reactions: ssrt7626
Title: [GUIDE] How to Revert GPU Passthrough Settings on Proxmox Using Ubuntu Live USB

Hello everyone,

If you've encountered issues with GPU Passthrough on your Proxmox server and need to revert the changes, this step-by-step guide will help you. We'll use an Proxmox Live USB to make the necessary adjustments.

Requirements:​

  • Proxmox Live USB
  • Proxmox installed on an SSD

Step-by-Step Guide​

Step 1: Boot from Ubuntu Live USB​

  1. Power off your computer.
  2. Insert the Proxmox Live USB.
  3. Power on your computer and enter the BIOS/UEFI menu to boot from the USB.
  4. Select "Try Proxmox" to boot into the live environment.

Step 2: Mount the Proxmox SSD​

  1. Open Terminal:Press Ctrl+Alt+T to open the terminal.
  2. Identify the Proxmox SSD:List all connected disks and partitions with:

    Code:
    lsblk
    Identify your Proxmox SSD. It will typically be something like /dev/sda1.
  3. Create a Mount Point:

    Code:
    sudo mkdir /mnt/proxmox
  4. Mount the Proxmox SSD:Replace /dev/pve/root with the appropriate device name if different.

    Code:
    mount /dev/pve/root /mnt/proxmox
  5. Verify the Mount:

    Code:
    ls /mnt/proxmox
    You should see the Proxmox file system contents.

Step 3: Bind Necessary Directories​

  1. Bind /dev, /proc, and /sys:

    Code:
    mount --bind /dev /mnt/proxmox/dev
    mount --bind /proc /mnt/proxmox/proc
    mount --bind /sys /mnt/proxmox/sys
  2. Enter the Chroot Environment:

    Code:
    chroot /mnt/proxmox

Step 4: Edit Configuration Files​

  1. Edit GRUB Configuration:

    Code:
    nano /etc/default/grub
    Change:

    Code:
    GRUB_CMDLINE_LINUX_DEFAULT="quiet intel_iommu=on iommu=pt pcie_acs_override=downstream,multifunction nofb nomodeset video=vesafb:off,efifb:off"
    to:

    Code:
    GRUB_CMDLINE_LINUX_DEFAULT="quiet"
    Save and exit (Ctrl+X, then Y, then Enter).
  2. Update GRUB:

    Code:
    update-grub
  3. Edit /etc/modules:

    Code:
    nano /etc/modules
    Remove the following lines:

    Code:
    vfio
    vfio_iommu_type1
    vfio_pci
    vfio_virqfd
    Save and exit.
  4. Edit IOMMU Remapping Configurations:a. iommu_unsafe_interrupts.conf:

    Code:
    nano /etc/modprobe.d/iommu_unsafe_interrupts.conf
    Remove the line:

    Code:
    options vfio_iommu_type1 allow_unsafe_interrupts=1
    Save and exit.
    b. kvm.conf:

    Code:
    nano /etc/modprobe.d/kvm.conf
    Remove the line:

    Code:
    options kvm ignore_msrs=1
    Save and exit.
  5. Edit Blacklist Configuration:

    Code:
    nano /etc/modprobe.d/blacklist.conf
    Remove the following lines:

    Code:
    blacklist radeon
    blacklist nouveau
    blacklist nvidia
    blacklist nvidiafb
    Save and exit.
  6. Edit VFIO Configuration:

    Code:
    nano /etc/modprobe.d/vfio.conf
    Remove the line:

    Code:
    options vfio-pci ids=(GPU number,Audio number) disable_vga=1
    Save and exit.

Step 5: Update Initramfs and Reboot​

  1. Update Initramfs:
    Code:
    update-initramfs -u
  2. Exit Chroot and Unmount:

    Code:
    exit
    sudo umount /mnt/proxmox/dev
    sudo umount /mnt/proxmox/proc
    sudo umount /mnt/proxmox/sys
    sudo umount /mnt/proxmox
  3. Reboot:

    Code:
    reboot
By following these steps, you can revert the GPU Passthrough settings on your Proxmox server. If you encounter any issues, feel free to ask for help in the forum.

Good luck!

In the Proxmox ISO when booted from USB, there is no “Try Proxmox” option, only:


• Install Proxmox VE (Graphical, debug mode)


• Install Proxmox VE (Terminal UI, debug mode)


• Install Proxmox VE (Serial console, debug mode)


• Install Proxmox VE (Automated)


• Rescue boot


• Test Memory
 

About

The Proxmox community has been around for many years and offers help and support for Proxmox VE, Proxmox Backup Server, and Proxmox Mail Gateway.
We think our community is one of the best thanks to people like you!

Get your subscription!

The Proxmox team works very hard to make sure you are running the best software and getting stable updates and security enhancements, as well as quick enterprise support. Tens of thousands of happy customers have a Proxmox subscription. Get yours easily in our online shop.

Buy now!