PMG with office365

Jun 13, 2024
15
1
1
hi,
i am trying to setup O365 mail to go through PMG. I set up the mx on the dns. Proxmox mail gateway seems to receive the emails, but i get this error message in the logs:

2024-07-11T08:00:15.752753-04:00 gateway postfix/smtpd[53817]: connect from mailout.easymail.ca[64.68.200.34]
2024-07-11T08:00:15.929286-04:00 gateway postfix/smtpd[53817]: NOQUEUE: reject: RCPT from mailout.easymail.ca[64.68.200.34]: 450 4.1.1 <(recipient email>: Recipient address rejected: unverified address: host smtp.office365.com[40.99.236.82] said: 530 5.7.57 Client not authenticated to send mail. [YQZPR01CA0021.CANPRD01.PROD.OUTLOOK.COM 2024-07-11T11:05:18.926Z 08DCA18125D5A1DD] (in reply to MAIL FROM command); from=<sender address> to=<recipient adress> proto=ESMTP helo=<mailout.easymail.ca>
2024-07-11T08:00:15.951572-04:00 gateway postfix/smtpd[53817]: disconnect from mailout.easymail.ca[64.68.200.34] ehlo=2 starttls=1 mail=1 rcpt=0/1 rset=1 quit=1 commands=6/7

thanks
 
The error you're encountering indicates that the Proxmox Mail Gateway (PMG) is attempting to relay emails to Office 365, but the connection is being rejected because the client (PMG) is not authenticated to send mail.

Here are the steps you can take to resolve this issue:

Step 1: Verify SMTP Relay Settings in Office 365​

Ensure that your Office 365 tenant is configured to allow SMTP relay from your PMG server. This typically involves setting up a connector in Office 365.

  1. Log in to Office 365 Admin Center:
  2. Navigate to Exchange Admin Center:
    • Click on Show all in the left-hand navigation pane and select Exchange.
  3. Set up a connector:
    • In the Exchange Admin Center, go to Mail flow > Connectors.
    • Create a new connector by clicking on the + icon.
    • Choose Your organization's email server as the mail flow scenario and click Next.
    • Name the connector and add a description, then click Next.
    • Select the option By verifying that the IP address of the sending server matches one of these IP addresses that belong to your organization.
    • Add the IP address of your PMG server.
    • Complete the setup by following the remaining prompts and saving the connector.

Step 2: Configure Proxmox Mail Gateway​

Ensure that PMG is configured to authenticate with Office 365 when sending emails.

  1. Edit the main.cf file in Postfix:
    • Open the main.cf configuration file for Postfix on your PMG server. This file is usually located at /etc/postfix/main.cf.
  2. Add the following lines to configure SMTP authentication:
    plaintext
    Copy code
    relayhost = [smtp.office365.com]:587
    smtp_sasl_auth_enable = yes
    smtp_sasl_password_maps = hash:/etc/postfix/sasl_passwd
    smtp_sasl_security_options = noanonymous
    smtp_tls_CAfile = /etc/ssl/certs/ca-certificates.crt
    smtp_use_tls = yes
  3. Create the sasl_passwd file:
    • Create a file named sasl_passwd in the /etc/postfix/ directory.
    • Add your Office 365 SMTP credentials to this file in the following format:
      plaintext
      Copy code
      [smtp.office365.com]:587 your_username@your_domain.com:your_password
  4. Secure the sasl_passwd file:
    bash
    Copy code
    sudo chmod 600 /etc/postfix/sasl_passwd
  5. Generate the hash db file:
    bash
    Copy code
    sudo postmap /etc/postfix/sasl_passwd
  6. Restart Postfix:
    bash
    Copy code
    sudo systemctl restart postfix

Step 3: Verify DNS Settings​

Ensure that your DNS MX records are correctly pointing to your PMG server.

  1. Check your MX records:
    • Use an online tool like MXToolbox (https://mxtoolbox.com/) to verify your MX records.
    • Ensure that the MX records point to your PMG server's hostname and IP address.
  2. Update SPF record:
    • Ensure that your SPF record includes the IP address of your PMG server and Office 365.
    • Example SPF record:
      plaintext
      Copy code
      v=spf1 ip4:<PMG IP address> include:spf.protection.outlook.com -all

Step 4: Test Email Flow​

  1. Send a test email:
    • Send an email through your PMG server to verify that it correctly relays to Office 365.
  2. Check logs:
    • Monitor the PMG and Postfix logs to ensure there are no errors.
If you continue to encounter issues, please provide additional details or error messages, and I can assist you further
Step 2 is not going to work because of MS disabling SMTP AUTH.


eaglex01, Are you using Exchange Online Protection (EOP) or Office 365 Hybrid Configuration?
 
So your all mailboxes are on Exchange Online and you are planning to use PMG as your first guard for SPAM protection.
Then you need to create a Connector as dat11's post Step 1, update your SPF record also mentioned on dat11's post Step 3.

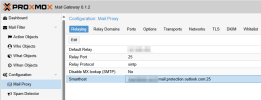
But for Step 2 (to flow mails from PMG to O365) you need to set Smarthost with your Office 365 MX FQDN (like domain-com.mail.protection.outlook.com) and use port 25

EDIT: NOT Smarthost, set your Exchange Online MX FQDN on Default Relay

1721135705155.png

BTW, just my curiosity how did you disable EOP?
 
Last edited:
So your all mailboxes are on Exchange Online and you are planning to use PMG as your first guard for SPAM protection.
Then you need to create a Connector as dat11's post Step 1, update your SPF record also mentioned on dat11's post Step 3.

But for Step 2 (to flow mails from PMG to O365) you need to set Smarthost with your Office 365 MX FQDN (like domain-com.mail.protection.outlook.com) and use port 25

EDIT: NOT Smarthost, set your Exchange Online MX FQDN on Default Relay

View attachment 71401

BTW, just my curiosity how did you disable EOP?
that worked, thanks

as for eop,

when you add your own dns to your domain you have the option to uncheck eop.

1721137259794.png
 
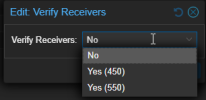
another quick question: mail worked if i dont enable verify receiver.

1721137899195.png

If i enable it (yes (450) it is rejected

2024-07-16T09:48:04.491945-04:00 gateway postfix/smtpd[145738]: connect from mailout.easymail.ca[64.68.200.34]
2024-07-16T09:48:04.538728-04:00 gateway postfix/smtpd[145738]: Anonymous TLS connection established from mailout.easymail.ca[64.68.200.34]: TLSv1.3 with cipher TLS_AES_256_GCM_SHA384 (256/256 bits) key-exchange X25519 server-signature RSA-PSS (2048 bits) server-digest SHA256
2024-07-16T09:48:04.665657-04:00 gateway postfix/smtpd[145738]: NOQUEUE: reject: RCPT from mailout.easymail.ca[64.68.200.34]: 450 4.1.1 <receiver email>: Recipient address rejected: unverified address: host smtp.office365.com[52.96.35.178] said: 530 5.7.57 Client not authenticated to send mail. [MN2PR12CA0013.namprd12.prod.outlook.com 2024-07-15T17:45:19.686Z 08DCA482329203B6] (in reply to MAIL FROM command); from=<from email> to=<receiver email> proto=ESMTP helo=<mailout.easymail.ca>
2024-07-16T09:48:04.729601-04:00 gateway postfix/smtpd[145738]: disconnect from mailout.easymail.ca[64.68.200.34] ehlo=2 starttls=1 mail=1 rcpt=0/1 rset=1 quit=1 commands=6/7
 
Do you have any config for your domain on Configuration > Mail Proxy > Transports
BTW, I am using 550 for Verify Receivers
 
I don't have anything in the transports. 550 seems to work thanks.

I think i am missing 1 connector though if i want the outgoing mail to pass through PMG as well?
 
I definitely recommend that you send your outgoing email traffic via Exchange Online. Because Microsoft's infrastructure in email distribution is very solid and it has a high reputation.

Also, even if you create a Connector for Exchange Online > PMG, you may not have the chance to set the SMTP port to 26. Under normal circumstances, when defining a Send Connector on On-Prem Exchange, you can change the Send Connectors SMTP Port to 26 instead of 25 with the Exchange Management Shell, but this may not be possible in the Connector in Exchange Online.

As I said, while Microsoft has a very solid and high reputation, it would be best to send your outgoing e-mail traffic through Exchange Online.
 
Step 2 is not going to work because of MS disabling SMTP AUTH.


eaglex01, Are you using Exchange Online Protection (EOP) or Office 365 Hybrid Configuration?
Quick question about this: the IT Company that installed the whole infrastructure of a customer has set the Inbound Connector to the following setting:
From: Partner
To: Office 365
Authentication Required/Filter for Incoming: * (that means for me, everything???)

So, in my eye this looks very bad. Because the Exchange Online Server has an open connector to receive emails from, without TLS or a IP Address Filter?

Im not a total professional in Exchange, but, what issues could we get into, having one Connector open without limitation?
 

About

The Proxmox community has been around for many years and offers help and support for Proxmox VE, Proxmox Backup Server, and Proxmox Mail Gateway.
We think our community is one of the best thanks to people like you!

Get your subscription!

The Proxmox team works very hard to make sure you are running the best software and getting stable updates and security enhancements, as well as quick enterprise support. Tens of thousands of happy customers have a Proxmox subscription. Get yours easily in our online shop.

Buy now!