How to download LXC version of OpenWRT and run it on Proxmox

I tried turning off the dhcp server in the openwrt LXC

Code:
uci set dhcp.lan.ignore='1'
uci commit dhcp
/etc/init.d/dnsmasq restart

I tried changing the virtual mac address to something else

It shows up in my router's dhcp server leases
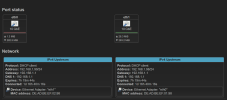
Active DHCP Leases​

HostnameIPv4 addressMAC addressLease time remainingStatic Lease
openwrt (openwrt.lan)192.168.1.136DE:AD:BE:EF:01:9911h 59m 51s
-192.168.1.237DE:AD:BE:EF:00:9911h 45m 59s

I ran nmap scan from proxmox host, shows all ports are closed

Code:
root@proxmox:~/test2# nmap 192.168.1.136
Starting Nmap 7.93 ( https://nmap.org ) at 2024-09-25 07:05 EST
Nmap scan report for 192.168.1.136
Host is up (0.000088s latency).
All 1000 scanned ports on 192.168.1.136 are in ignored states.
Not shown: 1000 closed tcp ports (reset)
MAC Address: DE:AD:BE:EF:01:99 (Unknown)

Nmap done: 1 IP address (1 host up) scanned in 38.64 seconds

Seems like something very basic is not working !
 
Ok, I have figured it out

By default this LXC container has only one network interace and it is configured as "WAN" which is locked down,

The following, can be pasted entire as is into the console or into a .sh script file

It will download the file, create the container and issue a series of command to turn the WAN interface into LAN

Proxmox openwrt LXC LAN only

Code:
CT_ID="999"  # Adjust the container ID
CT_template_download="https://jenkins.linuxcontainers.org/job/image-openwrt/architecture=amd64,release=23.05,variant=default/lastSuccessfulBuild/artifact/rootfs.tar.xz"
CT_template_filename="openwrt-amd64,23.05,default.tar.xz"
CT_template_file="local:vztmpl/$CT_template_filename"
CT_net_mac="DE:AD:BE:EF:01:99"
CT_hostname="myopenwrt"
CT_memory="1024"
CT_cores="4"
CT_rootfs_size="2"
CT_key_file="/ssh_key.pub"
CT_key="ssh-rsa AAAAB3NzaC1yc2EAAAADAQABAAABAQCIWFBY0G/lbORqeMXI2PfIcVBuDO66KeCzFr4IqXOFC1ehuC573tXRW6TQTAAR6nlYTXrzw4Mw+1y2lgwP3rkibH/RpkCIu96hPygad2ZrxObNoM44Hpzxq6Jq/S8sXNjpsb7Q0yN7yqjAwQIKA9eDvRaC/03yPz9pLcZ3gjk3YUVPZuZ3zUrjJV+n4XeCmw1HvMTkGRJ3SVCHw1tyB1K8rCxu6sGw55HK3P70moPj8JiAvxe2y+V84DGU9n4vWuwVMWcpISrubaQIeUo2WQebRB5C3qCkNyGzwTdTR6v6gBy+aiL1VvL2qUiNGQ3LE1FgnLnvwQZk5IubPMjfoyvT rsa-key-20240925"

[ ! -f /var/lib/vz/template/cache/$CT_template_filename ] && wget "$CT_template_download" -O /var/lib/vz/template/cache/$CT_template_filename

#Obtain the next CT_ID if not already set
: ${CT_ID:=$(pct list | awk 'NR>1 {print $1}' | sort -n | awk 'NR==1{prev=$1} NR>1 && $1>prev+1{print prev+1; exit} {prev=$1} END{if (prev+1 > $1) print prev+1}')}

echo "$CT_key" > $CT_key_file

# Create the container
pct create $CT_ID $CT_template_file --arch amd64 --cores $CT_cores --memory $CT_memory --hostname $CT_hostname --net0 name=eth0,bridge=vmbr0,firewall=1,hwaddr=$CT_net_mac,ip=dhcp,type=veth --rootfs local-lvm:$CT_rootfs_size --features nesting=1 --unprivileged 1 --ostype unmanaged

rm $CT_key_file

# Start the container
pct start $CT_ID

#Wait until container is finished booting
: ${CT_ID:=101}; while [[ $(pct status $CT_ID) != *"running"* ]]; do echo "Waiting for container $CT_ID to start..."; sleep 2; done; echo "Container $CT_ID is running."

sleep 5

# Step 1: Remove WAN and WAN6 interfaces
pct exec $CT_ID -- uci delete network.wan
pct exec $CT_ID -- uci delete network.wan6

# Step 2: Set LAN interface to use DHCP (so eth0 will act as a DHCP client)
pct exec $CT_ID -- uci set network.lan=interface
pct exec $CT_ID -- uci set network.lan.ifname='eth0'
pct exec $CT_ID -- uci set network.lan.proto='dhcp'

# Step 3: Commit the network configuration changes
pct exec $CT_ID -- uci commit network

# Step 4: Remove the WAN zone from the firewall (this includes removing WAN and WAN6)
pct exec $CT_ID -- uci delete firewall.@zone[1]

# Step 5: Update LAN zone in the firewall (associate it with the LAN network)
pct exec $CT_ID -- uci set firewall.@zone[0].network='lan'

# Step 6: Remove LAN-to-WAN forwarding rule (since there's no WAN now)
pct exec $CT_ID -- uci delete firewall.@forwarding[0]

# Step 7: Remove firewall rules specific to the WAN zone
pct exec $CT_ID -- uci delete firewall.@rule[8]  # Allow-ISAKMP
pct exec $CT_ID -- uci delete firewall.@rule[7]  # Allow-IPSec-ESP
pct exec $CT_ID -- uci delete firewall.@rule[6]  # Allow-ICMPv6-Forward
pct exec $CT_ID -- uci delete firewall.@rule[5]  # Allow-ICMPv6-Input
pct exec $CT_ID -- uci delete firewall.@rule[4]  # Allow-MLD
pct exec $CT_ID -- uci delete firewall.@rule[3]  # Allow-DHCPv6
pct exec $CT_ID -- uci delete firewall.@rule[2]  # Allow-IGMP
pct exec $CT_ID -- uci delete firewall.@rule[1]  # Allow-Ping
pct exec $CT_ID -- uci delete firewall.@rule[0]  # Allow-DHCP-Renew

# Step 8: Commit the firewall configuration changes
pct exec $CT_ID -- uci commit firewall

# Step 9: Restart the network and firewall services to apply the changes
pct exec $CT_ID -- /etc/init.d/network restart
pct exec $CT_ID -- /etc/init.d/firewall restart
 
Here is what you should see when running the above script

Code:
--2024-09-25 08:16:45--  https://jenkins.linuxcontainers.org/job/image-openwrt/architecture=amd64,release=23.05,variant=default/lastSuccessfulBuild/artifact/rootfs.tar.xz
Resolving jenkins.linuxcontainers.org (jenkins.linuxcontainers.org)... 45.45.148.7, 2602:fc62:a:1::7
Connecting to jenkins.linuxcontainers.org (jenkins.linuxcontainers.org)|45.45.148.7|:443... connected.
HTTP request sent, awaiting response... 200 OK
Length: 3758948 (3.6M) [application/x-xz]
Saving to: ‘/var/lib/vz/template/cache/openwrt-amd64,23.05,default.tar.xz’

/var/lib/vz/template/cache/openwrt-amd64,23.05,default.tar.xz      100%[=============================================================================================================================================================>]   3.58M  --.-KB/s    in 0.1s

2024-09-25 08:16:46 (32.4 MB/s) - ‘/var/lib/vz/template/cache/openwrt-amd64,23.05,default.tar.xz’ saved [3758948/3758948]

  WARNING: You have not turned on protection against thin pools running out of space.
  WARNING: Set activation/thin_pool_autoextend_threshold below 100 to trigger automatic extension of thin pools before they get full.
  Logical volume "vm-999-disk-0" created.
  WARNING: Sum of all thin volume sizes (1.92 TiB) exceeds the size of thin pool pve/data and the size of whole volume group (<446.13 GiB).
Creating filesystem with 524288 4k blocks and 131072 inodes
Filesystem UUID: 119175af-d979-4bac-8a73-d8f6f8d4199b
Superblock backups stored on blocks:
        32768, 98304, 163840, 229376, 294912
extracting archive '/var/lib/vz/template/cache/openwrt-amd64,23.05,default.tar.xz'
Total bytes read: 14315520 (14MiB, 70MiB/s)
Container 999 is running.

Then in your browser at myopenwrt.lan

There will be an empty password set as the web interface does not allow login in with a private key file, it will tell you to change the password immediately

1727270285286.png

When you go to Network -> Interface
you will have the following message
I don't know why, it does not appear to change anything in the configuration
You can ignore this message and it will only say that once

1727270387312.png
 
Here is another version of the Openwrt LXC container install script

This version will have two network interfaces setup

Note that the WAN interface will receive the myopenwrt2.lan hostname while the LAN interface will not receive a hostname

So http://myopenwrt2.lan will not work in your browser
But you can run
pct exec 1001 -- ifconfig
to get the ip address of your LAN interface (eth1)


Proxmox openwrt LXC WAN+LAN

Code:
CT_ID="1001"  # Adjust the container ID
CT_template_download="https://jenkins.linuxcontainers.org/job/image-openwrt/architecture=amd64,release=23.05,variant=default/lastSuccessfulBuild/artifact/rootfs.tar.xz"
CT_template_filename="openwrt-amd64,23.05,default.tar.xz"
CT_template_file="local:vztmpl/$CT_template_filename"
CT_net_mac="DE:AD:BE:EF:01:98"
CT_net_mac2="DE:AD:BE:EF:02:98"
CT_hostname="myopenwrt2"
CT_memory="1024"
CT_cores="4"
CT_rootfs_size="2"
CT_key_file="/ssh_key.pub"
CT_key="ssh-rsa AAAAB3NzaC1yc2EAAAADAQABAAABAQCIWFBY0G/lbORqeMXI2PfIcVBuDO66KeCzFr4IqXOFC1ehuC573tXRW6TQTAAR6nlYTXrzw4Mw+1y2lgwP3rkibH/RpkCIu96hPygad2ZrxObNoM44Hpzxq6Jq/S8sXNjpsb7Q0yN7yqjAwQIKA9eDvRaC/03yPz9pLcZ3gjk3YUVPZuZ3zUrjJV+n4XeCmw1HvMTkGRJ3SVCHw1tyB1K8rCxu6sGw55HK3P70moPj8JiAvxe2y+V84DGU9n4vWuwVMWcpISrubaQIeUo2WQebRB5C3qCkNyGzwTdTR6v6gBy+aiL1VvL2qUiNGQ3LE1FgnLnvwQZk5IubPMjfoyvT rsa-key-20240925"

[ ! -f /var/lib/vz/template/cache/$CT_template_filename ] && wget "$CT_template_download" -O /var/lib/vz/template/cache/$CT_template_filename

#Obtain the next CT_ID if not already set
: ${CT_ID:=$(pct list | awk 'NR>1 {print $1}' | sort -n | awk 'NR==1{prev=$1} NR>1 && $1>prev+1{print prev+1; exit} {prev=$1} END{if (prev+1 > $1) print prev+1}')}

echo "$CT_key" > $CT_key_file

# Create the container
pct create $CT_ID $CT_template_file --arch amd64 --cores $CT_cores --memory $CT_memory --hostname $CT_hostname --net0 name=eth0,bridge=vmbr0,firewall=1,hwaddr=$CT_net_mac,ip=dhcp,type=veth --net1 name=eth1,bridge=vmbr0,firewall=1,hwaddr=$CT_net_mac2,ip=dhcp,type=veth --rootfs local-lvm:$CT_rootfs_size --features nesting=1 --unprivileged 1 --ostype unmanaged

rm $CT_key_file

# Start the container
pct start $CT_ID

#Wait until container is finished booting
: ${CT_ID:=101}; while [[ $(pct status $CT_ID) != *"running"* ]]; do echo "Waiting for container $CT_ID to start..."; sleep 2; done; echo "Container $CT_ID is running."

sleep 5

# Step 1: Set LAN interface to use DHCP (so eth1 will act as a DHCP client)
pct exec $CT_ID -- uci set network.lan=interface
pct exec $CT_ID -- uci set network.lan.ifname='eth1'
pct exec $CT_ID -- uci set network.lan.proto='dhcp'
pct exec $CT_ID -- uci commit network
pct exec $CT_ID -- /etc/init.d/network restart
pct exec $CT_ID -- /etc/init.d/firewall restart
 

About

The Proxmox community has been around for many years and offers help and support for Proxmox VE, Proxmox Backup Server, and Proxmox Mail Gateway.
We think our community is one of the best thanks to people like you!

Get your subscription!

The Proxmox team works very hard to make sure you are running the best software and getting stable updates and security enhancements, as well as quick enterprise support. Tens of thousands of happy customers have a Proxmox subscription. Get yours easily in our online shop.

Buy now!