Get CPU temperature in Proxmox VE

wy3QkoM7Kk3666ou2vd

New Member
Apr 20, 2021
6
1
3
37
Hello,

I'm trying to get a reading of my cpu temperature but nothing seems to work really in Proxmox. My hardware is as follows:
- Ryzen 9 5950X
- Gigabyte Auorus B550M Pro-p

I have updated everything to the newest state with:
Code:
apt update
apt dist-upgrade
apt autoremove

Then i tried to get a reading with:
Code:
apt install lm-sensors hddtemp
sensors-detect
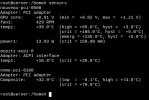
output.png

But nothing shows upp for the CPU. The next step was to upgrade the kernel to the newest version by first adding the following repository:
Code:
deb http://download.proxmox.com/debian/pve buster pve-no-subscription
Followed by:
Code:
apt install pve-kernel-5.11
apt install pve-headers-$(uname -r)
update-grub
reboot

This did not help either (It did fix the missing LAN-drivers for the motherboard though for others that have the same issue).
I also tried to use zenpower (https://github.com/ocerman/zenpower) but this does not solve the problem either.
Most workarounds seem to only focus on Asus motherboards and their particular drivers.

Anyone who know's how I can get a temperature reading om my ryzen 5000-series CPU?
 
Hello,

I'm pretty new to proxmox. I have a Ryzen 5 1600 AF on a Asrock B450M Pro4 and have the same issue with CPU temps. Also the fans RPM are not showing. Is it possible to get the temperature with cpu/mobo since the cpu is based of Zen+ architecture or do I also have to wait for a newer kernel?
 
Hello,
My amd 5700G have the same temps issue with sensors. I tried others google's tutorials but it doesn't work yet.
 
I have a 3950x with a ASRock x570s Riptide and not sure which one is the CPU temp:
I'm on proxmox kernel
Code:
Linux 5.13.19-6-pve x86_64
Code:
$sensors
nct6798-isa-0290
Adapter: ISA adapter
in0:                   712.00 mV (min =  +0.00 V, max =  +1.74 V)
in1:                     1.67 V  (min =  +0.00 V, max =  +0.00 V)  ALARM
in2:                     3.42 V  (min =  +0.00 V, max =  +0.00 V)  ALARM
in3:                     3.34 V  (min =  +0.00 V, max =  +0.00 V)  ALARM
in4:                     1.83 V  (min =  +0.00 V, max =  +0.00 V)  ALARM
in5:                     1.11 V  (min =  +0.00 V, max =  +0.00 V)  ALARM
in6:                     1.34 V  (min =  +0.00 V, max =  +0.00 V)  ALARM
in7:                     3.42 V  (min =  +0.00 V, max =  +0.00 V)  ALARM
in8:                     3.26 V  (min =  +0.00 V, max =  +0.00 V)  ALARM
in9:                     1.67 V  (min =  +0.00 V, max =  +0.00 V)  ALARM
in10:                    1.02 V  (min =  +0.00 V, max =  +0.00 V)  ALARM
in11:                  640.00 mV (min =  +0.00 V, max =  +0.00 V)  ALARM
in12:                  960.00 mV (min =  +0.00 V, max =  +0.00 V)  ALARM
in13:                  920.00 mV (min =  +0.00 V, max =  +0.00 V)  ALARM
in14:                  896.00 mV (min =  +0.00 V, max =  +0.00 V)  ALARM
fan1:                     0 RPM  (min =    0 RPM)
fan2:                   825 RPM  (min =    0 RPM)
fan3:                  1112 RPM  (min =    0 RPM)
fan4:                     0 RPM  (min =    0 RPM)
fan5:                     0 RPM  (min =    0 RPM)
fan6:                   385 RPM  (min =    0 RPM)
fan7:                   744 RPM  (min =    0 RPM)
SYSTIN:                 +39.0°C    sensor = thermistor
CPUTIN:                 +42.0°C  (high = +80.0°C, hyst = +75.0°C)  sensor = thermistor
AUXTIN0:                 +8.0°C    sensor = thermistor
AUXTIN1:                -60.0°C    sensor = thermistor
AUXTIN2:                +12.0°C    sensor = thermistor
AUXTIN3:                +32.0°C    sensor = thermistor
SMBUSMASTER 1:          +60.0°C  (high = +105.0°C, hyst = +95.0°C)
SMBUSMASTER 0:          +52.5°C 
PCH_CHIP_CPU_MAX_TEMP:   +0.0°C 
PCH_CHIP_TEMP:           +0.0°C 
intrusion0:            ALARM
intrusion1:            ALARM
beep_enable:           disabled

be2net-pci-0301
Adapter: PCI adapter
temp1:         +0.0°C 

nvme-pci-0a00
Adapter: PCI adapter
Composite:    +42.9°C  (low  = -273.1°C, high = +81.8°C)
                       (crit = +84.8°C)
Sensor 1:     +42.9°C  (low  = -273.1°C, high = +65261.8°C)
Sensor 2:     +47.9°C  (low  = -273.1°C, high = +65261.8°C)

nouveau-pci-0b00
Adapter: PCI adapter
fan1:        1654 RPM
temp1:        +41.0°C  (high = +95.0°C, hyst =  +3.0°C)
                       (crit = +105.0°C, hyst =  +5.0°C)
                       (emerg = +135.0°C, hyst =  +5.0°C)

k10temp-pci-00c3
Adapter: PCI adapter
Tctl:         +52.9°C 
Tdie:         +52.9°C 
Tccd1:        +48.2°C 
Tccd2:        +45.2°C 

be2net-pci-0300
Adapter: PCI adapter
temp1:         +0.0°C
 
How about this javascript attempt. Does not work yet, but basically it fetch the sensors cpu temps from IPMI or iDrac and add it to the html Summary windows

JavaScript:
const fs = require('fs');
const { exec } = require('child_process');
const readline = require('readline');
const rl = readline.createInterface({
    input: process.stdin,
    output: process.stdout
});

// Check if child_process module is installed, if not, install it
if (!fs.existsSync('./node_modules/child_process')) {
    exec('npm install child_process', (error, stdout, stderr) => {
        if (error) {
            console.log(`error: ${error.message}`);
            return;
        }
        if (stderr) {
            console.log(`stderr: ${stderr}`);
            return;
        }
    });
}

// function to parse the temperature data from the output of the IPMI command
function parseTempData(data) {
    const lines = data.split('\n');
    let tempData = {};
    for (let line of lines) {
        let parts = line.split('|');
        if (parts[0].includes('Temperature')) {
            let temp = parts[1].trim();
            let name = parts[0].split(':')[0].trim();
            tempData[name] = temp;
        }
    }
    return tempData;
}

// function to update the UI element with the temperature data
function updateCpuTempUI(tempData) {
    let tempString = "";
    for (let name in tempData) {
        tempString += `${name}: ${tempData[name]}`;
    }

    // Create an html file if not exist
    if (!fs.existsSync('cpu-temp.html')) {
        fs.writeFileSync('cpu-temp.html', `
            <div id="cpu-temp">${tempString}</div>
        `);
    } else {
        // Update the html file
        let data = fs.readFileSync('cpu-temp.html', 'utf8');
        data = data.replace(/<div id="cpu-temp">(.*?)<\/div>/, `<div id="cpu-temp">${tempString}</div>`);
        fs.writeFileSync('cpu-temp.html', data);
    }
}

// function to run the IPMI command and update the UI
function getCpuTemp() {
    exec('ipmi sensor', (error, stdout, stderr) => {
        if (error) {
            console.log(`error: ${error.message}`);
            return;
        }
        if (stderr) {
            console.log(`stderr: ${stderr}`);
            return;
        }
        let tempData = parseTempData(stdout);
        updateCpuTempUI(tempData);
    });
}

rl.question("Please enter the IPMI command: ", (answer) => {
    exec(answer, (error, stdout, stderr) => {
        if (error) {
            console.log(`error: ${error.message}`);
            return;
        }
        if (stderr) {
console.log(`stderr: ${stderr}`);
            return;
        }
        let tempData = parseTempData(stdout);
        updateCpuTempUI(tempData);
    });
    rl.close();
});


Please feel free to fix it as I'm not very fluent in js


dependency:

sudo apt-get install nodejs npm
 
another attemp in bash:

Bash:
# function to parse the temperature data from the output of the IPMI command
parse_temp_data() {
    local data="$1"
    local temp_data=""
    while IFS= read -r line; do
        if [[ $line == *"Temperature"* ]]; then
            local temp=$(echo "$line" | awk -F "|" '{print $2}' | tr -d '[:space:]')
            local name=$(echo "$line" | awk -F ":" '{print $1}' | tr -d '[:space:]')
            temp_data+="$name: $temp "
        fi
    done <<< "$data"
    echo "$temp_data"
}

# function to update the UI element with the temperature data
update_cpu_temp_ui() {
    local temp_data="$1"

    # Create an html file if not exist
    if [ ! -f "cpu-temp.html" ]; then
        echo "<div id='cpu-temp'>$temp_data</div>" > cpu-temp.html
    else
        # Update the html file
        sed -i "s/<div id='cpu-temp'>(.*?)<\/div>/<div id='cpu-temp'>$temp_data<\/div>/g" cpu-temp.html
    fi
}

# function to run the IPMI command and update the UI
get_cpu_temp() {
    local temp_data=$(ipmitool -I lanplus -H $ip_address -U $username -P $password sdr type temperature)
    parse_temp_data "$temp_data"
    update_cpu_temp_ui "$temp_data"
}

read -p "Please enter your iDrac/IPMI IP address: " ip_address
read -p "Please enter your iDrac/IPMI username: " username
read -p "Please enter your iDrac/IPMI password: " -s password
get_cpu_temp


I end up with this error:

Error: Unable to establish IPMI v2 / RMCP+ session

what the heck?
 
Last edited:
run your command manually to verify your variables work :)

also, if the machine in question is the same as the one you're executing the query, you can drop "-I lanplus -H $ip_address". If you run it as root, you can also drop the username and password.
 
  • Like
Reactions: yjjoe
An old thread to answer, but still might be useful for someone..

First of all install lm-sensors. Make sure you can see temp from sensors command. Mine looks like below:
Code:
# sensors
coretemp-isa-0000
Adapter: ISA adapter
Package id 0:  +67.0°C  (high = +80.0°C, crit = +100.0°C)
Core 0:        +67.0°C  (high = +80.0°C, crit = +100.0°C)
Core 1:        +63.0°C  (high = +80.0°C, crit = +100.0°C)
Core 2:        +64.0°C  (high = +80.0°C, crit = +100.0°C)
Core 3:        +64.0°C  (high = +80.0°C, crit = +100.0°C)

Now it's time to edit few files.

Open /usr/share/perl5/PVE/API2/Nodes.pm . Add the thermalstate part as below:
Code:
    $res->{pveversion} = PVE::pvecfg::package() . "/" .
        PVE::pvecfg::version_text();

    $res->{thermalstate} = `sensors -j`;    # Added for CPU Temp

    my $dinfo = df('/', 1);     # output is bytes

Next /usr/share/pve-manager/js/pvemanagerlib.js . And add some code so that it looks like below:
JavaScript:
    {
        itemId: 'version',
        colspan: 2,
        printBar: false,
        title: gettext('Manager Version'),
        textField: 'pveversion',
        value: '',
    },
    {    // for CPU Thermal State
            itemId: 'thermal',
            colspan: 2,
            printBar: false,
            title: gettext('CPU Thermal State'),
            textField: 'thermalstate',
            renderer:function(value){
                let objValue = JSON.parse(value);
        let core0 = objValue["coretemp-isa-0000"]["Core 0"]["temp2_input"];
        let core1 = objValue["coretemp-isa-0000"]["Core 1"]["temp3_input"];
        let core2 = objValue["coretemp-isa-0000"]["Core 2"]["temp4_input"];
        let core3 = objValue["coretemp-isa-0000"]["Core 3"]["temp5_input"];
        return `Core0 : ${core0}&degC | Core1 : ${core1}&degC | Core2 : ${core2}&degC | Core3 : ${core3}&degC`;
            },
    },
    ],

    updateTitle: function() {
    var me = this;
    var uptime = Proxmox.Utils.render_uptime(me.getRecordValue('uptime'));
    me.setTitle(me.pveSelNode.data.node + ' (' + gettext('Uptime') + ': ' + uptime + ')');
    },
Execute systemctl restart pveproxy. Close browser and open again. Login to Proxmox and check if your widget is out of space for added new line. I just had to increase the height to adjust all inside the window properly.
JavaScript:
Ext.define('PVE.node.StatusView', {
    extend: 'Proxmox.panel.StatusView',
    alias: 'widget.pveNodeStatus',

//    height: 350
    height: 360,
    bodyPadding: '15 5 15 5',

Reference from https://www.reddit.com/r/homelab/comments/rhq56e .

Any expertise is welcome. :)
 
Last edited:
Bash:
solution

#apt-get install lm-sensors

# nano /usr/share/pve-manager/js/pvemanagerlib.js

F6 and find textField: 'pveversion',


{

    itemId: 'thermal',

    colspan: 2,

    printBar: false,

    title: gettext('Thermal State(℃)'),

    textField: 'thermalstate',

    renderer:function(value){

        const cpu_temp_arr = JSON.parse(value);

        const sections = [];

        for (const [dev, arr] of Object.entries(cpu_temp_arr)) {

            for (const [name, temps] of Object.entries(arr)) {

                if (name === 'Adapter') {

                    continue;

                }

                for (const [temp_name, temp] of Object.entries(temps)) {

                    if (temp_name.includes("_input")) {

                        sections.push(dev.split('-')[0] + ": " + temp);

                        break; //

                    }

                }

                break; //

            }

        }

        return sections.join(", ");

    }

},

        {

            itemId: 'version',

            colspan: 2,

            printBar: false,

            title: gettext('Manager Version'),

            textField: 'pveversion',

            value: '',

        },

    ],


# nano /usr/share/perl5/PVE/API2/Nodes.pm

F6 and find textField: '$res->{pveversion} ',


        $res->{pveversion} = PVE::pvecfg::package() . "/" .

            PVE::pvecfg::version_text();


        $res->{thermalstate} = `sensors -j`;


        my $dinfo = df('/', 1);     # output is bytes


# systemctl restart pveproxy


refresh web page and see on summary


Thermal State(℃)


coretemp: 46, i750bb: 67, nvme: 39.85, coretemp: 44, nvme: 40.85
 
Last edited:
  • Like
Reactions: s8reccngj39r
@proxmox staff: Any chance this gets included?
depends on multiple factors e.g. how the code looks, how exactly it's integrated, but most important, the author should use our development workflow (e.g. sending patches to our list): https://pve.proxmox.com/wiki/Developer_Documentation
also, maybe it would be good to write to the devel list before actually preparing patches (except if they already exists) to get feedback on the general design
 
depends on multiple factors e.g. how the code looks, how exactly it's integrated, but most important, the author should use our development workflow (e.g. sending patches to our list): https://pve.proxmox.com/wiki/Developer_Documentation

I had to chuckle here, not wanting to drag this off-topic, but having a workflow requiring CLA for the contributor is antagonistic enough. This was (not) discussed when asked about here earlier: https://forum.proxmox.com/threads/contributor-license-agreement-agpl.153198/#post-698209

I have since found lots of github repos where clearly the author never even attempted to get into the "development workflow", I can imagine why.

This is kind of backwards, i.e. if the authors do not have much interest, but there is users demand, someone should probably reach out to the authors or at least actively make it easier to contribute. And no, it's not just me:
https://forum.proxmox.com/threads/czech-translation-for-4-1.25448/#post-128119
 
  • Like
Reactions: binaryanomaly
I wanted to point this out... ;)

I was mostly getting at the fact, that if the workflow was e.g. github pull request (since they already forked it from the mirror), then that's very easy to initiate (it does not have to be the forum for all discussions). I don't mean to say there's a problem with developer mailing list (as well), but that really is mostly good for regulars.

Also I'd certainly prefer a properly engineered solution by proxmox. But then I'm only wishing for things here. :)

Solutions are typically "properly engineered" by anyone with enough experience in that particular field and most importantly, motivation to address that particular issue, not having to juggle between various (including valid business) interests. I would not discount the quality of outside patches.
 

About

The Proxmox community has been around for many years and offers help and support for Proxmox VE, Proxmox Backup Server, and Proxmox Mail Gateway.
We think our community is one of the best thanks to people like you!

Get your subscription!

The Proxmox team works very hard to make sure you are running the best software and getting stable updates and security enhancements, as well as quick enterprise support. Tens of thousands of happy customers have a Proxmox subscription. Get yours easily in our online shop.

Buy now!