change guest hard drive from sata to scsi

Mar 20, 2022
12
5
8
I have a Windows 11 guest, with the main hard drive as a sata drive. I would like to change this over to a scsi drive. When I attempt to change it to a SCSI or VirtIO Block I get a blue screen when booting the VM.

I have followed the instructions here: https://pve.proxmox.com/wiki/Paravirtualized_Block_Drivers_for_Windows (also a similar topic here: https://www.caretech.io/2017/10/18/...d-disk-interface-to-virtio-with-proxmox-ve-5/)

Which basically say to add a temporary drive, install some drivers from VirtIO and then you should be good to go. When I add the temporary drive, the disk is already recognized in disk management, and I can already initialize the disk, create a volume and format it, without installing any additional drivers.

I can additionally add a secondary hard drive using "SCSI" and the VM continues to boot just fine; however when I attempt to change the primary disk over to "SCSI" it never boots and I get a windows blue screen error before it reaches the welcome screen.

Code:
agent: 1
bios: ovmf
boot: order=sata0;sata2;net0
cores: 6
cpu: host
efidisk0: main:vm-100-disk-0,efitype=4m,pre-enrolled-keys=1,size=1M
hostpci0: 0000:03:00,pcie=1,x-vga=1
hostpci1: 0000:0e:00,pcie=1
hostpci2: 0000:0f:00,pcie=1
machine: pc-q35-6.1
memory: 8192
meta: creation-qemu=6.1.0,ctime=1638831296
name: windows-11
net0: e1000=26:29:DD:B1:CA:51,bridge=vmbr0,firewall=1
numa: 0
ostype: win11
sata0: main:vm-100-disk-2,discard=on,size=64G,ssd=1
sata2: local:iso/virtio-win.iso,media=cdrom,size=543390K
scsi1: fast:vm-100-disk-0,discard=on,size=300G,ssd=1
scsihw: virtio-scsi-pci
smbios1: uuid=4e44a9b6-1a1d-4d93-a360-a7019f10d158
sockets: 1
spice_enhancements: foldersharing=1
tpmstate0: main:vm-100-disk-1,size=4M,version=v2.0
vga: qxl
vmgenid: aac9e774-1c6d-43c5-bc0d-6416a03f7521
 
Last edited:
Hmm, just tested it again in a Win11 VM.

  1. Installed all driver from the VirtIO ISO by running the "virtio-gt-win-x64" installer.
  2. Attached a new disk with SCSI bus. Wait for it to be detected within Disk Management, and it also showed up in the device manager.
  3. I shut down the VM.
  4. Remove the temporary disk
  5. Detach the main disk. Edit it and configure it at SCSI.
  6. Then adapt the boot order in the VM options to boot from scsi0 first.
  7. Boot the VM.

Works here. Did you do it exactly like this?

I did not test it with some PCI devices passed through though! Not sure how much of an impact that might have.
 
Yes I have done exactly as the instructions say.

The weird thing is that I also have 2 other virtual disks in the machine that are using SCSI (although these were created that way since the beginning). But as soon as I switch the boot disk to SCSI I get a blue screen before the Login Screen appears.

Removing the PCI devices did not make any difference.
 
Occasionally, after the VM reboots automatically due to the blue screen it will attempt to do a "startup repair"; however it always fails.
 
hmm I am a bit at a loss. The situation you describe sounds like that Windows installation has never seen a disk needing that driver.
If you change the bus type back to sata, the VM should boot fine again. It might need one boot to the recovery mode, though, where you can shut it down cleanly.

I would try to get it back booting with the disk as SATA. Then attach a new small dummy disk as SCSI, make sure it shows up as "QEMU QEMU HARDDISK SCSI Disk Device"

And then give it another try.

There is not much more I can recommend here unfortunately. :-/
 
I'm able to get back to the OS just fine if switching back to sata.

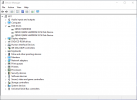
As you can see in the attached image, I have 2 drives attached (and working) that are "QEMU QEMU HARDDISK SCSI Disk Device"... These are not even dummy disks, but drives I'm actually using for storage... But switching the boot drive (currently "QEMU HARDDISK") to SCSI yields the blue screen)

Do you think this could possible be due to the "EFI Disk" or "TPM State". Neither of those give a "detach" option, so I'm not sure how I would even reconfigure them.

Or perhaps Windows is somehow storing the disk serial number or something and it believes it already knows that disk should be QEMU HARDDISK and can't adjust it during boot?

I don't think any of these options would be the cause, but when I switch it to SCSI these are the options I have:
Cache: Default (No cache)
Discard: Yes
SSD emulation: Yes
Backup: Yes
IO Thread: No
Skip replication: No
Read-only: No
Async IO: Default (io_uring)
1647990445633.png
 
try disable fast boot
try safemode once
Disabling fast boot didn't work...

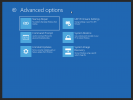
How can I get to safe mode? I thought it was supposed to be in this menu. I also attempted to use the installation disk to repair the operating system, which also fails to repair.
1648086153205.png
 
"Startup Settings" is missing. Sorry for my english, i would mean keep off "Turn on Fast Startup" from Power Settings.
under cmd elevated you can enable Legacy F8 Boot Menu with command :
bcdedit /set "{current}" bootmenupolicy legacy
Reboot, change to scsi then Quick press F8 to show Windows 7 like legacy boot menu. Once safemode boot done, restart, then boot driver missing will be enable.
 
  • Like
Reactions: ReenigneArcher
Resolved! Thank you @_gabriel !

These are the exact steps and commands I used. Hopefully this will help someone else in the future.
  1. With hdd set to sata, boot to Windows
  2. Open elevated cmd prompt
  3. Execute the following command
    Code:
    bcdedit /set {default} safeboot network
  4. Restart Windows (just to verify it enters safe mode)
  5. Shutdown Windows
  6. Detach the sata drive
  7. Reattach the drive as an SCSI drive
  8. Set the drive to the first boot option in options
  9. Start the VM
  10. Open elevated cmd prompt (I had to navigate to C:\Windows\System32 and right click on cmd.exe
  11. Execute the following command
    Code:
    bcdedit /deletevalue {default} safeboot
  12. Restart Windows
I used this as reference: https://www.lifewire.com/how-to-force-windows-to-restart-in-safe-mode-2625163
Thanks man, that worked for me!
Now I have a different issue. the ballooning stopped working properly. I ran the virtio repair and still no dice. Even after that I do not see the balloon service anywhere so I am troubleshooting that now. Any ideas, by chance?
 
you can installer Balloon service manually, even with last Windows 11 version :
https://pve.proxmox.com/wiki/Dynamic_Memory_Management#Enable_Auto-Ballooning_on_Windows_2008r2
Right on, thanks. I’ve already tried installing it by right-clicking on the setup and that didn’t work and I also tried doing
Code:
blnsrv.exe -i
as well. It said it installed but the service still doesn't run. The Event Viewer says the file cannot be found.

I have tried doing this all after mounting the virtio as a CD/DVD from the desktop. Do you think it makes any difference doing that vs attaching the CD/DVD though proxmox instead?
 
did you copy/paste files in a new folder as specified ?
because service is installed from path...
 

About

The Proxmox community has been around for many years and offers help and support for Proxmox VE, Proxmox Backup Server, and Proxmox Mail Gateway.
We think our community is one of the best thanks to people like you!

Get your subscription!

The Proxmox team works very hard to make sure you are running the best software and getting stable updates and security enhancements, as well as quick enterprise support. Tens of thousands of happy customers have a Proxmox subscription. Get yours easily in our online shop.

Buy now!