Complete Guide: Setting Up ARM64 Virtual Machines on Proxmox for Raspberry Pi 5 Development
Overview
This guide documents how to create ARM64 virtual machines on Proxmox for Raspberry Pi development and testing. Based on real-world experience setting up VM ID 277 with Debian ARM64 and Raspberry Pi OS.
Prerequisites
Common available CPUs:
Method A: Command Line
Method B: Web Interface
Common Error:
Solutions:
Working <VM-ID>.conf:
Step 5: Install ARM64 OS - Two Methods
Method 1: Install Debian ARM64 then Convert to Raspberry Pi OS
Step 7: Post-Installation Setup
Update Operating System
After first boot, update the system packages:
Install QEMU Guest Agent
Install for better Proxmox integration:
Verify Installation
Check if guest agent is running:
Troubleshooting
CPU Type Issues
Performance Issues
- Increase memory if needed
- Use virtio drivers for storage/network
Boot Issues
- Verify UEFI firmware: bios: ovmf
- Check ISO is properly attached
- Ensure ARM64 ISO (not x86_64)
Useful Commands
CPU Information Commands
Notes

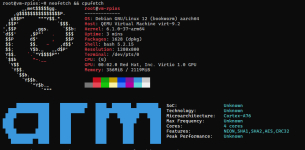
neofetch && cpufetch

This writeup was formatted and enhanced using AI tools for better readability and completeness.
Overview
This guide documents how to create ARM64 virtual machines on Proxmox for Raspberry Pi development and testing. Based on real-world experience setting up VM ID 277 with Debian ARM64 and Raspberry Pi OS.
Prerequisites
- Proxmox VE 8.x or later
- ARM64 ISO (Debian ARM64, Raspberry Pi OS ARM64, etc.)
- Minimum 2GB RAM, 8GB storage
Code:
qemu-system-aarch64 -cpu help | grep -i cortex- cortex-a53 - ARMv8, 4-core
- cortex-a57 - ARMv8, 4-core (baseline)
- cortex-a72 - ARMv8, +20% performance
- cortex-a76 - ARMv8.2, +40% performance (RPi5-like)
Method A: Command Line
Code:
qm create <VM-ID> --name vm-rpios-aarch64 --arch aarch64 --machine virt --cpu cortex-a76 --sockets 1 --cores 4 --memory 2048
qm set <VM-ID> --bios ovmf
qm set <VM-ID> --scsi0 local-lvm:8,format=raw
qm set <VM-ID> --net0 virtio,bridge=vmbr0- Create VM → OS Type: Linux → Version: 6.x - 2.6 Kernel
- Advanced → Architecture: aarch64
- BIOS: OVMF (UEFI)
Common Error:
Code:
vm <VM-ID> - unable to parse value of 'cpu' - Built-in cputype 'cortex-a76' is not defined- Use custom prefix:
Code:
qm set <VM-ID> --cpu custom-cortex-a76 - Use args override:
Code:
qm set <VM-ID> --args "-cpu cortex-a76" - Remove old setting:
Code:
qm set <VM-ID> --delete cpu
Working <VM-ID>.conf:
Code:
agent: 1
arch: aarch64
args: -cpu cortex-a76
balloon: 2048
bios: ovmf
boot: order=scsi0
cores: 4
efidisk0: local-lvm:vm-<VM-ID>-disk-2,efitype=4m,size=64M
memory: 2048
name: vm-rpios-aarch64
net0: virtio=XX:XX:XX:XX:XX:XX,bridge=vmbr0
ostype: l26
scsi0: local-lvm:vm-<VM-ID>-disk-0,size=8G
scsihw: virtio-scsi-pci
sockets: 1Method 1: Install Debian ARM64 then Convert to Raspberry Pi OS
- Download Debian ARM64 ISO:
Code:wget https://cdimage.debian.org/debian-cd/current/arm64/iso-dvd/debian-12.9.0-arm64-DVD-1.iso - Attach and install Debian ARM64:
Code:qm set <VM-ID> --scsi1 /path/to/debian-12.9.0-arm64-DVD-1.iso,media=cdrom - After Debian installation, convert to Raspberry Pi OS:
Code:# Install Raspberry Pi kernel and packages curl -fsSL https://archive.raspberrypi.org/debian/raspberrypi.gpg.key | sudo gpg --dearmor -o /usr/share/keyrings/raspberrypi-archive-keyring.gpg echo "deb [signed-by=/usr/share/keyrings/raspberrypi-archive-keyring.gpg] http://archive.raspberrypi.org/debian/ bookworm main" | sudo tee /etc/apt/sources.list.d/raspi.list sudo apt update && sudo apt install raspberrypi-kernel raspberrypi-bootloader raspi-config - Follow official conversion guides:
https://www.raspberrypi.com/documentation/computers/linux_kernel.html#kernel
https://github.com/jiangcuo/pxvirt/wiki/Install-or-upgrade-from-repo
- Download Raspberry Pi Imager:
https://www.raspberrypi.com/software/ - Download Raspberry Pi OS ARM64:
https://www.raspberrypi.com/software/operating-systems/ - Create Raspberry Pi OS image using Pi Imager
- Convert and import to Proxmox:
Code:# Convert Raspberry Pi OS image for Proxmox qm importdisk <VM-ID> /path/to/raspios.img local-lvm --format raw - Troubleshoot /boot and /efivars issues:
https://forum.proxmox.com/threads/h...ry-pi-os-images-and-import-to-proxmox.146837/
Code:
qm start <VM-ID>Update Operating System
After first boot, update the system packages:
Code:
sudo apt update && sudo apt upgrade -y
sudo apt autoremove -y
Install for better Proxmox integration:
Code:
sudo apt install qemu-guest-agent -y
sudo systemctl enable qemu-guest-agent
sudo systemctl start qemu-guest-agentCheck if guest agent is running:
Code:
sudo systemctl status qemu-guest-agentCPU Type Issues
Code:
qemu-system-aarch64 -cpu help | grep cortex- Increase memory if needed
- Use virtio drivers for storage/network
Boot Issues
- Verify UEFI firmware: bios: ovmf
- Check ISO is properly attached
- Ensure ARM64 ISO (not x86_64)
Useful Commands
Code:
qm config <VM-ID>
qm showcmd <VM-ID> | grep -E "(arch|machine|cpu)"
qm status <VM-ID>
qm monitor <VM-ID>
Code:
# Install system information tools
sudo apt install neofetch cpufetch -y
# Display system information
neofetch
# Display detailed CPU information
cpufetch- ARM64 emulation uses software (TCG) - expect 20-40% native performance
- GPIO and RPi-specific hardware not available
- Use for software development, not hardware-specific testing
- Consider real RPi5 for final testing

neofetch && cpufetch

This writeup was formatted and enhanced using AI tools for better readability and completeness.

