[TUTORIAL] How to convert Raspberry Pi OS images and import to Proxmox

primetechguides

New Member
May 11, 2024
1
4
3
I have Proxmox installed on a Raspberry Pi 5.

I wanted to have the VMs use the official Raspbian OS images. These are the steps to do it, looks more than it actually is. It was also based off my previous guide to do this on ESXI.

ESXI instructions similar

On a Linux computer:

Code:
apt-get install qemu-utils

Download a Raspberry Pi Image
Code:
xz -d 2024-03-15-raspios-bookworm-arm64-lite.img.xz

qemu-img convert -f raw 2024-03-15-raspios-bookworm-arm64-lite.img -O qcow2 2024-03-15-raspios-bookworm-arm64-lite.qcow2
qemu-img resize 2024-03-15-raspios-bookworm-arm64-lite.qcow2 20G

Copy the qcow2 image to Proxmox running server. I use WinSCP to /var/lib/vz/template/qcow

------------------------------------------
If Proxmox is running on a Raspberry Pi. Set below to enable SSH.
Code:
raspi-config
Interface Options > SSH > Enable

nano /etc/ssh/sshd_config

Set the below line
Code:
PermitRootLogin yes
CTRL+S > CTRL+X to save and quit.

Code:
service sshd restart
------------------------------------------

I use WinSCP to connect to Raspbbery Pi to transfer files
Create a new folder /var/lib/vz/template/qcow
Copy qcow2 file made earlier.

Download debian-12.5.0-arm64-netinst.iso [ Ensure it is the arm64 version ]
https://cdimage.debian.org/debian-cd/current/arm64/iso-cd/debian-12.5.0-arm64-netinst.iso

In Proxmox Web Interface.
Click the Proxmox Storage example local
Click ISO Images
Upload the Debian Netinst image.

Create a new VM in Proxmox
OS > Use CD/DVD - Storage Local > ISO Image - select the Debian Netinst iso.
System > BIOS - Select OVMF (UEFI)
EFI Storage > Local
Disks > Remove the scsi0 which it adds automatically.
So you have no Disks.
Finish the VM Creation.

Back to SSH on the Proxmox server.
Code:
cd /var/lib/vz/template/qcow

This is where you uploaded the .qcow2 image.

Code:
qm importdisk 100 2024-03-15-raspios-bookworm-arm64-lite.qcow2 local
Import disk where [local] is the name of your Proxmox storage and [100] is the VM ID

Click the VM in Proxmox and select Hardware.
You should now have 'Unused Disk 0' listed at the bottom
Double Click 'Unused Disk 0'
Ensure Bus/Device is SCSI and click Add.

Start the VM and it should boot the Debian Netinst.
Click Advanced Options > Rescue Mode
Enter through the options UNTIL you see 'Device to use as root file system' > Select '/dev/sda2'.
Click 'Execute a shell in /dev/sda2' > Click Continue

Code:
raspi-config --expand-rootfs

*** Reset the VM immediately after this command. ***
Go back through 'Advanced Options' > 'Rescue Mode' > 'Excecute a shell in /dev/sda2'

Code:
resize2fs /dev/sda2
nano /etc/fstab

Enter the below line at the end of the file. Then CTRL+S , CTRL+X to save.
Code:
none /sys/firmware/efi/efivars efivarfs defaults

Code:
mount /boot/firmware
touch /boot/firmware/ssh
mount /sys/firmware/efi/efivars
ls /sys/firmware/efi/efivars/


apt update
apt -y install grub-efi-arm64
apt -y install linux-image-arm64
apt-get -y purge linux-image.*rpi.*


grub-install --efi-directory=/boot/firmware
update-grub2

If you are using Raspberry OS Full and not Lite, Debian Bookworm Wayland does not seem to work, you would need to switch back to X11 desktop environment.

Code:
raspi-config
Advanced Options - Wayland - X11

Stop VM.
Click Proxmox > VM > Options > Boot Order
Enable the scsi0 hard drive and move this to the top of the list.
Click OK
Click Hardware > Double Click CD/DVD Drive.
Click 'Do not use any media'.

Start the VM and keep tapping ESC key to get into the BIOS.
Click Boot Manager.

If debian is not listed in the options we need to add a Boot Entry:
* Back to main menu of BIOS.
* Click Boot Options
* Add Boot Option
* Click bootfs.
* Click EFI > Debian
* Click grubbaa64.efi
* Type debianboot
* Click Commit.
* Change order and make sure debian is at the top.

Restart and Raspbian should start.
 
Last edited:
Thank you so much for this. I've registered on this forum specifically to thank you @primetechguides for this excellent guide.
I have had a little trouble getting the 'debianboot' boot option to stick/be persistent, but that is a small price to pay for the convenience of being able to spin up Raspi VM instances whenever I want.

Thanks again.
 
Thank you very much @primetechguides for this!
I have been carefully following all the steps, but I get an error message when I want to start the VM at the end:

Debian-access-denied.png

From what I could find this issue might be related to SecureBoot - turning it off in the BIOS did not help, and removing the "pre-enroll keys" as someone else suggested didn't help either even after recreating the VM.

Hardware : Raspberry Pi 5 (8GB), M.2 SSD (4 TB Lexar NM790), PoE+ HAT
OS: Raspberry Pi OS 64 Bit
Virtualization : Proxmox 8.2.4

Home Assistant OS has already been running successfully as a VM on it for weeks.

Any help would be much appreciated!

Thanks so much in advance.
 
Thank you very much @primetechguides for this!
I have been carefully following all the steps, but I get an error message when I want to start the VM at the end:

View attachment 71326

From what I could find this issue might be related to SecureBoot - turning it off in the BIOS did not help, and removing the "pre-enroll keys" as someone else suggested didn't help either even after recreating the VM.

Hardware : Raspberry Pi 5 (8GB), M.2 SSD (4 TB Lexar NM790), PoE+ HAT
OS: Raspberry Pi OS 64 Bit
Virtualization : Proxmox 8.2.4

Home Assistant OS has already been running successfully as a VM on it for weeks.

Any help would be much appreciated!

Thanks so much in advance.
Were you ever able to find a solution? I am currently stuck at this point as well. The only difference is that I was attempting to use ubuntu desktop jammy arm64 as the OS to load instead of raspios.
 
Hi @jatkins11
No, I have never received a reply and I wanted to get my Pi up as soon as possible so I ended up creating a minimal Ubuntu 24.04 LTS template which did the trick and has been running quite well ever since :)
 
@Bembel and anyone else that stumbles across this I have made some progress. I was able to get the system to "boot", but now all I can see is "Display output is not active." the way that I made it this far was by following a combination of the instructions above and the steps on this thread.
Since I attempting to use ubuntu desktop jammy arm64 I couldn't use the raspi-config --expand-rootfs command. As an alternative I manually expanded the rootfs by following the other thread.

Other items of note:
- I had to add the ipaddress for ports.ubuntu.com into /etc/hosts for proper resolution to use apt update.
- Before running grub-install I had to use the following command "mount /dev/sda1 /boot/firmware".
- After hitting esc to get into the boot settings ensure that secure boot is disabled.

I am now trying to figure out how to get past the display output is not active message.

@Bembel the template you created is it Ubuntu server or desktop? Could you point me in the direction to the steps you followed?
 
Last edited:
@jatkins11 I used an Ubuntu 24.04 LTS server ARM64 ISO (from here) and chose a minimal installation with no GUI/desktop. After manually updating the OS I have converted the VM to a template.
 
Hi.
Im using proxmox in a x86 computer.
I want to install raspbian in a VM.
If i follow your guide, i will end with a /boot/config.txt file in the VM of raspbian? (i mean, following your guide that file is still present and works like with a normal rpi?)
Thanks
 
Hello. By taking the OP instructions and some ideas from this tutorial, I've managed to get Raspberry Pi OS running on a x86 Proxmox. Here is the procedure I've followed:

First ensure that pve-edk2-firmware-aarch64 is installed on Proxmox machine:
Bash:
apt update
apt install pve-edk2-firmware-aarch64
and follow the OP instructions to get the Raspberry Pi OS image on the Proxmox machine and converted to .qcow2:

  • On a Linux computer (you can use your Proxmox machine):apt-get install qemu-utils
  • Download a Raspberry Pi Image and decompress it: xz -d 2024-03-15-raspios-bookworm-arm64-lite.img.xz
  • Convert and resize:
  • Bash:
    qemu-img convert -f raw 2024-03-15-raspios-bookworm-arm64-lite.img -O qcow2 2024-03-15-raspios-bookworm-arm64-lite.qcow2
    qemu-img resize 2024-03-15-raspios-bookworm-arm64-lite.qcow2 20G
  • Copy the qcow2 image to Proxmox machine.

Then

  1. Get the Debian arm64 netinst ISO on Proxmox (Proxmox Storage -> ISO Images -> Download from URL )
  2. Create VM
    • On 'OS' tab
      • Check 'Do not use any media'
    • On 'System' tab
      • Change BIOS to 'OVMF (UEFI)'
      • Uncheck 'Add EFI Disk'
      • Change SCSI Controller to 'VirtIO SCSI' (not Single)
    • On 'Disks' tab delete all disks (it will be added later)
    • On 'CPU' tab delete 'Type' (must be 'Default (kvm64)')
  3. Select the newly created VM, select 'Hardware' and remove the CD/DVD drive
  4. Now add the disk:
    • On Proxmox shell execute
    • Bash:
      qm importdisk <VM_ID> <raspios.qcow2> <STORAGE_NAME>
    where <VM_ID> is the id of the VM (i.e. 100), <raspios.qcow2> is the converted Raspberry PI OS image, and <STORAGE_NAME>is the name of the Proxmox storage to use (i.e. local).
    • Go back to the Proxmox webui and go to VM 'Hardware' settings. There must be now an 'unused disk'. Double click it and add to the VM (default settings, SCSI disk 0)
  5. Add the CD/DVD. On VM 'Hardware' settings, add CD/DVD drive as SCSI disk 1, with the Debian Arm64 netinst ISO
  6. Setup boot order. On VM 'Options', change boot order to place the CD/DVD on the first place
  7. Edit VM configuration file.
    • On Proxmox shell, execute
    • Bash:
      nano /etc/pve/qemu-server/<vm-id>.conf
    • modify the following, save with ctrl-s, exit with ctrl-x:
      • Add arch: aarch64 at the bottom of the file
      • Comment out the line that starts with vmgenid: by adding a # at the beginning
      • Remove the line that starts with cpu:, if it exists
  8. Start the VM. Select 'Advanced options -> Rescue Mode'. The console will show 'Display output is not active' for a few seconds before continuing. Go through the options until you see 'Device to use as root file system', then select '/dev/sda2'. Then select 'Execute a shell in /dev/sda2' and 'Continue'
  9. Execute
Bash:
raspi-config --expand-rootfs
you have to reset the VM after this step.

10. Go again to the shell by repeating step 8
11. Execute

Bash:
resize2fs /dev/sda2
then edit fstab:

Bash:
nano /etc/fstab
and add at the bottom the following line

Bash:
none    /sys/firmware/efi/efivars efivarfs defaults
save and then execute

Bash:
mount /boot/firmware
touch /boot/firmware/ssh
mount /sys/firmware/efi/efivars


Bash:
apt update
apt -y install grub-efi-arm64 linux-image-arm64
apt-get -y purge linux-image.*rpi.*
For the apt to work the machine must be connected to the internet. Usually you will need a DHCP server on the VM network for this. I had some resolv problems with static IP.
12. Install grub

Bash:
grub-install --efi-directory=/boot/firmware
update-grub2

13. If you are using Raspberry OS Full and not Lite, Debian Bookworm Wayland does not seem to work, you would need to switch back to X11 desktop environment. Execute `raspi-config` and select 'Advanced Options' -> 'Wayland' -> 'X11'

14. Exit from rescue shell and select 'Reboot' option. On startup press ESC to enter BIOS. Add a new boot entry to the BIOS. If debian is not listed in the options we need to add a boot entry:
* Back to main menu of BIOS.
* Click Boot Options
* Add Boot Option
* Click bootfs.
* Click EFI > Debian
* Click grubbaa64.efi
* Type debianboot
* Click Commit.
* Change order and make sure debian is at the top.

15. If the VM boots to the Grub cli, you must load again the Debian netinst ISO on the CD/DVD and go to rescue mode like in point 8. Once in the shell, reinstall Grub by executing `update-grub2` like in point 13. Then exit shell and reboot again. I don't know why this second time works.

While booting, the display can show the message 'Display output is not active'. This message may be there for a few minutes on the first boot. For consecutive boots it shows for less time. Eventually the display becomes active and you can login into your Raspberry Pi VM.

Regards.
 
Last edited:
@Peluko thank you. quick comment, you can't run apt-get install qemu-utils on a pve host (as it'd remove proxmox-ve). That package already exists on a PVE host. Maybe this should be removed from the quoted part above.

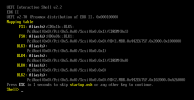
Also, I'm stuck after booting the VM. This is the screen I end up with on the console after the porxmox boot splash:
1735546022840.png
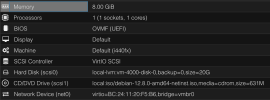
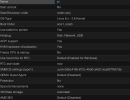
This is how the VM is configured:
1735546095879.png
1735546067225.png

Any idea what's going on?
 
Last edited:
@Peluko thank you. quick comment, you can't run apt-get install qemu-utils on a pve host (as it'd remove proxmox-ve). That package already exists on a PVE host. Maybe this should be removed from the quoted part above.

Also, I'm stuck after booting the VM. This is the screen I end up with on the console after the porxmox boot splash:
[...]

Any idea what's going on?

Hello. I think that this has something to do with the UEFI config for VM booting. What I did for booting is explained in point 14 of the guide.

Regards.
 

About

The Proxmox community has been around for many years and offers help and support for Proxmox VE, Proxmox Backup Server, and Proxmox Mail Gateway.
We think our community is one of the best thanks to people like you!

Get your subscription!

The Proxmox team works very hard to make sure you are running the best software and getting stable updates and security enhancements, as well as quick enterprise support. Tens of thousands of happy customers have a Proxmox subscription. Get yours easily in our online shop.

Buy now!