I personally did not need to put this line to get it to work. Based on qfina's post, he/she had the IP of the NUT server (Proxmox host) entered.Question in Item #11
LISTEN xxx.xxx.xxx.xxx 3493
Should this IP address be the Client in the Container or the IP address of the Server as the Proxmox host?
Config for Network UPS Tool (NUT) for Prolink
- Thread starter sleeper52
- Start date
You are using an out of date browser. It may not display this or other websites correctly.
You should upgrade or use an alternative browser.
You should upgrade or use an alternative browser.

@sleeper52 Everything is looking good,,,,
It's so much easier having the Proxmox Host and NUT server on the same IP.
The client-server in the container has blank values for the Input / Output / Load %.
Did I miss something or is this an APC compatibility?
Everything else looks great!
It's so much easier having the Proxmox Host and NUT server on the same IP.
The client-server in the container has blank values for the Input / Output / Load %.
Did I miss something or is this an APC compatibility?
Everything else looks great!
Output: | |
|---|---|
UPS Model: | Smart-UPS_1000 |
Status: | ONLINE |
Runtime: | 01:40:18 |
Battery: | 26.9 V |
Input: |
| battery.charge | : | 98 |
| battery.charge.low | : | 10 |
| battery.charge.warning | : | 50 |
| battery.runtime | : | 5991 |
| battery.runtime.low | : | 150 |
| battery.type | : | PbAc |
| battery.voltage | : | 26.9 |
| battery.voltage.nominal | : | 24.0 |
| device.mfr | : | American Power Conversion |
| device.model | : | Smart-UPS_1000 |
| device.serial | : | AB2109162124 |
| device.type | : | ups |
| driver.name | : | usbhid-ups |
| driver.parameter.pollfreq | : | 30 |
| driver.parameter.pollinterval | : | 15 |
| driver.parameter.port | : | auto |
| driver.parameter.productid | : | 0003 |
| driver.parameter.synchronous | : | auto |
| driver.parameter.vendorid | : | 051D |
| driver.version | : | 2.8.0 |
| driver.version.data | : | APC HID 0.98 |
| driver.version.internal | : | 0.47 |
| driver.version.usb | : | libusb-1.0.26 (API: 0x1000109) |
| ups.beeper.status | : | disabled |
| ups.delay.shutdown | : | 180 |
| ups.firmware | : | UPS 15.5 / ID=1018 |
| ups.mfr | : | American Power Conversion |
| ups.mfr.date | : | 2021/03/03 |
| ups.model | : | Smart-UPS_1000 |
| ups.productid | : | 0003 |
| ups.serial | : | AS2109162124 |
| ups.status | : | OL CHRG |
| ups.timer.reboot | : | -1 |
| ups.timer.shutdown | : | -1 |
| ups.vendorid | : | 051d |
I'm not entirely sure since I don't use an APC UPS. Might want to ask @bigjim63 since he's using one. He also posted his config files so you might want to check those out.@sleeper52 Everything is looking good,,,,
It's so much easier having the Proxmox Host and NUT server on the same IP.
The client-server in the container has blank values for the Input / Output / Load %.
Did I miss something or is this an APC compatibility?
Everything else looks great!
Smart-UPS_1000 ONLINE 01:40:18 26.9 V
battery.charge : 98 battery.charge.low : 10 battery.charge.warning : 50 battery.runtime : 5991 battery.runtime.low : 150 battery.type : PbAc battery.voltage : 26.9 battery.voltage.nominal : 24.0 device.mfr : American Power Conversion device.model : Smart-UPS_1000 device.serial : AB2109162124 device.type : ups driver.name : usbhid-ups driver.parameter.pollfreq : 30 driver.parameter.pollinterval : 15 driver.parameter.port : auto driver.parameter.productid : 0003 driver.parameter.synchronous : auto driver.parameter.vendorid : 051D driver.version : 2.8.0 driver.version.data : APC HID 0.98 driver.version.internal : 0.47 driver.version.usb : libusb-1.0.26 (API: 0x1000109) ups.beeper.status : disabled ups.delay.shutdown : 180 ups.firmware : UPS 15.5 / ID=1018 ups.mfr : American Power Conversion ups.mfr.date : 2021/03/03 ups.model : Smart-UPS_1000 ups.productid : 0003 ups.serial : AS2109162124 ups.status : OL CHRG ups.timer.reboot : -1 ups.timer.shutdown : -1 ups.vendorid : 051d
Hi there.9. Create a new ups.conf filenano /etc/nut/ups.confand enter the following
NOTE: Enter the details of the UPS values as according to the values provided in theCode:pollinterval = 15 maxretry = 3 offdelay = 180 ondelay = 300 #Enter the nut-scanner -U values here [prolink] driver = nutdrv_qx port = auto desc = "Prolink PRO1501SFCU UPS" vendorid = 0665 productid = 5161nut-scanner -Ucommand.
NOTE: You can name the UPS whatever you like inside the brackets; the name will be used in calling the UPS (ie. upsc prolink@localhost)
10. Once both config files are saved, you can run it by typingupsdrvctl startand you should get a result similar to
Code:Network UPS Tools - UPS driver controller 2.8.0 Network UPS Tools - Generic Q* USB/Serial driver 0.32 (2.8.0) USB communication driver (libusb 1.0) 0.43 Using protocol: Voltronic-QS 0.07 No values for battery high/low voltages Using 'guesstimation' (low: 20.800000, high: 26.000000)! Battery runtime will not be calculated (runtimecal not set) Broadcast message from root@pve (somewhere) (Wed Aug 2 11:46:33 2023): Communications with UPS prolink@localhost established
I've got a Tripp Lite AVR900U that I have named as tripplite (instead of your prolink). When I get to step 10 (as quoted above), I get the following:
Code:
Network UPS Tools - UPS driver controller 2.8.0
Network UPS Tools - Generic HID driver 0.47 (2.8.0)
USB communication driver (libusb 1.0) 0.43
Can't claim USB device [09ae:3024]@0/0: Entity not found
Driver failed to start (exit status=1)
I've exceeded the breadth of my Google-Fu, so I'm really not sure where the issue is. I'd read in another thread elsewhere that the cable could be the issue so I had already tried to replace that (though Amazon doesn't make it easy to know if you're getting precisely what you need). I'm not sure if I've had NUT functional since I transitioned to VE 8. My upgrade didn't go well, and I'm still putting pieces back together again.
Hi,Hi there.
I've got a Tripp Lite AVR900U that I have named as tripplite (instead of your prolink). When I get to step 10 (as quoted above), I get the following:
Code:Network UPS Tools - UPS driver controller 2.8.0 Network UPS Tools - Generic HID driver 0.47 (2.8.0) USB communication driver (libusb 1.0) 0.43 Can't claim USB device [09ae:3024]@0/0: Entity not found Driver failed to start (exit status=1)
I've exceeded the breadth of my Google-Fu, so I'm really not sure where the issue is. I'd read in another thread elsewhere that the cable could be the issue so I had already tried to replace that (though Amazon doesn't make it easy to know if you're getting precisely what you need). I'm not sure if I've had NUT functional since I transitioned to VE 8. My upgrade didn't go well, and I'm still putting pieces back together again.
What do you get get when u type
nut-scanner -U and typing lsusb?And what does your
nano /etc/nut/ups.conf file look like?
Last edited:
nut-scanner -U
Code:
[nutdev1]
        driver = "usbhid-ups"
        port = "auto"
        vendorid = "09AE"
        productid = "3024"
        product = "AVR900U"
        serial = "redacted"
        vendor = "Tripp Lite"
        bus = "001"
lsusb
Code:
Bus 001 Device 011: ID 09ae:3024 Tripp Lite AVR900Unano /etc/nut/ups.conf
Code:
pollinterval = 15
maxretry = 3


offdelay = 180
ondelay = 330


[tripplite]
driver = usbhid-ups
port = auto
desc = "Tripp Lite AVR900U"
# these two are optional
vendorid = 09AE
productid = 3024
It doesn't make a difference if I change it there (and elsewhere) to
nutdev1 either.that looks right. I just remembered Techno Tim mention that there is an additional configuration for Tripp Lite UPS devices. Please check this out. I've already set the timestamp to 30:44 where he talks about it. Hopefully this resolves your issue.nut-scanner -U
Code:[nutdev1] driver = "usbhid-ups" port = "auto" vendorid = "09AE" productid = "3024" product = "AVR900U" serial = "redacted" vendor = "Tripp Lite" bus = "001"
lsusb
Code:Bus 001 Device 011: ID 09ae:3024 Tripp Lite AVR900U
nano /etc/nut/ups.conf
Code:pollinterval = 15 maxretry = 3 offdelay = 180 ondelay = 330 [tripplite] driver = usbhid-ups port = auto desc = "Tripp Lite AVR900U" # these two are optional vendorid = 09AE productid = 3024
It doesn't make a difference if I change it there (and elsewhere) tonutdev1either.
Last edited:
Thanks for the share. I remember setting up a rules file (not the exact one specified) but it doesn't seem to have made a difference. I saw...somewhere...in some thread...suggesting powering down the UPS and restarting it so I'll find a quiet time, maybe this weekend, to do that, see if that helps at all.that looks right. I just remembered Techno Tim mention that there is an additional configuration for Tripp Lite UPS devices. Please check this out. I've already set the timestamp to 30:44 where he talks about it. Hopefully this resolves your issue.
If you are like me, and you have just ctrl+c ctrl+v the nano commands, there is a typo in step 28.
"nano /etc/nut/upssmon.conf" should be "nano /etc/nut/upsmon.conf" which causes the service "nut-client" to crash in the LXC container.
@SilicaStorm I dont think its necessary, actually I think it's the nut-server to won't start. I didnt put it there and everything is working just fine.
"nano /etc/nut/upssmon.conf" should be "nano /etc/nut/upsmon.conf" which causes the service "nut-client" to crash in the LXC container.
@SilicaStorm I dont think its necessary, actually I think it's the nut-server to won't start. I didnt put it there and everything is working just fine.
Tested on Prolink PRO903-ERS it shutdown when power off but when power comeback it also still shutdown . i don't know what's wrong? also i can't change upsrw -s ups.delay.shutdown=180 prolink@localhost it always come back to default value 30 after reboot.Update: I have finally successfully got the Prolink PRO1501SFCU running with NUT.
The process and configuration is as below.
1. Ensure the USB cable from the UPS is connected to the Proxmox server
2. SSH into the Proxmox server or open it's shell terminal; we will be configuring this as the NUT server.
3. Update the repositories and packages
apt update && apt dist-upgrade -y
4. Install the NUT packageNOTE: As of using Proxmox 8, I could only get NUT 2.8.x-x to work as the prior versions (ie. 2.7.x-x) had a lot of errorsCode:apt install NUT
NOTE: If you had a prior version of NUT installed, ensure you use the commandCode:root@pve:~# apt-cache policy nut nut-server nut-client nut: Installed: 2.8.0-7 Candidate: 2.8.0-7 Version table: *** 2.8.0-7 500 500 http://deb.debian.org/debian bookworm/main amd64 Packages 100 /var/lib/dpkg/status nut-server: Installed: 2.8.0-7 Candidate: 2.8.0-7 Version table: *** 2.8.0-7 500 500 http://deb.debian.org/debian bookworm/main amd64 Packages 100 /var/lib/dpkg/status nut-client: Installed: 2.8.0-7 Candidate: 2.8.0-7 Version table: *** 2.8.0-7 500 500 http://deb.debian.org/debian bookworm/main amd64 Packages 100 /var/lib/dpkg/status
apt purge nutor doapt autoremove
to ensure that it's dependencies (ie. nut-server, nut-client, etc.) and config files are also removed. I had some trouble after installing the new NUT version as the prior configs (ie. /etc/nut, /run/nut, and some services) were interfering.
5. Check if the UPS usb cable is detected by the Proxmox server.
Code:root@pve:~# lsusb ... Bus 001 Device 002: ID 0665:5161 Cypress Semiconductor USB to Serial ... root@pve:~# lsusb -v -s 001:002 Bus 001 Device 002: ID 0665:5161 Cypress Semiconductor USB to Serial Device Descriptor: bLength 18 bDescriptorType 1 bcdUSB 1.10 bDeviceClass 0 bDeviceSubClass 0 bDeviceProtocol 0 bMaxPacketSize0 8 idVendor 0x0665 Cypress Semiconductor idProduct 0x5161 USB to Serial bcdDevice 0.02 iManufacturer 1 INNO TECH iProduct 2 USB to Serial iSerial 0 bNumConfigurations 1 Configuration Descriptor: bLength 9 bDescriptorType 2 wTotalLength 0x0022 bNumInterfaces 1 bConfigurationValue 1 iConfiguration 3 20100813 bmAttributes 0x80 (Bus Powered) MaxPower 100mA Interface Descriptor: bLength 9 bDescriptorType 4 bInterfaceNumber 0 bAlternateSetting 0 bNumEndpoints 1 bInterfaceClass 3 Human Interface Device bInterfaceSubClass 0 bInterfaceProtocol 0 iInterface 4 Sample HID HID Device Descriptor: bLength 9 bDescriptorType 33 bcdHID 1.00 bCountryCode 0 Not supported bNumDescriptors 1 bDescriptorType 34 Report wDescriptorLength 27 Report Descriptors: ** UNAVAILABLE ** Endpoint Descriptor: bLength 7 bDescriptorType 5 bEndpointAddress 0x81 EP 1 IN bmAttributes 3 Transfer Type Interrupt Synch Type None Usage Type Data wMaxPacketSize 0x0008 1x 8 bytes bInterval 1 Device Status: 0x0000 (Bus Powered)
6. After installing NUT, perform a scan using the nut-scanner tool and copy it's values
Code:root@pve:~# nut-scanner -U Scanning USB bus. [nutdev1] driver = "nutdrv_qx" port = "auto" vendorid = "0665" productid = "5161" product = "USB to Serial" vendor = "INNO TECH" bus = "001"
7. Navigate to the /etc/nut directory and backup all the default/sample config files
Code:root@pve:~# cd /etc/nut root@pve:/etc/nut# ls nut.conf ups.conf upsd.conf upsd.users upsmon.conf upssched-cmd upssched.conf root@pve:/etc/nut# mv nut.conf nut.example.conf root@pve:/etc/nut# mv upsd.conf upsd.example.conf root@pve:/etc/nut# mv upsd.users upsd.example.users root@pve:/etc/nut# mv ups.conf ups.example.conf root@pve:/etc/nut# mv upsmon.conf upsmon.example.conf root@pve:/etc/nut# mv upssched.conf upssched.example.conf root@pve:/etc/nut# ls nut.conf ups.conf upsd.conf upsd.users upsmon.conf upssched-cmd upssched.conf nut.example.conf upsd.example.conf upsd.example.users ups.example.conf upsmon.example.conf upssched.example.conf
8. Create a new nut.conf filenano /etc/nut/nut.confand enter the followingCode:MODE=netserver
9. Create a new ups.conf filenano /etc/nut/ups.confand enter the following
NOTE: Enter the details of the UPS values as according to the values provided in theCode:pollinterval = 15 maxretry = 3 offdelay = 180 ondelay = 300 #Enter the nut-scanner -U values here [prolink] driver = nutdrv_qx port = auto desc = "Prolink PRO1501SFCU UPS" vendorid = 0665 productid = 5161nut-scanner -Ucommand.
NOTE: You can name the UPS whatever you like inside the brackets; the name will be used in calling the UPS (ie. upsc prolink@localhost)
10. Once both config files are saved, you can run it by typingupsdrvctl startand you should get a result similar to
Code:Network UPS Tools - UPS driver controller 2.8.0 Network UPS Tools - Generic Q* USB/Serial driver 0.32 (2.8.0) USB communication driver (libusb 1.0) 0.43 Using protocol: Voltronic-QS 0.07 No values for battery high/low voltages Using 'guesstimation' (low: 20.800000, high: 26.000000)! Battery runtime will not be calculated (runtimecal not set) Broadcast message from root@pve (somewhere) (Wed Aug 2 11:46:33 2023): Communications with UPS prolink@localhost established
11. Create a new upsd.conf filenano /etc/nut/upsd.confand enter the following
Code:LISTEN 0.0.0.0 3493 LISTEN :: 3493
12. Create a new upsd.users filenano /etc/nut/upsd.usersand enter the following
NOTE: you can name the user accounts whatever you like by changing the values inside the brackets; in our case the account names are upsadmin for the master and upsuser for the slave/clientCode:[upsadmin] # Administrative user password = ******** # Allow changing values of certain variables in the UPS. actions = SET # Allow setting the "Forced Shutdown" flag in the UPS. actions = FSD # Allow all instant commands instcmds = ALL upsmon master [upsuser] # Normal user password = ******** upsmon slave
NOTE: Enter the your own password value in place of ********
13. Create a new upsmon.conf filenano /etc/nut/upsmon.confand enter the following
NOTE: replace ******* with the master passwordCode:RUN_AS_USER root MONITOR prolink@localhost 1 upsadmin ******* master MINSUPPLIES 1 SHUTDOWNCMD "/sbin/shutdown -h" NOTIFYCMD /usr/sbin/upssched POLLFREQ 2 POLLFREQALERT 1 HOSTSYNC 15 DEADTIME 15 MAXAGE 24 POWERDOWNFLAG /etc/killpower NOTIFYMSG ONLINE "UPS %s on line power" NOTIFYMSG ONBATT "UPS %s on battery" NOTIFYMSG LOWBATT "UPS %s battary is low" NOTIFYMSG FSD "UPS %s: forced shutdown in progress" NOTIFYMSG COMMOK "Communications with UPS %s established" NOTIFYMSG COMMBAD "Communications with UPS %s lost" NOTIFYMSG SHUTDOWN "Auto logout and shutdown proceeding" NOTIFYMSG REPLBATT "UPS %s battery needs to be replaced" NOTIFYMSG NOCOMM "UPS %s is unavailable" NOTIFYMSG NOPARENT "upsmon parent process died - shutdown impossible" NOTIFYFLAG ONLINE SYSLOG+WALL+EXEC NOTIFYFLAG ONBATT SYSLOG+WALL+EXEC NOTIFYFLAG LOWBATT SYSLOG+WALL+EXEC NOTIFYFLAG FSD SYSLOG+WALL+EXEC NOTIFYFLAG COMMOK SYSLOG+WALL+EXEC NOTIFYFLAG COMMBAD SYSLOG+WALL+EXEC NOTIFYFLAG SHUTDOWN SYSLOG+WALL+EXEC NOTIFYFLAG REPLBATT SYSLOG+WALL NOTIFYFLAG NOCOMM SYSLOG+WALL+EXEC NOTIFYFLAG NOPARENT SYSLOG+WALL RBWARNTIME 43200 NOCOMMWARNTIME 600 FINALDELAY 5
14. Create a new upssched.conf filenano /etc/nut/upssched.confand enter the following
Code:CMDSCRIPT /etc/nut/upssched-cmd PIPEFN /etc/nut/upssched.pipe LOCKFN /etc/nut/upssched.lock AT ONBATT * START-TIMER onbatt 30 AT ONLINE * CANCEL-TIMER onbatt online AT ONBATT * START-TIMER earlyshutdown 30 AT LOWBATT * EXECUTE onbatt AT COMMBAD * START-TIMER commbad 30 AT COMMOK * CANCEL-TIMER commbad commok AT NOCOMM * EXECUTE commbad AT SHUTDOWN * EXECUTE powerdown AT SHUTDOWN * EXECUTE powerdown
15. Create a new upssched-cmd filenano /etc/nut/upssched-cmdand enter the following
Code:#!/bin/sh case $1 in onbatt) logger -t upssched-cmd "UPS running on battery" ;; earlyshutdown) logger -t upssched-cmd "UPS on battery too long, early shutdown" /usr/sbin/upsmon -c fsd ;; shutdowncritical) logger -t upssched-cmd "UPS on battery critical, forced shutdown" /usr/sbin/upsmon -c fsd ;; upsgone) logger -t upssched-cmd "UPS has been gone too long, can't reach" ;; *) logger -t upssched-cmd "Unrecognized command: $1" ;; esac
16. Ensure that the upssched-cmd file is executable
Code:chmod +x /etc/nut/upssched-cmd
17. Restart the Proxmox server (which is now the nut-server) or run the following commands
Code:service nut-server restart service nut-client restart systemctl restart nut-monitor upsdrvctl stop upsdrvctl start
18. Test the NUT server using the commandupsc prolink@localhost
Code:root@pve:/etc/nut# upsc prolink@localhost Init SSL without certificate database battery.charge: 100 battery.voltage: 26.80 battery.voltage.high: 26.00 battery.voltage.low: 20.80 battery.voltage.nominal: 24.0 device.type: ups driver.name: nutdrv_qx driver.parameter.pollfreq: 30 driver.parameter.pollinterval: 15 driver.parameter.port: auto driver.parameter.productid: 5161 driver.parameter.synchronous: auto driver.parameter.vendorid: 0665 driver.version: 2.8.0 driver.version.data: Voltronic-QS 0.07 driver.version.internal: 0.32 driver.version.usb: libusb-1.0.26 (API: 0x1000109) input.voltage: 245.6 input.voltage.fault: 245.6 output.current.nominal: 6.0 output.frequency: 60.2 output.frequency.nominal: 60 output.voltage: 245.6 output.voltage.nominal: 230 ups.beeper.status: enabled ups.delay.shutdown: 30 ups.delay.start: 180 ups.firmware.aux: PM-V ups.load: 13 ups.productid: 5161 ups.status: OL ups.type: offline / line interactive ups.vendorid: 0665
19. You can display the list of commands with parameters that can be changed by typingupsrw prolink@loclhost
Code:root@pve:/etc/nut# upsrw prolink@localhost [ups.delay.shutdown] Interval to wait after shutdown with delay command (seconds) Type: RANGE NUMBER Option: "12-540" SELECTED [ups.delay.start] Interval to wait before (re)starting the load (seconds) Type: RANGE NUMBER Option: "60-599940" SELECTED
You can change the said parameters by typingupsrw -s ups.delay.shutdown=180 prolink@localhost
NOTE: in this example, I used 180 which is in seconds
NOTE: you will be asked to enter the username we've entered in the /etc/nut/upsd.users file (in this case upsadmin) and it's corresponding password
NOTE: the changes in the parameters will be reflected when typingupsc prolink@localhost
Code:root@pve:/etc/nut# upsrw -s ups.delay.shutdown=180 prolink@localhost Username (root): upsadmin Password: OK root@pve:/etc/nut# upsc prolink@localhost Init SSL without certificate database battery.charge: 100 battery.voltage: 26.80 battery.voltage.high: 26.00 battery.voltage.low: 20.80 battery.voltage.nominal: 24.0 device.type: ups driver.name: nutdrv_qx driver.parameter.pollfreq: 30 driver.parameter.pollinterval: 15 driver.parameter.port: auto driver.parameter.productid: 5161 driver.parameter.synchronous: auto driver.parameter.vendorid: 0665 driver.version: 2.8.0 driver.version.data: Voltronic-QS 0.07 driver.version.internal: 0.32 driver.version.usb: libusb-1.0.26 (API: 0x1000109) input.voltage: 239.2 input.voltage.fault: 239.2 output.current.nominal: 6.0 output.frequency: 59.9 output.frequency.nominal: 60 output.voltage: 239.2 output.voltage.nominal: 230 ups.beeper.status: enabled ups.delay.shutdown: 180 ups.delay.start: 180 ups.firmware.aux: PM-V ups.load: 12 ups.productid: 5161 ups.status: OL ups.type: offline / line interactive ups.vendorid: 0665
20. Create a Proxmox LXC container setup as a NUT-client to host the UPS status on your local browser by typing it's URL
NOTE: any container will do; I created a Debian Turnkey core Linux container with 1 core, 512MB or RAM, and 2GB of storage, and a static IP
NOTE: ensure "start at boot" is enabled for this container
21. SSH on to the LXC container or open it's shell terminal
22. On the LXC container terminal, update repositories and it's packages
Code:apt update && apt dist-upgrade -y
23. On the LXC container terminal, install apache2, nut-cgi, and nut-client pacakge
NOTE: you can also choose to install the entire NUT package which includes both nut-server, and nut-client but we will only configure the nut-client portion of this container as it will be used as such
Code:apt install apache2 nut-cgi nut-client -y
24. On the LXC container, navigate to the /etc/nut directory and backup the default/sample configs similar to what we did in the NUT server
Code:root@prolink /etc/nut# mv /etc/nut/hosts.conf /etc/nut/hosts.example.conf root@prolink /etc/nut# mv /etc/nut/nut.conf /etc/nut/nut.example.conf root@prolink /etc/nut# mv /etc/nut/upsmon.conf /etc/nut/upsmon.example.conf root@prolink /etc/nut# mv /etc/nut/upsset.conf /etc/nut/upsset.example.conf
25. On the LXC container /etc/nut directory, create a new nut.conf filenano /etc/nut/nut.confand enter the following
Code:MODE=netclient
26. On the LXC container /etc/nut directory, create a new hosts.conf filenano /etc/nut/hosts.confand enter the following
NOTE: replace xxx.xxx.xxx.xxx with the IP of the NUT serverCode:MONITOR prolink@xxx.xxx.xxx.xxx "Prolink PRO1501SFCU UPS"
27. On the LXC container /etc/nut directory, create a new upsset.conf filenano /etc/nut/upsset.confand enter the following
Code:I_HAVE_SECURED_MY_CGI_DIRECTORY
28. On the LXC container /etc/nut directory, create a new upsmon.conf filenano /etc/nut/upssmon.confand enter the following
NOTE: replace xxx.xxx.xxx.xxx with the IP of the NUT server; replace ******* with the client/slave password you've entered in the NUT server upsd.users fileCode:RUN_AS_USER root MONITOR prolink@xxx.xxx.xxx 1 upsuser ******* slave
29. On the LXC container, enter the command
Code:a2enmod cgi
30. On the LXC container, restart apache
Code:systemctl restart apache2
31. You can now see the UPS status by typinghttp://xxx.xxx.xxx.xxx/cgi-bin/nut/upsstats.cgion the browser from any device in your local network.
NOTE: replace xxx.xxx.xxx.xxx with the IP address of the LXC container configured as the NUT client
Last edited:
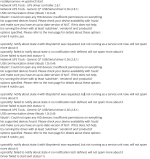
Hello, I am using a PRO1201SFCU and when I try to do step 10 @ upsdrvctl start, it shows this output at the attached file.Update: I have finally successfully got the Prolink PRO1501SFCU running with NUT.
The process and configuration is as below.
1. Ensure the USB cable from the UPS is connected to the Proxmox server
2. SSH into the Proxmox server or open it's shell terminal; we will be configuring this as the NUT server.
3. Update the repositories and packages
apt update && apt dist-upgrade -y
4. Install the NUT packageNOTE: As of using Proxmox 8, I could only get NUT 2.8.x-x to work as the prior versions (ie. 2.7.x-x) had a lot of errorsCode:apt install NUT
NOTE: If you had a prior version of NUT installed, ensure you use the commandCode:root@pve:~# apt-cache policy nut nut-server nut-client nut: Installed: 2.8.0-7 Candidate: 2.8.0-7 Version table: *** 2.8.0-7 500 500 http://deb.debian.org/debian bookworm/main amd64 Packages 100 /var/lib/dpkg/status nut-server: Installed: 2.8.0-7 Candidate: 2.8.0-7 Version table: *** 2.8.0-7 500 500 http://deb.debian.org/debian bookworm/main amd64 Packages 100 /var/lib/dpkg/status nut-client: Installed: 2.8.0-7 Candidate: 2.8.0-7 Version table: *** 2.8.0-7 500 500 http://deb.debian.org/debian bookworm/main amd64 Packages 100 /var/lib/dpkg/status
apt purge nutor doapt autoremove
to ensure that it's dependencies (ie. nut-server, nut-client, etc.) and config files are also removed. I had some trouble after installing the new NUT version as the prior configs (ie. /etc/nut, /run/nut, and some services) were interfering.
5. Check if the UPS usb cable is detected by the Proxmox server.
Code:root@pve:~# lsusb ... Bus 001 Device 002: ID 0665:5161 Cypress Semiconductor USB to Serial ... root@pve:~# lsusb -v -s 001:002 Bus 001 Device 002: ID 0665:5161 Cypress Semiconductor USB to Serial Device Descriptor: bLength 18 bDescriptorType 1 bcdUSB 1.10 bDeviceClass 0 bDeviceSubClass 0 bDeviceProtocol 0 bMaxPacketSize0 8 idVendor 0x0665 Cypress Semiconductor idProduct 0x5161 USB to Serial bcdDevice 0.02 iManufacturer 1 INNO TECH iProduct 2 USB to Serial iSerial 0 bNumConfigurations 1 Configuration Descriptor: bLength 9 bDescriptorType 2 wTotalLength 0x0022 bNumInterfaces 1 bConfigurationValue 1 iConfiguration 3 20100813 bmAttributes 0x80 (Bus Powered) MaxPower 100mA Interface Descriptor: bLength 9 bDescriptorType 4 bInterfaceNumber 0 bAlternateSetting 0 bNumEndpoints 1 bInterfaceClass 3 Human Interface Device bInterfaceSubClass 0 bInterfaceProtocol 0 iInterface 4 Sample HID HID Device Descriptor: bLength 9 bDescriptorType 33 bcdHID 1.00 bCountryCode 0 Not supported bNumDescriptors 1 bDescriptorType 34 Report wDescriptorLength 27 Report Descriptors: ** UNAVAILABLE ** Endpoint Descriptor: bLength 7 bDescriptorType 5 bEndpointAddress 0x81 EP 1 IN bmAttributes 3 Transfer Type Interrupt Synch Type None Usage Type Data wMaxPacketSize 0x0008 1x 8 bytes bInterval 1 Device Status: 0x0000 (Bus Powered)
6. After installing NUT, perform a scan using the nut-scanner tool and copy it's values
Code:root@pve:~# nut-scanner -U Scanning USB bus. [nutdev1] driver = "nutdrv_qx" port = "auto" vendorid = "0665" productid = "5161" product = "USB to Serial" vendor = "INNO TECH" bus = "001"
7. Navigate to the /etc/nut directory and backup all the default/sample config files
Code:root@pve:~# cd /etc/nut root@pve:/etc/nut# ls nut.conf ups.conf upsd.conf upsd.users upsmon.conf upssched-cmd upssched.conf root@pve:/etc/nut# mv nut.conf nut.example.conf root@pve:/etc/nut# mv upsd.conf upsd.example.conf root@pve:/etc/nut# mv upsd.users upsd.example.users root@pve:/etc/nut# mv ups.conf ups.example.conf root@pve:/etc/nut# mv upsmon.conf upsmon.example.conf root@pve:/etc/nut# mv upssched.conf upssched.example.conf root@pve:/etc/nut# ls nut.conf ups.conf upsd.conf upsd.users upsmon.conf upssched-cmd upssched.conf nut.example.conf upsd.example.conf upsd.example.users ups.example.conf upsmon.example.conf upssched.example.conf
8. Create a new nut.conf filenano /etc/nut/nut.confand enter the followingCode:MODE=netserver
9. Create a new ups.conf filenano /etc/nut/ups.confand enter the following
NOTE: Enter the details of the UPS values as according to the values provided in theCode:pollinterval = 15 maxretry = 3 offdelay = 180 ondelay = 300 #Enter the nut-scanner -U values here [prolink] driver = nutdrv_qx port = auto desc = "Prolink PRO1501SFCU UPS" vendorid = 0665 productid = 5161nut-scanner -Ucommand.
NOTE: You can name the UPS whatever you like inside the brackets; the name will be used in calling the UPS (ie. upsc prolink@localhost)
10. Once both config files are saved, you can run it by typingupsdrvctl startand you should get a result similar to
Code:Network UPS Tools - UPS driver controller 2.8.0 Network UPS Tools - Generic Q* USB/Serial driver 0.32 (2.8.0) USB communication driver (libusb 1.0) 0.43 Using protocol: Voltronic-QS 0.07 No values for battery high/low voltages Using 'guesstimation' (low: 20.800000, high: 26.000000)! Battery runtime will not be calculated (runtimecal not set) Broadcast message from root@pve (somewhere) (Wed Aug 2 11:46:33 2023): Communications with UPS prolink@localhost established
11. Create a new upsd.conf filenano /etc/nut/upsd.confand enter the following
Code:LISTEN 0.0.0.0 3493 LISTEN :: 3493
12. Create a new upsd.users filenano /etc/nut/upsd.usersand enter the following
NOTE: you can name the user accounts whatever you like by changing the values inside the brackets; in our case the account names are upsadmin for the master and upsuser for the slave/clientCode:[upsadmin] # Administrative user password = ******** # Allow changing values of certain variables in the UPS. actions = SET # Allow setting the "Forced Shutdown" flag in the UPS. actions = FSD # Allow all instant commands instcmds = ALL upsmon master [upsuser] # Normal user password = ******** upsmon slave
NOTE: Enter the your own password value in place of ********
13. Create a new upsmon.conf filenano /etc/nut/upsmon.confand enter the following
NOTE: replace ******* with the master passwordCode:RUN_AS_USER root MONITOR prolink@localhost 1 upsadmin ******* master MINSUPPLIES 1 SHUTDOWNCMD "/sbin/shutdown -h" NOTIFYCMD /usr/sbin/upssched POLLFREQ 2 POLLFREQALERT 1 HOSTSYNC 15 DEADTIME 15 MAXAGE 24 POWERDOWNFLAG /etc/killpower NOTIFYMSG ONLINE "UPS %s on line power" NOTIFYMSG ONBATT "UPS %s on battery" NOTIFYMSG LOWBATT "UPS %s battary is low" NOTIFYMSG FSD "UPS %s: forced shutdown in progress" NOTIFYMSG COMMOK "Communications with UPS %s established" NOTIFYMSG COMMBAD "Communications with UPS %s lost" NOTIFYMSG SHUTDOWN "Auto logout and shutdown proceeding" NOTIFYMSG REPLBATT "UPS %s battery needs to be replaced" NOTIFYMSG NOCOMM "UPS %s is unavailable" NOTIFYMSG NOPARENT "upsmon parent process died - shutdown impossible" NOTIFYFLAG ONLINE SYSLOG+WALL+EXEC NOTIFYFLAG ONBATT SYSLOG+WALL+EXEC NOTIFYFLAG LOWBATT SYSLOG+WALL+EXEC NOTIFYFLAG FSD SYSLOG+WALL+EXEC NOTIFYFLAG COMMOK SYSLOG+WALL+EXEC NOTIFYFLAG COMMBAD SYSLOG+WALL+EXEC NOTIFYFLAG SHUTDOWN SYSLOG+WALL+EXEC NOTIFYFLAG REPLBATT SYSLOG+WALL NOTIFYFLAG NOCOMM SYSLOG+WALL+EXEC NOTIFYFLAG NOPARENT SYSLOG+WALL RBWARNTIME 43200 NOCOMMWARNTIME 600 FINALDELAY 5
14. Create a new upssched.conf filenano /etc/nut/upssched.confand enter the following
Code:CMDSCRIPT /etc/nut/upssched-cmd PIPEFN /etc/nut/upssched.pipe LOCKFN /etc/nut/upssched.lock AT ONBATT * START-TIMER onbatt 30 AT ONLINE * CANCEL-TIMER onbatt online AT ONBATT * START-TIMER earlyshutdown 30 AT LOWBATT * EXECUTE onbatt AT COMMBAD * START-TIMER commbad 30 AT COMMOK * CANCEL-TIMER commbad commok AT NOCOMM * EXECUTE commbad AT SHUTDOWN * EXECUTE powerdown AT SHUTDOWN * EXECUTE powerdown
15. Create a new upssched-cmd filenano /etc/nut/upssched-cmdand enter the following
Code:#!/bin/sh case $1 in onbatt) logger -t upssched-cmd "UPS running on battery" ;; earlyshutdown) logger -t upssched-cmd "UPS on battery too long, early shutdown" /usr/sbin/upsmon -c fsd ;; shutdowncritical) logger -t upssched-cmd "UPS on battery critical, forced shutdown" /usr/sbin/upsmon -c fsd ;; upsgone) logger -t upssched-cmd "UPS has been gone too long, can't reach" ;; *) logger -t upssched-cmd "Unrecognized command: $1" ;; esac
16. Ensure that the upssched-cmd file is executable
Code:chmod +x /etc/nut/upssched-cmd
17. Restart the Proxmox server (which is now the nut-server) or run the following commands
Code:service nut-server restart service nut-client restart systemctl restart nut-monitor upsdrvctl stop upsdrvctl start
18. Test the NUT server using the commandupsc prolink@localhost
Code:root@pve:/etc/nut# upsc prolink@localhost Init SSL without certificate database battery.charge: 100 battery.voltage: 26.80 battery.voltage.high: 26.00 battery.voltage.low: 20.80 battery.voltage.nominal: 24.0 device.type: ups driver.name: nutdrv_qx driver.parameter.pollfreq: 30 driver.parameter.pollinterval: 15 driver.parameter.port: auto driver.parameter.productid: 5161 driver.parameter.synchronous: auto driver.parameter.vendorid: 0665 driver.version: 2.8.0 driver.version.data: Voltronic-QS 0.07 driver.version.internal: 0.32 driver.version.usb: libusb-1.0.26 (API: 0x1000109) input.voltage: 245.6 input.voltage.fault: 245.6 output.current.nominal: 6.0 output.frequency: 60.2 output.frequency.nominal: 60 output.voltage: 245.6 output.voltage.nominal: 230 ups.beeper.status: enabled ups.delay.shutdown: 30 ups.delay.start: 180 ups.firmware.aux: PM-V ups.load: 13 ups.productid: 5161 ups.status: OL ups.type: offline / line interactive ups.vendorid: 0665
19. You can display the list of commands with parameters that can be changed by typingupsrw prolink@loclhost
Code:root@pve:/etc/nut# upsrw prolink@localhost [ups.delay.shutdown] Interval to wait after shutdown with delay command (seconds) Type: RANGE NUMBER Option: "12-540" SELECTED [ups.delay.start] Interval to wait before (re)starting the load (seconds) Type: RANGE NUMBER Option: "60-599940" SELECTED
You can change the said parameters by typingupsrw -s ups.delay.shutdown=180 prolink@localhost
NOTE: in this example, I used 180 which is in seconds
NOTE: you will be asked to enter the username we've entered in the /etc/nut/upsd.users file (in this case upsadmin) and it's corresponding password
NOTE: the changes in the parameters will be reflected when typingupsc prolink@localhost
Code:root@pve:/etc/nut# upsrw -s ups.delay.shutdown=180 prolink@localhost Username (root): upsadmin Password: OK root@pve:/etc/nut# upsc prolink@localhost Init SSL without certificate database battery.charge: 100 battery.voltage: 26.80 battery.voltage.high: 26.00 battery.voltage.low: 20.80 battery.voltage.nominal: 24.0 device.type: ups driver.name: nutdrv_qx driver.parameter.pollfreq: 30 driver.parameter.pollinterval: 15 driver.parameter.port: auto driver.parameter.productid: 5161 driver.parameter.synchronous: auto driver.parameter.vendorid: 0665 driver.version: 2.8.0 driver.version.data: Voltronic-QS 0.07 driver.version.internal: 0.32 driver.version.usb: libusb-1.0.26 (API: 0x1000109) input.voltage: 239.2 input.voltage.fault: 239.2 output.current.nominal: 6.0 output.frequency: 59.9 output.frequency.nominal: 60 output.voltage: 239.2 output.voltage.nominal: 230 ups.beeper.status: enabled ups.delay.shutdown: 180 ups.delay.start: 180 ups.firmware.aux: PM-V ups.load: 12 ups.productid: 5161 ups.status: OL ups.type: offline / line interactive ups.vendorid: 0665
20. Create a Proxmox LXC container setup as a NUT-client to host the UPS status on your local browser by typing it's URL
NOTE: any container will do; I created a Debian Turnkey core Linux container with 1 core, 512MB or RAM, and 2GB of storage, and a static IP
NOTE: ensure "start at boot" is enabled for this container
21. SSH on to the LXC container or open it's shell terminal
22. On the LXC container terminal, update repositories and it's packages
Code:apt update && apt dist-upgrade -y
23. On the LXC container terminal, install apache2, nut-cgi, and nut-client pacakge
NOTE: you can also choose to install the entire NUT package which includes both nut-server, and nut-client but we will only configure the nut-client portion of this container as it will be used as such
Code:apt install apache2 nut-cgi nut-client -y
24. On the LXC container, navigate to the /etc/nut directory and backup the default/sample configs similar to what we did in the NUT server
Code:root@prolink /etc/nut# mv /etc/nut/hosts.conf /etc/nut/hosts.example.conf root@prolink /etc/nut# mv /etc/nut/nut.conf /etc/nut/nut.example.conf root@prolink /etc/nut# mv /etc/nut/upsmon.conf /etc/nut/upsmon.example.conf root@prolink /etc/nut# mv /etc/nut/upsset.conf /etc/nut/upsset.example.conf
25. On the LXC container /etc/nut directory, create a new nut.conf filenano /etc/nut/nut.confand enter the following
Code:MODE=netclient
26. On the LXC container /etc/nut directory, create a new hosts.conf filenano /etc/nut/hosts.confand enter the following
NOTE: replace xxx.xxx.xxx.xxx with the IP of the NUT serverCode:MONITOR prolink@xxx.xxx.xxx.xxx "Prolink PRO1501SFCU UPS"
27. On the LXC container /etc/nut directory, create a new upsset.conf filenano /etc/nut/upsset.confand enter the following
Code:I_HAVE_SECURED_MY_CGI_DIRECTORY
28. On the LXC container /etc/nut directory, create a new upsmon.conf filenano /etc/nut/upssmon.confand enter the following
NOTE: replace xxx.xxx.xxx.xxx with the IP of the NUT server; replace ******* with the client/slave password you've entered in the NUT server upsd.users fileCode:RUN_AS_USER root MONITOR prolink@xxx.xxx.xxx 1 upsuser ******* slave
29. On the LXC container, enter the command
Code:a2enmod cgi
30. On the LXC container, restart apache
Code:systemctl restart apache2
31. You can now see the UPS status by typinghttp://xxx.xxx.xxx.xxx/cgi-bin/nut/upsstats.cgion the browser from any device in your local network.
NOTE: replace xxx.xxx.xxx.xxx with the IP address of the LXC container configured as the NUT client
I am currently stuck at what I am supposed to do now and I would really appreciate any help I could get