Windows 10 VM stuck in Automatic Repair boot loop

Hello oguz

Yes, I did install intel microcode as you pointed in this thread:

Code:
# dpkg -l | grep microcode
ii  intel-microcode                      3.20220207.1~deb11u1           amd64        Processor microcode firmware for Intel CPUs
ii  iucode-tool                          2.3.1-1                        amd64        Intel processor microcode tool

# dmidecode | grep -i version
        Version: FNCML357.0056.2022.0223.1614

And my current BIOS is the latest available [FNCML357] according to Intel:
https://www.intel.com/content/www/u...-10-performance-kit-nuc10i7fnk/downloads.html
 
you can also test older qemu versions by changing the machine property in the "Hardware" menu for your VM and pin an older qemu version.
though in my tests the qemu version has made no difference.


same setup works here using OVMF as well:

Code:
bios: ovmf
boot: order=scsi0;ide2
cores: 4
cpu: host
efidisk0: guests:vm-424-disk-1,efitype=4m,pre-enrolled-keys=1,size=1M
ide0: ISO:iso/virtio-win-0.1.215.iso,media=cdrom,size=528322K
ide2: ISO:iso/Win10_21H2_EnglishInternational_x64.iso,media=cdrom,size=5748118K
kvm: 1
machine: pc-q35-6.2
memory: 4096
meta: creation-qemu=6.2.0,ctime=1651749465
name: win10-host-ovmf
net0: virtio=8A:36:B8:50:9C:04,bridge=vmbr0,firewall=1
numa: 0
ostype: win10
scsi0: guests:vm-424-disk-0,cache=writeback,discard=on,size=32G,ssd=1
scsihw: virtio-scsi-pci
smbios1: uuid=80446a4e-16ed-4a8a-82c9-9ac42599bfa3
sockets: 1
vmgenid: 3a09285c-36e1-4793-89df-0b23a0305d56


* do you have intel-microcode package installed? (for amd would be amd64-microcode)

* have you checked for possible BIOS upgrades?
my microcode:
Bash:
root@proxmox:~# grep 'stepping\|model\|microcode' /proc/cpuinfo
model           : 122
model name      : Intel(R) Pentium(R) Silver J5005 CPU @ 1.50GHz
stepping        : 1
microcode       : 0x34
model           : 122
model name      : Intel(R) Pentium(R) Silver J5005 CPU @ 1.50GHz
stepping        : 1
microcode       : 0x34
model           : 122
model name      : Intel(R) Pentium(R) Silver J5005 CPU @ 1.50GHz
stepping        : 1
microcode       : 0x34
model           : 122
model name      : Intel(R) Pentium(R) Silver J5005 CPU @ 1.50GHz
stepping        : 1
microcode       : 0x34

My Bios version is from march 2021 so at the moment not that old in my opinion
 
No luck on my side with my NUC i7-10710U

I configured like you asked:

Code:
echo "options kvm ignore_msrs=1 report_ignored_msrs=0" > /etc/modprobe.d/kvm.conf
update-initramfs -k all -u
reboot

My current Win10 installed VM was still stuck in automatic repair loop.
I tried to set up another Win10 VM from scratch to be sure.
After trying to install WSL
wsl --install
it ended up again with an endless automatic repair loop, unfortunately. :-(
also no luck with this
 
my microcode:
Bash:
root@proxmox:~# grep 'stepping\|model\|microcode' /proc/cpuinfo
model           : 122
model name      : Intel(R) Pentium(R) Silver J5005 CPU @ 1.50GHz
stepping        : 1
microcode       : 0x34
model           : 122
model name      : Intel(R) Pentium(R) Silver J5005 CPU @ 1.50GHz
stepping        : 1
microcode       : 0x34
model           : 122
model name      : Intel(R) Pentium(R) Silver J5005 CPU @ 1.50GHz
stepping        : 1
microcode       : 0x34
model           : 122
model name      : Intel(R) Pentium(R) Silver J5005 CPU @ 1.50GHz
stepping        : 1
microcode       : 0x34

My Bios version is from march 2021 so at the moment not that old in my opinion
Bash:
root@proxmox:~# dmesg | grep microcode
[    1.720185] microcode: sig=0x706a1, pf=0x1, revision=0x34
[    1.720327] microcode: Microcode Update Driver: v2.2.
 
But I can assure you that it was working perfectly with Proxmox 7.1
It's only with 7.2 that it started to induce this automatic repair loop.

Just as a data point for the support team, I've had exactly the same experience with the same NUC10i7 host.

I had been running a Windows 10 VM successfully for several months with WSL2 on Proxmox 6.4 using the "-cpu SandyBridge" args trick.

When I rebuilt my NUC host early this year using 7.1 and got all my VMs restored from backups, the first thing I checked was to see if nested virtualization was better supported in 7.x vs 6.x by changing that VM to "cpu: host" with no args. I was quite excited to find that indeed it was, and performance was noticeably better as well.

That VM is only used for occasional Docker development however, so it stayed dormant over the next few months. I only tried to boot it again a couple of weeks ago after the host had been updated to 7.2. I immediately got the same "Preparing Automatic Repair" bootloop that others have reported. I tried starting from scratch with a fresh Windows 10 install and got the same results. Everything looks good until you complete the WSL install, then the next boot is a no go.

I got the VM working again by reverting back to the args listed in this thread, but I sure miss the glory days of 7.1 when they weren't necessary.

Clearly, something changed between 7.1 and 7.2 that broke nested virtualization via cpu: host on the i7-10710U.
 
Last edited:
Have you tried downgrading the kernel version to 5.13 to see if it works?
Both kernel and pve-qemu-kvm had new releases between 7.1 and 7.2.
 
Have you tried downgrading the kernel version to 5.13 to see if it works?
Both kernel and pve-qemu-kvm had new releases between 7.1 and 7.2.
I tried to play with kernel ... booting previous one with proxmox-boot-tool kernel...
with no luck
 
Can you provide the current VM config? qm config <VMID>
Is it still the same VM you mentioned in the first post?
 
Can you provide the current VM config? qm config <VMID>
Is it still the same VM you mentioned in the first post?
Yes it is still the same machine:

Bash:
agent: 1
balloon: 0
boot: order=scsi0;ide2
cores: 2
cpu: qemu64
ide2: local-btrfs:iso/virtio-win-0.1.221.iso,media=cdrom,size=519030K
kvm: 1
memory: 8192
name: vm-win10-100
net0: virtio=xxx,bridge=vmbr0,firewall=1
numa: 0
ostype: win10
protection: 1
scsi0: local-btrfs:105/vm-105-disk-0.raw,cache=writeback,size=250G,ssd=1
scsihw: virtio-scsi-pci
smbios1: uuid=xxx
sockets: 1
spice_enhancements: foldersharing=1
startup: order=3
vcpus: 1
vga: qxl,memory=32
vmgenid: xxx

Bash:
root@proxmox:~# lscpu
Architecture:                    x86_64
CPU op-mode(s):                  32-bit, 64-bit
Byte Order:                      Little Endian
Address sizes:                   39 bits physical, 48 bits virtual
CPU(s):                          4
On-line CPU(s) list:             0-3
Thread(s) per core:              1
Core(s) per socket:              4
Socket(s):                       1
NUMA node(s):                    1
Vendor ID:                       GenuineIntel
CPU family:                      6
Model:                           122
Model name:                      Intel(R) Pentium(R) Silver J5005 CPU @ 1.50GHz
Stepping:                        1
CPU MHz:                         2800.000
CPU max MHz:                     2800.0000
CPU min MHz:                     800.0000
BogoMIPS:                        2995.20
Virtualization:                  VT-x
L1d cache:                       96 KiB
L1i cache:                       128 KiB
L2 cache:                        4 MiB
NUMA node0 CPU(s):               0-3
 
Why did you set `vcpus` when you don't have CPU hotplug enabled?
Remove that option in the CPU settings.

Does it work if you switch the disk to `ide` from `scsi`? And did you try setting the CPU to type `host` or something that matches your physical CPU?
 
Why did you set `vcpus` when you don't have CPU hotplug enabled?
Remove that option in the CPU settings.

Does it work if you switch the disk to `ide` from `scsi`? And did you try setting the CPU to type `host` or something that matches your physical CPU?
Hi,

CPU was on host at the beginning, then at some point it did not work anymore. So I set it to qemu and it worked again.

It deactivated vcpus, but that did not the trick.

What do you mean with ide to scsi, there is no option, what do I have todo?
 
Last edited:
Your disk is attached as `scsi`: scsi0: local-btrfs:105/vm-105-disk-0.raw,cache=writeback,size=250G,ssd=1
Try to attach it as `ide` instead.
 
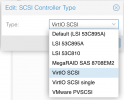
The only option I have are this:

1677331304153.png

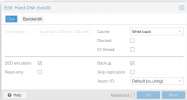
and on HDD itself this:

1677331349675.png

I do not really get what I have to do. sorry for circumstances.

I think you want me to add a new HDD with an IDE controller is this correct.? But when I add it I loose my old image or not?
 
Select a disk in the Hardware panel and press `Detach` at the top.
This will move the disk to `unused0`. Once it is unused, double click it to open the Edit dialog.
In the Edit dialog select IDE as BUS and press OK. Now you'll have the disk attached as IDE.
 
Last weekend after upgrading to proxmox 7.4 I started with the automatic repair boot loop using host cpu config. I really don't know if the cause was just proxmox update or any other package update I installed in that period of time.

Here is a list of things I did in chronological order:

proxmox 7.3 - 6.0 edge kernel - host cpu -> worked fine before update

proxmox 7.4 - 6.2 kernel - host cpu -> I remember it worked after a few reboots but after one or two days, the automatic repair boot loop started. So I really don't know if it was because proxmox update, kernel update or a windows update

proxmox 7.4 - 6.1 kernel or 6.0 edge kernel - host cpu -> didn't work either

proxmox 7.4 - 6.2 kernel - default kvm64 cpu -> worked fine

Its kind of a shame but I really didn't find any big problem using non host cpu so I guess I will keep it for a few weeks and try to change it after a few updates (of pakages or windows). I would be glad If anybody knows something I could try to fix it and I hope at least help anybody who just lands in this post after a google search
 

About

The Proxmox community has been around for many years and offers help and support for Proxmox VE, Proxmox Backup Server, and Proxmox Mail Gateway.
We think our community is one of the best thanks to people like you!

Get your subscription!

The Proxmox team works very hard to make sure you are running the best software and getting stable updates and security enhancements, as well as quick enterprise support. Tens of thousands of happy customers have a Proxmox subscription. Get yours easily in our online shop.

Buy now!