Unable to migrate VM from ESXi 6.0.0 to Proxmox 6.3-2

jreno

New Member
Jan 12, 2021
5
0
1
34
Hello everyone,

I am trying to migrate my Ubuntu 20.04 LTS VM from ESXi 6.0.0 to Proxmox 6.3-2 however I could not get it to boot up.

VM in ESXi :
Ubuntu 20.04
200Gb HD
format vmdk

I first transferred the .vmdk as well as the flat .vmdk that comes with it into my proxmox machine into the directory /var/lib/vz/template/iso/my_vm_to_migrate/

Having done this I then create a VM in Promox and then use:

qm importdisk 104 /var/lib/vz/template/iso/my_vm_to_migrate/myvm.vmdk --format qcow2 local-lvm

It successfully created my Unused disk in the GUI, I then proceed to attach it and detach the disk that was initially created with the VM.

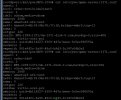
However when I boot up I get :

1610455014802.png

It does not detect the boot sequence in the disk. The VM boots up correctly in ESXi, but I cant manage to have it boot in proxmox.

What I tried :

- Changing BIOS configuration in GUI
- Changing Bus/Device (SCSI, IDE, SATA) in GUI
- I tried .raw format
- I tried .vmdk format
- I tried to create the VM with .vmdk hard disk then replace it by with my own .vmdk (I know I shouldn't do that)
- I tried changing the SCSI Controller
- I tried qemu-img convert function to change format before import-disk

and much more,

I feel stuck because I have other VMs to migrate and can't have this first one to work correctly,

Can someone guide me in a direction to boot up this machine? I can provide more details if asked,

thanks!
 
hi,

- Changing BIOS configuration in GUI
- Changing Bus/Device (SCSI, IDE, SATA) in GUI
- I tried .raw format
- I tried .vmdk format
- I tried to create the VM with .vmdk hard disk then replace it by with my own .vmdk (I know I shouldn't do that)
- I tried changing the SCSI Controller
- I tried qemu-img convert function to change format before import-disk
did you try changing the boot order in the options menu?

could you post the configuration? qm config VMID
 
Hello,

thank you for your fast answer:

Code:
root@mtl1:~# qm config 104
boot: order=ide2;net0
cores: 2
ide1: local:104/vm-104-disk-1.raw,size=200G
ide2: none,media=cdrom
memory: 2048
name: REDACTED
net0: e1000=AA:46:84:67:D8:F2,bridge=vmbr0,firewall=1
numa: 0
ostype: l26
sata1: local:104/vm-104-disk-3.qcow2,size=200G
scsi0: local:104/vm-104-disk-4.qcow2,size=200G
scsihw: pvscsi
smbios1: uuid=a4460b04-4df2-474d-9f39-f229235c4419
sockets: 1
virtio1: local:104/vm-104-disk-2.raw,size=200G
vmgenid: 5c6bc4f8-379f-4610-ac48-ee9d5cd15f5b
root@mtl1:~#

I did not change the boot order in the config but whenever I run the VM I tried pressing ESC and selecting the disk.

1610463219040.png

I tried the 3 of them and get the same error.

Thanks
 
it's possible to fix it, but it'll take some trial & error until you get the right combination of options (if you want to try, you can set the scsi controller back to default)

otherwise i suggest you to read here [0] and start over, make sure to set the boot order to the imported disk in the options and try again

[0]: https://pve.proxmox.com/wiki/Migration_of_servers_to_Proxmox_VE#VMware
 
It would be great if you could check if the export as OVF option exists in ESXi 6.0. Then we could add this to the Wiki article. Using export as OVF in the ESXi GUI and importovf in Proxmox VE is certainly the easiest migration path.
 
Hello,

Dominic I tried your suggestion, and it failed, so you can add this in the wiki (I am using ESXi 6.0.0 Update 2 Build 4600944)

Also :
Code:
# ovftool --version
VMware ovftool 4.4.0 (build-15722219)

First I get a segfault then I get a random error. It says completed with error but the directory that it created is empty.

Code:
root@vtl7:/var/lib/vz/template/iso/MY_UBUNTU_VMDK# ovftool "vi://root@xxx.xxx.xxx.xxx/My_Ubuntu_Vm" .
Enter login information for source vi://xxx.xxx.xxx.xxx/
Username: root
Password: ***************
Opening VI source: vi://root@xxx.xxx.xxx.xxx:443/My_Ubuntu_Vm
Opening OVF target: .
Writing OVF package: ./My_Ubuntu_Vm/My_Ubuntu_Vm.ovf
Disk progress: 1%
Removing temporary objects and files
Transfer Failed
Error: Execution aborted
Segmentation fault
root@vtl7:/var/lib/vz/template/iso/MY_UBUNTU_VMDK# ovftool "vi://root@xxx.xxx.xxx.xxx/My_Ubuntu_Vm" .
Enter login information for source vi://xxx.xxx.xxx.xxx/
Username: root
Password: ***************
Opening VI source: vi://root@xxx.xxx.xxx.xxx:443/My_Ubuntu_Vm
Opening OVF target: .
Writing OVF package: ./My_Ubuntu_Vm/My_Ubuntu_Vm.ovf
Disk progress: 1%
Removing temporary objects and files
Transfer Failed
Error: Execution aborted
Completed with errors
root@vtl7:/var/lib/vz/template/iso/MY_UBUNTU_VMDK# ls -la
total 12
drwxr-xr-x 3 root root 4096 Jan 13 14:01  .
drwxr-xr-x 4 root root 4096 Jan 12 12:46  ..
drwxr-xr-x 2 root root 4096 Jan 13 14:15 My_Ubuntu_Vm
root@vtl7:/var/lib/vz/template/iso/MY_UBUNTU_VMDK# cd ./My_Ubuntu_Vm/
root@vtl7:/var/lib/vz/template/iso/MY_UBUNTU_VMDK/My_Ubuntu_Vm# ls -la
total 8
drwxr-xr-x 2 root root 4096 Jan 13 14:15 .
drwxr-xr-x 3 root root 4096 Jan 13 14:01 ..
root@vtl7:/var/lib/vz/template/iso/MY_UBUNTU_VMDK/My_Ubuntu_Vm#

I will try again with a fresh start with oguz suggestion and give you news.

Thank you really appreciate the support!
 
Last edited:
I tried a third time and got another error:

Error: System error: (std::exception)

Welp, seems ovftool can't work with this ESXi version
 
Thanks for trying, I added a hint to the Wiki. Unfortunately, I haven't managed to get ESXi 6.0 working yet to try this myself.
 
Hi all,

I'm migrated VM-Esxi 6.0 run ubuntu-18.04 to VM-Prox 6.3, I did the following:

Condition :
- Setup and mounted one NFS-DATASTORES (NFS-1099) for ESXi 6.0 and PROXMOX 6.3-3
- The VM-Esxi is running on the NFS-DATASTORES or maybe migrate change datastores to it

1. Create a new VM with the same configuration as the VM needs to migrate, the hard drive format must be RAW.

2. In the new VM path delete the RAW hard disk file
cd /mnt/pve/NFS-1099/images/1371/
rm -rf vm-1371-disk-0.raw

3. Copy and rename directly file.vmdk to file.raw
cp /mnt/pve/NFS-1099/ubunt18-nfs/ubunt18-nfs-flat.vmdk /mnt/pve/NFS-1099/images/1371/vm-1371-disk-0.raw

4. Reconfig on Proxmox GUI (before and after are shown in attached image)
Hardware -> Detach -> And imported again with IDE option.
Options -> Boot Order -> Option for IDE first boot.

5. Start VM-Prox
- reconfig network (note : device name)

Install tools :
- apt install qemu-guest-agent

6. PowerOff and reconfig :
Hardware -> Detach -> And imported again with SCSI option.
Options -> Boot Order -> Option for SCSI first boot.

7. Maybe change hard drive format with "Move disk" tools if needed.

Best regards,
 

Attachments

  • 222.Annotation 2021-01-29 144747.jpg
    222.Annotation 2021-01-29 144747.jpg
    128 KB · Views: 49
  • Like
Reactions: Dominic

About

The Proxmox community has been around for many years and offers help and support for Proxmox VE, Proxmox Backup Server, and Proxmox Mail Gateway.
We think our community is one of the best thanks to people like you!

Get your subscription!

The Proxmox team works very hard to make sure you are running the best software and getting stable updates and security enhancements, as well as quick enterprise support. Tens of thousands of happy customers have a Proxmox subscription. Get yours easily in our online shop.

Buy now!