[SOLVED] Oh no... wake-up with "SMART error (FailedOpenDevice) detected on host..." message!

Nov 19, 2020
89
15
13
25
Hi!

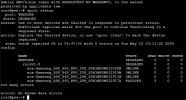
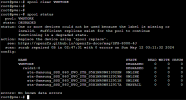
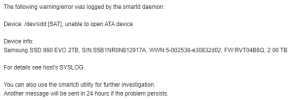
I wake up today with "SMART error (FailedOpenDevice) detected on host..." in my email. When i look, i see that there is failed drive (part of raidz1-0):
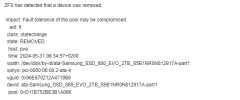
1717133653169.png

1717133699481.png

1717133568860.png


1717133615912.png


Device was probably "removed" because of malfunction, nobody touch the server, since it is in rack. I already order a new disk (newer model - Samsung EVO 870 2TB) but It will come somewhere in the next week.

This ZFS disk failure error is my first time so please can anyone write a proper steps for replacing failed disk with new one and resilvering the pool? Also, shall i turn off the server now, so there will be no other error? There is no spare drives (no space) and if now goes another one, then that would be a problem. I have a backup but still it wonn't be funny... And this weekend is Mugello, so I already pack for going there but now this happen...

Thank you for any helpfull informations.

WIth best regards!
 
So because of your ZFS config try

zpool clear VMSTORE

zpool scrub VMSTORE

this may or may not work but worth a try

if it doesnt try this

zpool labelclear -f *serial of your faulted SSD* (ata-samsung_SSD whatever)

then

zpool replace VMSTORE-f *serial of your faulted SSD*

and put your new drive in

Edit:
It should be fine to leave your machine running as you appear to only have one drive in the pool that has faulted,
but if you can deal without it being on you could shut it down if you're worried another drive may fail.
 
Last edited:
  • Like
Reactions: GazdaJezda
This is the reference doc for replacing a failed ZFS drive in Proxmox:

https://pve.proxmox.com/wiki/ZFS_on_Linux#sysadmin_zfs_change_failed_dev

No need to panic, it's pretty straight forward.

It can also be useful to open up the server / reseat the drive and it's connections before assuming it's really actually dead.

Sometimes drives and other things (ie PCIe cards, ram) just seem to shift around a tiny bit physically over time, so pushing them back in (etc) can get their electrical connectivity working again.
 
Last edited:
So because of your ZFS config try

zpool clear VMSTORE

zpool scrub VMSTORE

this may or may not work but worth a try

if it doesnt try this

zpool labelclear -f *serial of your faulted SSD* (ata-samsung_SSD whatever)

then

zpool replace VMSTORE-f *serial of your faulted SSD*

and put your new drive in

Edit:
It should be fine to leave your machine running as you appear to only have one drive in the pool that has faulted,
but if you can deal without it being on you could shut it down if you're worried another drive may fail.

I try that, but since disk is not visible to the system:

Smartctl open device: /dev/sdd failed : no such device

pool is still in Degraded state:

1717140271469.png

This is the reference doc for replacing a failed ZFS drive in Proxmox:

https://pve.proxmox.com/wiki/ZFS_on_Linux#sysadmin_zfs_change_failed_dev

No need to panic, it's pretty straight forward.

It can also be useful to open up the server / reseat the drive and it's connections before assuming it's really actually dead.

Sometimes drives and other things (ie PCIe cards) just seem to shift around a tiny bit physically over time, so pushing them back in (etc) can get their electrical connectivity working again.

Will look if this is situation when I will be at home. There is a chance that new disc will be here today (hopefully) so I will first change them and get pool in flawless state, this is primary. After that I will check degraded disc. Will post here what will develop out of it.

Thank you!
 
  • Like
Reactions: justinclift
I open a posted link and it said:

1717140983164.png

Only one command is needed? Really that easy? So I do:
  1. turn off computer
  2. swap drives (old out, new in)
  3. boot computer to proxmox
  4. execute a "zpool replace -f VMSTORE /dev/sdd /dev/sdd"? I presume that new disc will get same /dev/hdd mount / id?
  5. wait till ZFS do what it needs to be done?
Is really that simple? Hopefully it is :)
 
Just one hint: do not unplug the old drive, leave it in place and attach the new one to a (hopefully) free port.
This is just to make 100% sure you do not unplug a healthy disk.
If you have hot plug enabled in BIOS you should be able to do that without powering off.
Then do above command and wait until its finished.
 
This is just to make 100% sure you do not unplug a healthy disk.
Definitely true.

In this particular case though, @GazdaJezda is turning off the computer prior to removing anything, and has the serial number of the potentially dead drive.

It's hard (though not impossible) to get that wrong when the matching serial number is printed on the outside of the things. :)
 
  • Like
Reactions: GazdaJezda
zpool replace -f VMSTORE /dev/sdd /dev/sdd
Hell no! (really, NO)

Instead of using a drive identifier that can easily change (ie sda/sdb/sdc/sdd), use the name of the drive from the /dev/disk/by-id/ directory instead, preferably the path that includes the serial number.

That way the path will always be correct, regardless of which transient drive letter thing (sda/b/c/d) it happens to pick up on a boot. And the serial number will show up in useful places, like when a drive fails. :)
 
Last edited:
No, there is only 4 SATA ports on that SuperMicro board... Otherwise I would have a spare... It's a small case / comp (EPYC) which is great for home comp. Only situations like this can be kind of s****y... I have written port number on discs when I assemble parts. I presume that port 1 is /dev/hda, port 2 is /dev/hdb etc... If not, I'm doomed.

Also, I need to pull comp off the rack, because there is no hot plug tray. So power down, get it out...

In case a unplug a wrong drive and boot back to PVE, that means PVE (ZFS) will notice that there is disc missing and stop mounting pool & not trying to start VM's, which resides on that pool?

So, I just plugin a new disc, boot to PVE, check if disk is present (hopefully /dev/hdd), run command and wait till it's done?
 
Hell no! (really, NO)

Instead of using a drive identifier that can easily change (ie sda/sdb/sdc/sdd), use the name of the drive from the /dev/disk/by-id/ directory instead, preferably the path that includes the serial number.

That way the path will always be correct, regardless of which transient drive letter thing (sda/b/c/d) it happens to pick up on a boot. And the serial number will show up in useful places, like when a drive fails. :)

Ok, sounds fair. Proper command would then be sometime like that (with a proper ID of new disk, below is only for illustration):

zpool replace -f VMSTORE /dev/sdd /dev/disk/by-id/ata-Samsung_SSD_860_EVO_2TB_S5B1NR0N812919M

Is that ok?

And, thank you!
 
  • Like
Reactions: justinclift
@GazdaJezda Looking at your initial post in this thread, it has this:

1717133699481-png.69023


Note the vpath there is /dev/disk/by-id/ata.... [etc] ...17A-part1 ?

That's a path from the /dev/disk/by-id/ directory on your Proxmox box, and is the kind of path you'll want to use for the replacement device.

Probably a good idea to make a note of the serial number on the outside of the new one before powering things on and looking for it to show up.

The "-part1" text fragment on the end of the path in the screenshot is also important to notice. That means your drive is using partitions rather than giving the complete drive to ZFS.

That's nothing to worry about, and the official docs (linked to in previous post above) give the super simple commands to copy the partition structure from any "good" drive to the new one.

So, your steps are pretty much as you have them, but before doing the "zpool replace" you need to copy the partition structure from any existing good disk to the new one, and for the "zpool replace" command you use the path for your new disk under /dev/disk/by-id/ that has the -part1 fragment in its name.

It'll be something like (to copy from your example):

zpool replace -f VMSTORE /dev/sdd /dev/disk/by-id/ata-Samsung_SSD_860_EVO_2TB_S5B1NR0N812919M-part1

That -part1 path will only appear after you've copied the partition structure to the new drive btw. Don't expect it to show up beforehand.

You'll be fine. :)
 
Last edited:
  • Like
Reactions: GazdaJezda
Oh, as a tip for not taking out the wrong drive just make sure you're doing it like this:

1. Take out a single drive. Check if its serial number matches the dead one. If not, put it back in the slot it came from.
2. Take out the next drive (just one), and repeat the above process until you have the one you want.

It's pretty much impossible to pull out the wrong drive using that process when the whole system is already powered off, unless you get interrupted (pet, partner, fire!) and somehow more than one drive leaves the system. :)
 
Last edited:
You'll be fine. :)

I really hope that :)

And you are right, there is -part1 addendum. Ok, but according to:

1717151709429.png

I'm quite sure that beside -part1 there is also part-9 on failed disc. So I need to copy both partitions (1 and 9)? Now I'm little confused.

If my english is just litlle bit of worth, then this are partition structure copy command's (from the above link under Changing a failed bootable device section):

# sgdisk <healthy bootable device> -R <new device>
# sgdisk -G <new device>
# zpool replace -f <pool> <old zfs partition> <new zfs partition>

In my case (if we say that ata-NEW-device-ID is NEW device and ata-FAULTY-device-ID is FAULTY device), command would be:

# sgdisk /dev/hda -R /dev/disk/by-id/ata-NEW-device-ID - /dev/hda because it is working disk with good partitions to copy structure from
# sgdisk -G /dev/disk/by-id/ata-NEW-device-ID
# zpool replace -f VMSTORE ata-FAULTY-device-ID-part1 ata-NEW-device-ID-part1

What about partition 9? Do I then also need to do:

# zpool replace -f VMSTORE ata-FAULTY-device-ID-part9 ata-NEW-device-ID-part9

This is kind of confusing me now. I expect that ZFS itself will create (clone) partitions if there is a replace command. But yes, I do not have experience with that, my first time :)


P.S. - at 15:00 I will go to collect new disk (will take me 2 hours, since is not so close to me). Then I will remove a FAULTY disk from server and replace it with a new one and turn on server. I believe it will boot normaly (starting VM's and all). After that I will proceed with upper command's - if they are right of course. Are they a?
 
Last edited:
In my case (if we say that ata-NEW-device-ID is NEW device and ata-FAULTY-device-ID is FAULTY device), command would be:

# sgdisk /dev/hda -R /dev/disk/by-id/ata-NEW-device-ID - /dev/hda because it is working disk with good partitions to copy structure from
# sgdisk -G /dev/disk/by-id/ata-NEW-device-ID
# zpool replace -f VMSTORE ata-FAULTY-device-ID-part1 ata-NEW-device-ID-part1
That bit seems good to me. :)

What about partition 9?
That's the right question. The answer is less straight forward though.

I've not (yet) seen a Proxmox install with a partition 9 before. That being said, I'm only a few months into using Proxmox myself, so that's not super surprising.

It's probably best to do some further investigation of WTF partition 9 has in it, before making decisions about how to copy its contents. :D

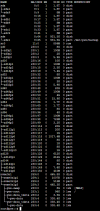
For starters, running lsblk (without options) should spit out a list of all the drives and partitions on the system. Paste that in here (if you're ok with that) and we should be able to start figuring out what the heck partition 9 is, and then what to do with it. :)
 
Last edited:
  • Like
Reactions: GazdaJezda
Note that you can probably do the above partition structure copying + zpool replacing bit without having to delay for a better understanding of partition 9 first.

We can come back to the partition 9 handling later on, once the partition structure is in place and the zpool replace has been run and is getting the zpool into a happy state again.
 
  • Like
Reactions: GazdaJezda
k, so whatever partition 9 is, it's small. 8MB in size. We'll need to investigate it a bit more (ie find out what it contains).

But you can do that later on, no need to delay the drive replacement. I'm in a different time zone to you, and need to get some sleep pretty soon, so I probably won't be around when you're replacing your drive.


The zdXX devices are ZFS disk volumes, generally used by Proxmox as virtual drives for VMs. So you can pretty much ignore them for this particular exercise. :)

Don't worry about partition 9, it's a ZFS legacy remnant from way back and is commonly believed to help with small drive-size differences. It's basically blank unless you're on Solaris.

Proxmox root install to zfs does not create it, only happens when you setup a ZFS data pool.

https://serverfault.com/questions/946055/increase-the-zfs-partition-to-use-the-entire-disk

https://github.com/openzfs/zfs/issues/6110
 
Ho!

New disk is in server and resilvering:

1717177976499.png

I hope process will end well. After disk has been added I start a lsblk command and see that there are already part 1 & part 9 on new disk. So i just spawn a zpool replace command with pool and device id's and it start to resilver. In fact i'm a little confused, but as long it will work, I can be :)
But it needs to complete successfully. Will be back when it ends.
 

About

The Proxmox community has been around for many years and offers help and support for Proxmox VE, Proxmox Backup Server, and Proxmox Mail Gateway.
We think our community is one of the best thanks to people like you!

Get your subscription!

The Proxmox team works very hard to make sure you are running the best software and getting stable updates and security enhancements, as well as quick enterprise support. Tens of thousands of happy customers have a Proxmox subscription. Get yours easily in our online shop.

Buy now!