K85183351-munyak: How to deploy BIG-IP VE with Proxmox Virtual Environment
Published Date: Oct 12, 2020
Updated Date: June 20, 2024
Applies to:
Topic
You should consider using this procedure under the following condition:
- You want to deploy a BIG-IP VE instance in an existing Proxmox Virtual Environment.
- Proxmox v8.2.4
Description
The Proxmox Virtual Environment integrates the Kernel-based Virtual Machine (KVM) hypervisor, LXC Linux containers, software defined storage and network functionality into a single management platform that allows configuration, deployment, and monitoring through browser-based access. The following procedures outline how to deploy a BIG-IP VE instance using the Proxmox Virtual Environment.
Note: You cannot upload or import image files through the Proxmox Virtual Environment GUI.
Prerequisites
You must meet the following prerequisites to use this procedure:
- You have a general understanding of the Proxmox Virtual Environment.
- You are familiar with using the Linux command line.
- You can access the Proxmox Virtual Environment on TCP ports 8006 and 22.
- You have a BIG-IP registration key and access to the internet.
Note: The BIG-IP VE instance does not require access to the internet; however, internet access is required to complete licensing of the BIG-IP VE instance.
Procedures
- Create SDN within Proxmox pve-docs
- Create a new virtual machine (VM)
- Add additional network interfaces to the BIG-IP VM
- Use the BIG-IP qcow2 disk image
- Alternate method to utilize the BIG-IP qcow2 disk image
- Launch the BIG-IP VM instance
Optional procedures
- Optional: Considerations for configuring the Proxmox Virtual Environment and multiple VM networks
- Optional: Install the ifupdown2 utility for non-subscription Proxmox Virtual Environments
- Optional: Modify the /etc/networks/interfaces file
Prepare Proxmox VE SDN environment
- Create Zones
- Create ‘Simple Zones’
- VLAN zone : for vlan tagging
- Create VNets
- Create ‘external’ VNet: v100 : dataplane
- Create ‘internal’ VNet: v200 : dataplane
- Create ‘internal’ VNet: v290: dataplane FO
- Create virtualized Subnets
- Subnet (1) 172.16.10.0/24 : v100 : external
- Subnet (2) 172.16.20.0/24 : v200 : internal
- Subnet (2) 172.16.90.0/24 : v290 : internal
- Apply changes
Create a new virtual machine (VM)
The following procedure creates a base virtual machine (VM) that specifies the BIG-IP VE name, CPU, memory, and management network settings
Issue with v8.1.2/8.2.4
Latest Proxmox update Breaks Licensing
Create initial VE in Proxmox
Impact of procedure: Performing the following procedure should not have a negative impact on your system.
- Log in to the Proxmox Virtual Environment GUI.
- Select Server View.
- Go to Datacenter.
- Select the Proxmox Virtual Environment name for which you want deploy the BIG-IP VE instance.
- In the upper-right corner of the GUI, select Create VM.
- Select the Advanced check box.
- The following are based on a successfully deployed image on my lab platform.
General
- Name text box
- Name: F5-BigIP
- ID: 9001
- Important: Note the numeric VM ID.
OS Type
- Select Do not use any media.
- Type = Linux
- Version = Version to 6.x-2.6 Kernel
System
- Graphic Card = Default
- SCSI Controller = VirtIO SCSI single.
- BIOS = SeaBIOS (default).
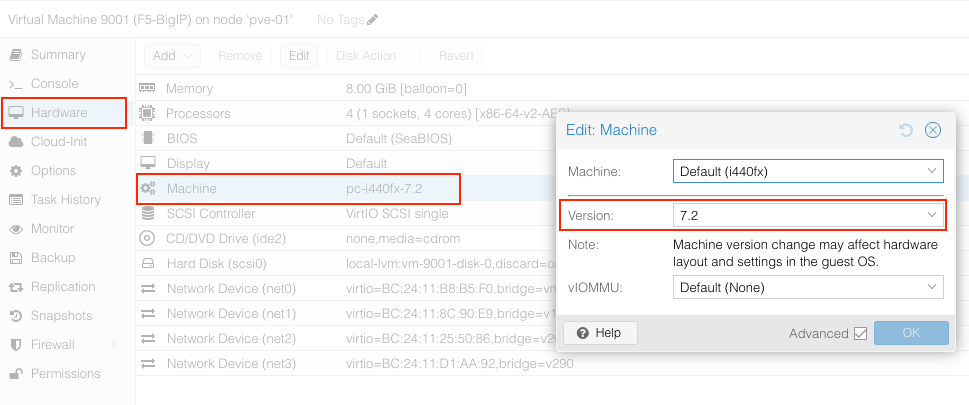
- Machine = i440fx (default)
- Qemu Agent = enable
- TPM = disabled
Disks
- Delete Disk - This will be added later.
CPU
- Sockets = 1
- Cores = 4
- Advanced > CPU Limit 4
- Note: F5 recommends that you review the memory and CPU requirements for KVM deployments in K15796: Hardware requirements to host BIG-IP VE on private cloud platforms.
- Type = x86-64-v2-AES
Memory
- Memory = 8192 (8GiB)
- Ballooning = uncheck
Network
- Bridge = vmbr0
- Firewall = unchecked
- Model: VirtIO
Confirm
- UnCheck = start after created
- Finish
Adjust VM settings
Hardware
- Add Network Device = v100
- Disconnect = unchecked
- Add Network device = v200
- Disconnect = unchecked
- Add VirtIO RNG for random number generator for SSL connections
- Delete CD/DVD
Impost disk image: BIG-IP qcow2 disk image
- Download qcow2 image from my.f5.com
BIGIP-17.1.1.1-0.0.2.ALL.qcow2.zip
BIGIP-16.1.4-0.0.2.ALL.qcow2.zip
- Upload image from local machine to proxmox server
scp BIGIP-16.1.4-0.0.2.ALL.qcow2.zip root@proxmox.domain.local:/root/f5vm
- After you upload the BIG-IP VE image file, access the Proxmox Virtual Environment command line and use the following command syntax to unzip the qcow2 file:
unzip BIGIP-16.1.4-0.0.2.ALL.qcow2.zip
- Import image using qm
- qm disk import <vmid> <source> local-lvm
qm disk import 9001 BIGIP-16.1.4-0.0.2.qcow2 local-lvm
:
transferred 79.9 GiB of 82.0 GiB (97.42%)
transferred 80.7 GiB of 82.0 GiB (98.44%)
transferred 81.6 GiB of 82.0 GiB (99.48%)
transferred 82.0 GiB of 82.0 GiB (100.00%)
transferred 82.0 GiB of 82.0 GiB (100.00%)
Successfully imported disk as 'unused0:local-lvm:vm-9001-disk-0'
Configuring the VM to use the imported disk image
For the new VM to boot the imported BIG-IP VE image file, you must modify the VM instance to remove the hard drive of the initial deployment and select the BIG-IP image file as the default hard drive.
The following procedure removes the initial deployment hard drive and configures the VM to use the imported hard drive.
Impact of procedure: Performing the following procedure should not have a negative impact on your system.
- Log in to the Proxmox Virtual Environment GUI.
- Select Server View.
- Go to Datacenter.
- Expand the Proxmox VM list.
- Select the name of the previously created BIG-IP virtual machine.
- Select Hardware.
- Double-click the remaining Unused Disk (the BIG-IP imported disk).
- Important: Note the disk Bus/Device settings.
- SCSI: 0
- Check Discard
- Check SSD emulation
- Select Add.
Options > Boot Order
- Select Options.
- Double-click Boot Order.
- Set Boot device to the imported BIG-IP disk image, based on the Bus/Device settings in the previous step.
- Select OK.
Create Local DNS entry for static IP
192.168.1.50 A f5lab01
Launch the BIG-IP VM instance
The following procedure launches the BIG-IP VM instance, resets the BIG-IP root password, and, if you want, configures the BIG-IP management IP address.
Impact of procedure: Performing the following procedure should not have a negative impact on your system.
- Select the BIG-IP VM.
- Select Start.
- Select Console.
- Log in to the BIG-IP console as the root/default user.
Note: The system prompts you to reset the root password.
- To determine the IP address of the management interface, enter the following command:
- ip a show mgmt
- To change the management IP address access the TMOS Shell (tmsh) by entering the following command:
- tmsh
- Use the following syntax to set a static IP address for the management interface:
modify /sys global-settings mgmt-dhcp disabled
delete /sys management-ip 192.168.1.161/24
create /sys management-ip 192.168.1.50/24
save /sys config
reboot now
- Note: These commands are not required if you prefer the BIG-IP VM to use DHCP to configure the management interface IP address.
Note: Replace <existing ip address> with the IP address listed by the ip a show mgmt command.
Note: Replace <ip address/netmask> with an available IP address on your management network range as configured on the Proxmox Virtual Environment (typically vmbr0).
- You can now access the BIG-IP Configuration utility using the specified management IP address to license, provision, and configure the BIG-IP virtual machine.
Note: For single network interface deployments, access the Configuration utility using the following URL syntax: https://<management-ip address>:8443/.
Note: <management-ip address> is the IP address configured in the previous steps or from DHCP.
- Modify Admin password from CLI
tmsh modify auth user admin prompt-for-password
Additional steps (optional)
- Disable GUI global settings
tmsh modify sys global-settings gui-setup disabled
tmsh modify sys global-settings hostname f5lab01.domain.local
- Create UCS before Licensing
Tmsh save sys ucs pre-license
- Add VNets defined above, shutdown before adding in proxmox > hardware
- v100 external
- v200 internal
- v290 for failover
- Then proceed to license device, using GUI
- Before you can license, you need to modify the machine version. This appears to be still broken in v8.2.4 proxmox
- Set version to 7.2
Restart VM and now you should be able to License the VM
Optional: Considerations for configuring the Proxmox Virtual Environment and multiple VM networks
Related Content