[TUTORIAL] Local-lvm

furfix

New Member
Oct 8, 2022
11
3
3
Hey there. New in proxmox, and trying to learn. There is a basic question that I can't really find out there, so wondering if you can help me and show me the right path...

When I install proxmox, I have "local" and "local-lvm" (disk 1 = sda). I'm ok with the sizes proxmox used, but I want to convert "local-lvm" in a place to store only ISO images. Is that possible?

I want to avoid to expand root. I like the idea to have ISOs in a different volume.

I will add later a 2nd dedicated ssd to store VMs, but first I will like to understand how to handle "Local"

Hope you can help me!
Thanks!
F

*** Below I have posted step by step instructions, in case you want to remove Local-LVM and use that space for storing ISOs not using root for that ***
 
Last edited:
"local" or "pve-root" is a LV formated and used as your root filesystem.
"local-lvm" or "pve-data_tmeta" + "pve-data_tdata" is a LV used as a LVM-Thin pool.

The latter one can only store block devices, so you won't be able to store anything else except virtual disks for VMs/LXCs on it.
Atleast when using PVEs features to manage it.

But what you could do is manually create a new LV ontop of that LVM-Thin pool, format it with the filesystem of your choice, mount it using fstab, create a directory storage pointing to that mountpoint and then use that directory storage to store your ISOs. But that all has to be done in CLI on your own.
So if thats a new installation it might be easier to just wipe that system disk and install PVE again and then create it without a "local-lvm" storage. See chapter "Advanced LVM configuration Options" in the manual: https://pve.proxmox.com/wiki/Installation
Thanks dunuin for replying! It’s a home new lab, so I could remove pve-data during the installation or after. A lot of videos around there explaining how to delete pve-data and extend pve-root, but it’s not exactly what I would like to do, so probably it’s about creating LV ontop of that LVM-Thin pool on cli. If you don’t mind, could you please share the commands or any doc that explains how to do it?? Thanks!!
 
In case somebody is looking do the same as I was, here is the solution:

Before start, make sure login to PVE web gui, delete local-lvm from Datacenter -> Storage. Select the local-lvm, Click on “Remove” button

1.1 Login to pve via SSH

1.2 Unmount and Delete lvm-thin


umount /dev/pve/data
lvremove /dev/pve/data


(Confirm to delete)


1.3 Check free space

vgdisplay pve | grep Free


1.4 Create new lvm

Note
: I've decided to reserve 50G for ISOs, and I will reasign the remaining free space to Root, but you can replace 12500 (50G) with the number you get from step 1.3, which is all available free space

lvcreate -l 12500 -n data pve


1.5 Format and mount

mkfs.ext4 /dev/pve/data
mkdir /mnt/data
mount /dev/pve/data /mnt/data


Note: Use “mkfs.ext4” for ext4 format, “mkfs.xfs -f” to use xfs format

1.6 Modify fstab, so that it’s mounted on boot, add following line to the end of the file

nano /etc/fstab

/dev/pve/data /mnt/data ext4 defaults 0 0

Note: If you have used xfs, replace ext4 with xfs

2 Use it in Proxmox

2.1 Login to Proxmox web gui
2.2 Navigate to Datacenter -> Storage, click on “Add” button
2.3 Click on “Directory”
2.4 Give it a name (ID field), Directory is “/mnt/data”, select Content you want to put to the directory, you can just select all of them.
2.5 Click on “Add” button
2.6 Now you can use the folder on that LVM volume easily within Proxmox


3 Reasigning the remaining free space to root (skip this step if you have allocated all free space in 1.4 step):

3.1 Login to pve via SSH


lvresize -l +100%FREE /dev/pve/root
resize2fs /dev/mapper/pve-root


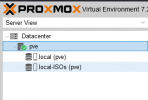
This is how it looks now:

1665314115167.png
 
Last edited:
  • Like
Reactions: readcoil
In case somebody is looking do the same as I was, here is the solution:

Before start, make sure login to PVE web gui, delete local-lvm from Datacenter -> Storage. Select the local-lvm, Click on “Remove” button

1.1 Login to pve via SSH

1.2 Unmount and Delete lvm-thin


umount /dev/pve/data
lvremove /dev/pve/data


(Confirm to delete)


1.3 Check free space

vgdisplay pve | grep Free


1.4 Create new lvm

Note
: I've decided to reserve 50G for ISOs, and I will reasign the remaining free space to Root, but you can replace 12500 (50G) with the number you get from step 1.3, which is all available free space

lvcreate -l 12500 -n data pve


1.5 Format and mount

mkfs.ext4 /dev/pve/data
mkdir /mnt/data
mount /dev/pve/data /mnt/data


Note: Use “mkfs.ext4” for ext4 format, “mkfs.xfs -f” to use xfs format

1.6 Modify fstab, so that it’s mounted on boot, add following line to the end of the file

nano /etc/fstab

/dev/pve/data /mnt/data ext4 defaults 0 0

Note: If you have used xfs, replace ext4 with xfs

2 Use it in Proxmox

2.1 Login to Proxmox web gui
2.2 Navigate to Datacenter -> Storage, click on “Add” button
2.3 Click on “Directory”
2.4 Give it a name (ID field), Directory is “/mnt/data”, select Content you want to put to the directory, you can just select all of them.
2.5 Click on “Add” button
2.6 Now you can use the folder on that LVM volume easily within Proxmox


3 Reasigning the remaining free space to root (skip this step if you have allocated all free space in 1.4 step):

3.1 Login to pve via SSH


lvresize -l +100%FREE /dev/pve/root
resize2fs /dev/mapper/pve-root


This is how it looks now:

View attachment 42058
Thank you for this. Exactly what I needed.
 

About

The Proxmox community has been around for many years and offers help and support for Proxmox VE, Proxmox Backup Server, and Proxmox Mail Gateway.
We think our community is one of the best thanks to people like you!

Get your subscription!

The Proxmox team works very hard to make sure you are running the best software and getting stable updates and security enhancements, as well as quick enterprise support. Tens of thousands of happy customers have a Proxmox subscription. Get yours easily in our online shop.

Buy now!