[TUTORIAL] How-To: Convert Windows 10 Generation 2 Hyper-V VM to a Proxmox VM

pbengert

New Member
Apr 1, 2022
4
7
3
Hi!
I found lots of infos how to use a Windows 10 generation 2 Hyper-V VM in Proxmox. But none worked for me completly.
So I decided to write down what worked for me. Unfortunately I can only attach 10 pictures here, so I can't show all the pictures.

What you need:
1) Windows 10 Installation ISO - get it here: https://www.microsoft.com/en-us/software-download/windows10ISO
2) Virtio-win ISO - get it here: https://fedorapeople.org/groups/virt/virtio-win/direct-downloads/stable-virtio/virtio-win.iso

Common problems:
1) Generation 2 virtual machines are booting via UEFI. So you can't use SeaBIOS in Proxmox but you must use OVMF and you need to add a EFI Disk. Further you might have to tweak the boot process in the UEFI Bios.
2) Virtio-Driver do not load by default even if installed earlier. Workaround: Inject the Virtio-SCSI driver before booting and then install the virtio-win CD.

You find some information here: https://pve.proxmox.com/wiki/Migration_of_servers_to_Proxmox_VE

Step 1 on the Hyper-V Server:
a) Shutdown the windows VM. Right-click and export the vm.
b) We only need the disk file with the ending vhdx or vhd
c) Transfer this file to your proxmox server

Step 2 on Proxmox:
a) Create a new virtual machine
  • In the general tab: no special settings needed
  • In the OS tab: Use a CD/DVD and attach the Windows 10 iso. Guest OS: set to Microsoft Windows an Version to 10.
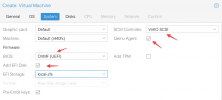
  • In the System tab: Choose OVMF (UEFI) as BIOS and add a EFI Disk. Set the SCSI controller to VirtIO SCSI and check Qemu Agent
1648894041053.png
  • In the Disks tab: in proxmox 7.1. delete the preconfigures harddisk and create it without harddisk. In earlier versions create a harddisk - but please delete it right after creating the vm! We use our import vhdx/vhd instead!
  • For the CPU and memory tab: try to match your hyper-v vm as closely as possible.
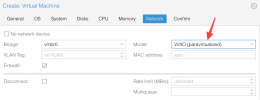
  • In the Network Tab: use VirtIO as your model

1648894366596.png
Next create the VM but do not start it. (If you had to create a harddisk delete it now).

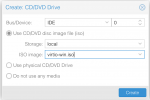
Add a second CD/DVD:
1648894469278.png
an use the virtio-win.iso

Now it is time to import the windows_10 vhdx:
This need to be done in the terminal:
Code:
We can use this command:
qm importdisk <vmid> <source> <storage> [OPTIONS]

For me it looks like this:
root@pm2:~# qm importdisk 200 ./Windows\ 10\ Pro.vhdx local-zfs
importing disk './Windows 10 Pro.vhdx' to VM 200 ...
....
....
Successfully imported disk as 'unused0:local-zfs:vm-200-disk-1'

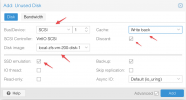
Now we can see the disk in the proxmox gui and we can attach it by double-clicking it:

1648895452601.png

Attach it to SCSI on the VirtIO SCSI. Set the cache type to what you like, maybe see documentation for pros and cons.

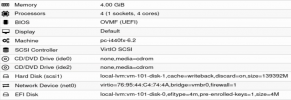
Now my machine looks like this:

1648896679280.png
Make sure that the boot order is correct. It should first try to boot from the CD/DVD drives and then from our imported harddisk on scsi1.


Inject the virtio-driver to your windows installation:
Now it is time to boot the machine up. Try not to miss the "Press an key to boot from CD" to boot from the windows iso.
Now you will get the Windows Setup windows

Choose your language settings --> next --> Repair your computer --> Troubleshoot --> Command prompt
Now you get a windows command prompt:

    • First step: show all drives: wmic logicaldisk get deviceid, volumename, description
    • This will show you all drives - but it will not show the imported windows harddisk as the virtio scsi driver is not loaded
    • see which drive contains the virtio-win iso, here it is drive D:
    • Load the virtio-scsi driver with: drvload d:\vioscsi\w10\amd64\vioscsi.inf
    • Show all drives again: wmic logicaldisk get deviceid, volumename, description - now drive c: with the windows installation should be found. If this is the case, then we can inject the driver into this windows installation
    • dism /image:c:\ /add-driver /driver:d:\vioscsi\w10\amd64\vioscsi.inf
    1648897673399.png

    We have injected the virtio scsi driver so we can exit this shell, shutdown the pc and reboot.

    Now see if windows boots. If it won't boot see the next post down below to see how to fix the UEFI Bios boot process.
    It you can boot windows the continue:
    In Windows 10: Install all virtio-driver from the virtio-win cd that is loaded in windows and install the qemu-guest-agent from guest-agent folder
    See the windows device-manager if all drivers are installed:

    1648898398543.png

    Et volia. You have migrated your windows 10 to proxmox. Reboot to see if everything works!

    Troubleshooting the UEFI boot process if windows does not boot:
    • Remove the CD/DVDs -> Hardware -> Double-click the CD/DVD Drive and check "Do not use any media" for both CD/DVD drives (or remove them completely)
    • Start the VM in the console view - right after starting it press ESC a few time to enter the UEFI Bios
    • Go to Boot Maintainance Manager --> Boot From File --> Now choose the correct harddisk (if you have removed the isos from the CD/DVD you should only have one entry) --> Choose this one --> Now you might have to experiment a bit --> for me this works: <EFI> --> <Boot> --> bootx64.efi --> choose this entry and see if windows boots now. If it does not boot see in you can find another efi file which works
    • If you found the correct file, now make it persistent. Reboot --> ESC to get into the UEFI Bios
    • Boot Maintenance Manager --> Boot Options --> Add Boot Option -> Choose the efi-file that worked -> input a description like "Windows10" --> Commit changes and exit --> Change Boot Order --> Sort the boot order that you new entry is on top of the list and press F10 to save it. Now leave the Bios an reboot to see if it works

    Good luck and happy converting to proxmox!
 
Last edited:
I'm having trouble getting this to work. I've gone over your instructions very carefully. I've tried this with a long standing VM and also a fresh one that I spun up this morning.

The disk appears to import just fine. I upload the disk to one of our NAS, mounted the NAS to Proxmox, and run the import while the vhdx is on the NAS. The vhdx was only 9gigs, but the import declared it at 50gb.

Then, I boot into the repair command line, load the driver, run the wmic and it doesn't show the C: drive.

Any thoughts on what I'm doing wrong? Could it be the QM import doesn't like the vhdx being on the NAS when attempting to import?
I have no good idea why it does not work. Check if the C: drive is really attached to the vm. (Only importing it does not attach it automatically). Maybe post screenshot of your vm configuration.
 
Hi!
I found lots of infos how to use a Windows 10 generation 2 Hyper-V VM in Proxmox. But none worked for me completly.
So I decided to write down what worked for me. Unfortunately I can only attach 10 pictures here, so I can't show all the pictures.

What you need:
1) Windows 10 Installation ISO - get it here: https://www.microsoft.com/en-us/software-download/windows10ISO
2) Virtio-win ISO - get it here: https://fedorapeople.org/groups/virt/virtio-win/direct-downloads/stable-virtio/virtio-win.iso

Common problems:
1) Generation 2 virtual machines are booting via UEFI. So you can't use SeaBIOS in Proxmox but you must use OVMF and you need to add a EFI Disk. Further you might have to tweak the boot process in the UEFI Bios.
2) Virtio-Driver do not load by default even if installed earlier. Workaround: Inject the Virtio-SCSI driver before booting and then install the virtio-win CD.

You find some information here: https://pve.proxmox.com/wiki/Migration_of_servers_to_Proxmox_VE

Step 1 on the Hyper-V Server:
a) Shutdown the windows VM. Right-click and export the vm.
b) We only need the disk file with the ending vhdx or vhd
c) Transfer this file to your proxmox server

Step 2 on Proxmox:
a) Create a new virtual machine
  • In the general tab: no special settings needed
  • In the OS tab: Use a CD/DVD and attach the Windows 10 iso. Guest OS: set to Microsoft Windows an Version to 10.
  • In the System tab: Choose OVMF (UEFI) as BIOS and add a EFI Disk. Set the SCSI controller to VirtIO SCSI and check Qemu Agent
View attachment 35675
  • In the Disks tab: in proxmox 7.1. delete the preconfigures harddisk and create it without harddisk. In earlier versions create a harddisk - but please delete it right after creating the vm! We use our import vhdx/vhd instead!
  • For the CPU and memory tab: try to match your hyper-v vm as closely as possible.
  • In the Network Tab: use VirtIO as your model

View attachment 35677
Next create the VM but do not start it. (If you had to create a harddisk delete it now).

Add a second CD/DVD:
View attachment 35678
an use the virtio-win.iso

Now it is time to import the windows_10 vhdx:
This need to be done in the terminal:
Code:
We can use this command:
qm importdisk <vmid> <source> <storage> [OPTIONS]

For me it looks like this:
root@pm2:~# qm importdisk 200 ./Windows\ 10\ Pro.vhdx local-zfs
importing disk './Windows 10 Pro.vhdx' to VM 200 ...
....
....
Successfully imported disk as 'unused0:local-zfs:vm-200-disk-1'

Now we can see the disk in the proxmox gui and we can attach it by double-clicking it:
View attachment 35681

Attach it to SCSI on the VirtIO SCSI. Set the cache type to what you like, maybe see documentation for pros and cons.

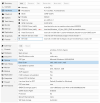
Now my machine looks like this:
View attachment 35684
Make sure that the boot order is correct. It should first try to boot from the CD/DVD drives and then from our imported harddisk on scsi1.


Inject the virtio-driver to your windows installation:
Now it is time to boot the machine up. Try not to miss the "Press an key to boot from CD" to boot from the windows iso.
Now you will get the Windows Setup windows

Choose your language settings --> next --> Repair your computer --> Troubleshoot --> Command prompt
Now you get a windows command prompt:

    • First step: show all drives: wmic logicaldisk get deviceid, volumename, description
    • This will show you all drives - but it will not show the imported windows harddisk as the virtio scsi driver is not loaded
    • see which drive contains the virtio-win iso, here it is drive D:
    • Load the virtio-scsi driver with: drvload d:\vioscsi\w10\amd64\vioscsi.inf
    • Show all drives again: wmic logicaldisk get deviceid, volumename, description - now drive c: with the windows installation should be found. If this is the case, then we can inject the driver into this windows installation
    • dism /image:c:\ /add-driver /driver:d:\vioscsi\w10\amd64\vioscsi.inf
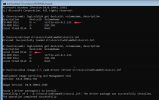
    View attachment 35685

    We have injected the virtio scsi driver so we can exit this shell, shutdown the pc and reboot.

    Now see if windows boots. If it won't boot see the next post down below to see how to fix the UEFI Bios boot process.
    It you can boot windows the continue:
    In Windows 10: Install all virtio-driver from the virtio-win cd that is loaded in windows and install the qemu-guest-agent from guest-agent folder
    See the windows device-manager if all drivers are installed:
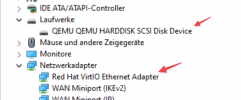
    View attachment 35688

    Et volia. You have migrated your windows 10 to proxmox. Reboot to see if everything works!

    Troubleshooting the UEFI boot process if windows does not boot:
    • Remove the CD/DVDs -> Hardware -> Double-click the CD/DVD Drive and check "Do not use any media" for both CD/DVD drives (or remove them completely)
    • Start the VM in the console view - right after starting it press ESC a few time to enter the UEFI Bios
    • Go to Boot Maintainance Manager --> Boot From File --> Now choose the correct harddisk (if you have removed the isos from the CD/DVD you should only have one entry) --> Choose this one --> Now you might have to experiment a bit --> for me this works: <EFI> --> <Boot> --> bootx64.efi --> choose this entry and see if windows boots now. If it does not boot see in you can find another efi file which works
    • If you found the correct file, now make it persistent. Reboot --> ESC to get into the UEFI Bios
    • Boot Maintenance Manager --> Boot Options --> Add Boot Option -> Choose the efi-file that worked -> input a description like "Windows10" --> Commit changes and exit --> Change Boot Order --> Sort the boot order that you new entry is on top of the list and press F10 to save it. Now leave the Bios an reboot to see if it works

    Good luck and happy converting to proxmox!
Hi there

Thank you for this great tutorial! I am a bit stuck. I have followed all the steps. But during the driver injection step, I cannot load it to C: drive. I get dism error 2. At that step I had:
Local Fixed Disk C System Reserved
CD-ROM disk
CD-ROM disk
Local Fixed Disk F
Local Fixed Disk G
Local Fixed Disk X Boot

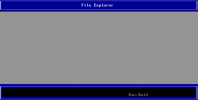
So I ran the dism command on F, that worked. Later on tried on G, that also gave dism error 2. I still tried to reboot thinking that the driver is injected on disk F, and that it will maybe work. Does not boot. So I went to the UEFI troubleshooting part. I detached both the CD Rom drives and selected the first boot device as local disk. When I go to the Boot Maintenance Manager -> Boot From File, the File Explorer is completely empty. Any ideas what else I could try? This is for a server 2016. I see the post is marked as
Generation 2, could if be that my VM is exported in a Generation 1 format and therefor it does not work? I am not overly familiar with Windows and VHDX so any help will be greatly appreciated!

1654588919143.png

1654588952591.png
 
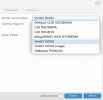
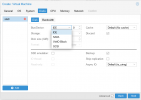
If you don't want to install the extra drivers, you can try to use an IDE SATA Drive instead of the VirtIO. Also for networking you can use the E1000 type instead of VirtIO.
Once you have Windows up and running, then you can log in and install the VirtIO drivers easily by downloading them with a browser and installing with a normal exe or you can mount the iso in windows.
 
Last edited:
Thank you, but in 7.1 I don't have that option:

1666181950084.png


Was this what you were referring to?
 
Hi all. Here is my way to migrate hyper-v gen 2 drive to proxmox:
1. Convert .vhdx - > .qcow2 (i use StarWind V2V Converter);
2. Tranfer file disk to proxmox (/var/lib/vz/images);
3. Import
Code:
qm importdisk 107 /var/lib/vz/images/windows.qcow2 local --format qcow2
107 - id VM
3. Create VM on Proxmox with SATA (name will be windows.qcow2);
4. Create VM on Proxmox with SCSI (temp);
5. Run VM (with 2 disk SATA and SCSI);
6. Install Windows VirtIO Drivers;
4. Detach and delete SCSI (temp) disk;
5. Detach SATA disk (windows.qcow2);
6. Attach windows.qcow2 but change SCSI!!!
7. Run VM;
8. Congratulations!!!
 
Last edited:
  • Like
Reactions: GoaMetz and UdoB
I am attempting to convert a Hyper-V VM (Win server 2022) and followed the steps from above in bold below.:

Inject the virtio-driver to your windows installation:
Now it is time to boot the machine up. Try not to miss the "Press an key to boot from CD" to boot from the windows iso.
Now you will get the Windows Setup windows

Choose your language settings --> next --> Repair your computer --> Troubleshoot --> Command prompt
Now you get a windows command prompt:


    • First step: show all drives: wmic logicaldisk get deviceid, volumename, description
    • This will show you all drives - but it will not show the imported windows harddisk as the virtio scsi driver is not loaded
    • see which drive contains the virtio-win iso, here it is drive D:
    • Load the virtio-scsi driver with: drvload d:\vioscsi\w10\amd64\vioscsi.inf
    • Show all drives again: wmic logicaldisk get deviceid, volumename, description - now drive c: with the windows installation should be found. If this is the case, then we can inject the driver into this windows installation
    • dism /image:c:\ /add-driver /driver:d:\vioscsi\w10\amd64\vioscsi.inf

This was successful:
  • Load the virtio-scsi driver with: drvload d:\vioscsi\w10\amd64\vioscsi.inf
  • But then when checking
    wmic logicaldisk get deviceid, volumename, description again, C drive does not show up.

Any ideas?
 
Last edited:
I am attempting to convert a Hyper-V VM (Win server 2022) and followed the steps from above in bold below.:

Inject the virtio-driver to your windows installation:
Now it is time to boot the machine up. Try not to miss the "Press an key to boot from CD" to boot from the windows iso.
Now you will get the Windows Setup windows

Choose your language settings --> next --> Repair your computer --> Troubleshoot --> Command prompt
Now you get a windows command prompt:


    • First step: show all drives: wmic logicaldisk get deviceid, volumename, description
    • This will show you all drives - but it will not show the imported windows harddisk as the virtio scsi driver is not loaded
    • see which drive contains the virtio-win iso, here it is drive D:
    • Load the virtio-scsi driver with: drvload d:\vioscsi\w10\amd64\vioscsi.inf
    • Show all drives again: wmic logicaldisk get deviceid, volumename, description - now drive c: with the windows installation should be found. If this is the case, then we can inject the driver into this windows installation
    • dism /image:c:\ /add-driver /driver:d:\vioscsi\w10\amd64\vioscsi.inf

This was successful:
  • Load the virtio-scsi driver with: drvload d:\vioscsi\w10\amd64\vioscsi.inf
  • But then when checking
    wmic logicaldisk get deviceid, volumename, description again, C drive does not show up.

Any ideas?
Check if adding viostor driver helps. I had that, and in fact it depends on whether you used virtio or SCSI for mounting the image in Proxmox.
Chris
 
Thanks for your help, after 24 hours of struggle, I can migrate my VMS from hyper v to Proxmox. it was the driver issue due to which I could not see the converted disk. Thanks, Thanks Thanks a lot.
 

About

The Proxmox community has been around for many years and offers help and support for Proxmox VE, Proxmox Backup Server, and Proxmox Mail Gateway.
We think our community is one of the best thanks to people like you!

Get your subscription!

The Proxmox team works very hard to make sure you are running the best software and getting stable updates and security enhancements, as well as quick enterprise support. Tens of thousands of happy customers have a Proxmox subscription. Get yours easily in our online shop.

Buy now!