

Hello fellow Proxmoxers,
I spent the last day banging my head against the desk trying to get our Windows Servers with Virtualization Based Security to properly run. To avoid further brain cell loss and bruises within the community, I wanted to share my findings with you here and also give a step-by-step guide on how I ended up building the best custom CPU model for our environment (may vary with your hardware of course).
Disclaimer: This was done on and applies to Intel CPUs >= Kabylake. For AMD users there may be a lot of similarities, but I know of at least a couple of differences regarding MBEC/GMET. Don't have AMD CPUs to test there.
Since the guide is probably what most of you want anyway, lets get this out of the way first.
This gave me nearly identical performance to having a Windows VM with Hyper-V turned off. Since I need live-migration capability, I had to drop the hv-reenlightment flag in the end which does cost some performance. Hopefully Proxmox can find a way to add this in the future.
Now for the rabbithole that VBS/HVIC/Hyper-V etc. is.
Have you ever wondered what happens when you enable the optional Hyper-V feature in Windows? And why it is a prerequisite to VBS, Hotpatching, HVIC etc.?
Well, I was in for a surprise, but lets start from the beginning.
The whole journey started when I wanted to move Windows VMs from VMware to Proxmox. I am neither a VMware admin nor a Windows admin, I only use Linux and Proxmox in my day-to-day so some of these might be obvious to you when you are experienced in those.
In VMware there is a checkbox for "Virtualization Based Security", short VBS. If you want to use VBS in Windows, you also need to enable that checkbox in Vmware. I don't know all the things it does it the background, but the most important one: It enables nested virtualization.
VBS uses nested virtualization to put some components of Windows in a more isolated environment, a Hyper-V VM/partition. The Credential Guard feature of VBS for example does this with things related to authentication, but there are other things like HVIC or "Hypervisor enforced Code Integrity" as it is called in some places in Windows.
How does Windows do VMs? Well... with Hyper-V. So you need to have Hyper-V enabled for this to work.
I went ahead and activated Hyper-V and VBS in a VM and then started doing some CPU benchmarks between a "normal" VM which does not nested-virt enabled and the one with nested-virt, Hyper-V and VBS. And I noticed a 30% CPU performance drop which was a bit (a lot) more than I expected.
So I began trying things.
Deactivate VBS: performance still shit, did not change much
Switch to the other CPU Model that does not have nested-virt enabled: Performance good, but VBS can't run because Hyper-V can't run. Just wanted to test this though to make sure that it is not some weird thing in the windows installation itself.
Switch back to nested-virt CPU Model and turn off Hyper-V: Performance good.
Turn Hyper-V back on: Performance bad.
So Hyper-V seemed to be the culprit. I looked further into what happens when you enable Hyper-V and was a bit suprised.
When off, the chain of commands looks like this: Application -> Windows Kernel - > L0 Hypervisor (Proxmox/KVM in this case).
When you enable Hyper-V, it changes to this: Application -> Windows root partitions kernel (L2) -> Hyper-V hypervisor (L1) - > L0 Hypervisor.
So basically enabling Hyper-V results in Windows itself running as a VM on a Hyper-V hypervisor which then runs on KVM.
This introduces more VMCS layers (Virtual Machine Control Structure). What this does on a really basic level: Each level is seperated for security reasons. Your hypervisor runs in L0, your normal VM in L1. Normally you are running on L0. If the VM you have needs some CPU time, this calls a VMENTRY command in the VT-x extension of Intel CPUs which results in the L0 state being put away into the Host State Area and loading the L1 state (your VM) from the Guest State Area. Once your time-slice runs out of the operation is finished, it calles a VMEXIT which writes the progress back to the Guest State Area and loads L0 again from the Host State Area.
This is usually pretty fast and you don't really notice it, this is what VT-x is for. Its hardware accelerated.
Here is a graphic that I generated with AI to illustrate this. The entire rest of this forum post here was written by me though:
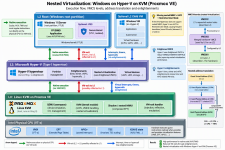
With Hyper-V enabled, a VMExit from L2 (which now exists, your "normal" Windows is in L2) to L0 is also reflected to L1 which exponentially increases the amount of VMENTRY/EXIT you have to do. When running with VBS and Credential Guard or HVCI, Windows gains two virtual trust levels. VTL 0 and VTL 1. VTL 0 is your "normal" kernel and your user applications. VTL 0 is treated as if it was to eventually get compromised. So some components are in VTL 1 which is a secure stripped down kernel where login hashes, tokens etc. are stored and cannot be accessed from VTL 0.
To keep VTL 0 safe, Memory Integrity (HVCI) enforces a strict rule on memory pages: memory can be writable or executable, never both at the same time. Furthermore, the hypervisor must separate which memory pages can run as User Mode (normal apps like Chrome or games) versus Kernel Mode (high-privilege OS code).
Usually, every time your computer switches back and forth between running a normal app (User Mode) and handling a background OS task (Kernel Mode), the hypervisor has to manually step in, swap memory permission tables, and verify code integrity.
A user reports having 1.2 million VMexits/second across an 8 vCPU Windows 11 guest [1] while watching a Youtube Video. With the KVM feature of eVMCS (Enlightened VMCS) the VMREAD/WRITE commands are emulated which reduces the real amount of ENTRY/EXIT which hit L0 to 200k/s which is a lot less but still way too much.
This is where another Intel Hardware feature steps in, MBEC (Mode-Based Execute Control). On AMD this is called GMET (Guest Mode Execute Trap). This feature is available since Kabylake or Zen 2. This gives the processor two separate hardware permission switches on every memory page, one for user mode and one for kernel mode. So the permission checks are run at hardware speed and not emulated within Windows. Windows emulation for this is called "Restricted User Mode" and basically fakes this in software which results in the atrocious speeds and millions of exits.
With MBEC enabled, the same user [1] reports a 24x reduction in VMEXITs.
So... was I not using MBEC then?
MBEC support for KVM was introduced into the Linux Kernel very recently, see [1] (and [2] as a previous attempt). Proxmox backported the changes to Kernel 7.0.0 and shipped in Proxmox VE 9.2. (BIG FAT THANK YOU PROXMOX!!!) Qemu also needed to learn about this flag, this was introduced to Proxmox with Qemu 11.0.0 and got some fixes, it is now stable for me in 11.0.0+pve2.
So I thought this should work, why doesn't it? Can I check from within windows if MBEC/GMET is supported? Yes you can, and no, it wasn't enabled for my VM.
Check it with this command:

If the "AvailableSecurityProperties" has a "7" (lucky number) in it, MBEC works.
I needed to enable MBEC with another CPU flag on my custom CPU type, +vmx-mbec. After that my performance was basically the same with or without Hyper-V enabled.
I hope this can serve my future self and maybe others here as a reference and guide on how to run Windows with VBS enabled and minimal performance hit.
This text was written by myself and with what I could understand and gather from reading through mailing lists, posts, docs for a day. There may be mistakes in here. If you spot a mistake, please let me know and I will edit this post to keep it accurate and up to date.
[1]: https://lwn.net/Articles/1051782/
[2]: https://lwn.net/Articles/951240/
[3]: https://www.qemu.org/docs/master/system/i386/hyperv.html "The enlightenment is nested specific, it targets Hyper-V on KVM guests. When enabled, it provides HV_X64_MSR_REENLIGHTENMENT_CONTROL (0x40000106), HV_X64_MSR_TSC_EMULATION_CONTROL (0x40000107)and HV_X64_MSR_TSC_EMULATION_STATUS (0x40000108) MSRs allowing the guest to get notified when TSC frequency changes (only happens on migration) and keep using old frequency (through emulation in the hypervisor) until it is ready to switch to the new one. This, in conjunction with hv-frequencies, allows Hyper-V on KVM to pass stable clocksource (Reference TSC page) to its own guests.
Note, KVM doesn’t fully support re-enlightenment notifications and doesn’t emulate TSC accesses after migration so ‘tsc-frequency=’ CPU option also has to be specified to make migration succeed. The destination host has to either have the same TSC frequency or support TSC scaling CPU feature."
This cannot currently be specified in PVE.
I spent the last day banging my head against the desk trying to get our Windows Servers with Virtualization Based Security to properly run. To avoid further brain cell loss and bruises within the community, I wanted to share my findings with you here and also give a step-by-step guide on how I ended up building the best custom CPU model for our environment (may vary with your hardware of course).
Disclaimer: This was done on and applies to Intel CPUs >= Kabylake. For AMD users there may be a lot of similarities, but I know of at least a couple of differences regarding MBEC/GMET. Don't have AMD CPUs to test there.
Since the guide is probably what most of you want anyway, lets get this out of the way first.
- Figure out what the oldest generation of CPU is you have in your Proxmox Cluster if you mix generations. I had Icelake and Granite Rapids in my Cluster, so I went with Icelake. You don't want to choose "host" when you have mixed CPU generations as that can break Live-Migrations.
- In Datacenter -> Custom CPU Models add a Model and choose your result from step 1 in the Base Model, for me that was Icelake. There are usually multiple generations of Icelake Servers in there:
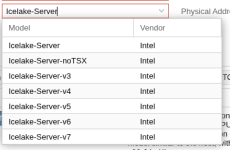
Ideally you choose the latest version you can, so that would be v7 for me. But in the BIOS of my servers TSX and all the related extensions (hle, rtm) are disabled because of security reasons. The v3 to v7 models expect you to have TSX enabled to be able to start a VM. If you don't, it will error out when trying to start.
But I still want that new v7, so lets choose that and just disable the missing flags by (in my case) setting "hle" and "rtm" to "off". Test yourself if you need to disable those flags by just trying to start a VM, it will tell you in the error message which flags are the issue.
- The next step is setting the correct flags for some CPU vulnerabilities. This will also vary depending on your CPU generation. On the Proxmox Host check the vulnerabilities output of lscpu. This can look like this:
Code:Vulnerabilities: Gather data sampling: Vulnerable Ghostwrite: Not affected Indirect target selection: Mitigation; Aligned branch/return thunks Itlb multihit: Not affected L1tf: Not affected Mds: Not affected Meltdown: Not affected Mmio stale data: Mitigation; Clear CPU buffers; SMT vulnerable Old microcode: Not affected Reg file data sampling: Not affected Retbleed: Not affected Spec rstack overflow: Not affected Spec store bypass: Mitigation; Speculative Store Bypass disabled via prctl Spectre v1: Mitigation; usercopy/swapgs barriers and __user pointer sanitization Spectre v2: Mitigation; Enhanced / Automatic IBRS; IBPB conditional; PBRSB-eIBRS SW seq uence; BHI SW loop, KVM SW loop Srbds: Not affected Tsa: Not affected Tsx async abort: Not affected Vmscape: Not affected
Then you go through and set the appropriate flags to let your VM know that you are not vulnerable to the attacks or that the hypervisor already mitigates them. If you don't do that, some OSses might try to mitigate them in software themselves reducing performance.
For example I see I am not affected by the "Reg file data sampling" or rfds vulnerability, so I set the flag "rfds-no" to "On" (the -no in the name confused me at first. if something is <vuln>-no and you set it to "on", it tells the VM that you are not vulnarable to <vuln>). In my case that resulted in something like this:+md-clear;+flush-l1d;+psdp-no;+rfds-no;+sbdr-ssdp-no;+stibpBut again, check with your hardware. This step is a bit tedious.
- So far this has been pretty "normal" stuff that is not specific to Windows. Now for the Windows specifics when you want to run Hyper-V (which is also a pre-requisite to VBS, WSL, HVIC, Credential Guard, etc.).
Set nested-virt on
Set hv-avic on
Set hv-emsr-bitmap on
Set hv-frequencies on
Set hv-reenlightenment on [WARNING: This will break live migration. This option will require a tsc-freq set but PVE offers no way to set this. Costs some performance if left off, but leaves migration intact. See footnote 3]
Set hv-tlbflush on
Set hv-tlbflush-direct on
Set hv-tlbflush-ext on
Set vmx-mbec on
Some of these are explained a bit further down in the long text.
- Configure your Windows VMs to use this custom CPU model. I have dual-socket hosts so in my testing I got the most performance when setting the sockets to 2 and enabling NUMA in the CPU settings of the VM as well. Only slightly better, but reproducable ~5%. Match this to your infrastructure.
Code:
~# cat /etc/pve/virtual-guest/cpu-models.conf
cpu-model: VBS_Icelake-Server-v7-noTSX
    flags -hle;-rtm;-taa-no;+nested-virt;+flush-l1d;+hv-avic;+hv-emsr-bitmap;+hv-frequencies;+hv-reenlightenment;+hv-tlbflush;+hv-tlbflush-direct;+hv-tlbflush-ext;+md-clear;+psdp-no;+rfds-no;+sbdr-ssdp-no;+stibp;+tsc-adjust;+vmx-mbec
    reported-model Icelake-Server-v7
This gave me nearly identical performance to having a Windows VM with Hyper-V turned off. Since I need live-migration capability, I had to drop the hv-reenlightment flag in the end which does cost some performance. Hopefully Proxmox can find a way to add this in the future.
Now for the rabbithole that VBS/HVIC/Hyper-V etc. is.
Have you ever wondered what happens when you enable the optional Hyper-V feature in Windows? And why it is a prerequisite to VBS, Hotpatching, HVIC etc.?
Well, I was in for a surprise, but lets start from the beginning.
The whole journey started when I wanted to move Windows VMs from VMware to Proxmox. I am neither a VMware admin nor a Windows admin, I only use Linux and Proxmox in my day-to-day so some of these might be obvious to you when you are experienced in those.
In VMware there is a checkbox for "Virtualization Based Security", short VBS. If you want to use VBS in Windows, you also need to enable that checkbox in Vmware. I don't know all the things it does it the background, but the most important one: It enables nested virtualization.
VBS uses nested virtualization to put some components of Windows in a more isolated environment, a Hyper-V VM/partition. The Credential Guard feature of VBS for example does this with things related to authentication, but there are other things like HVIC or "Hypervisor enforced Code Integrity" as it is called in some places in Windows.
How does Windows do VMs? Well... with Hyper-V. So you need to have Hyper-V enabled for this to work.
I went ahead and activated Hyper-V and VBS in a VM and then started doing some CPU benchmarks between a "normal" VM which does not nested-virt enabled and the one with nested-virt, Hyper-V and VBS. And I noticed a 30% CPU performance drop which was a bit (a lot) more than I expected.
So I began trying things.
Deactivate VBS: performance still shit, did not change much
Switch to the other CPU Model that does not have nested-virt enabled: Performance good, but VBS can't run because Hyper-V can't run. Just wanted to test this though to make sure that it is not some weird thing in the windows installation itself.
Switch back to nested-virt CPU Model and turn off Hyper-V: Performance good.
Turn Hyper-V back on: Performance bad.
So Hyper-V seemed to be the culprit. I looked further into what happens when you enable Hyper-V and was a bit suprised.
When off, the chain of commands looks like this: Application -> Windows Kernel - > L0 Hypervisor (Proxmox/KVM in this case).
When you enable Hyper-V, it changes to this: Application -> Windows root partitions kernel (L2) -> Hyper-V hypervisor (L1) - > L0 Hypervisor.
So basically enabling Hyper-V results in Windows itself running as a VM on a Hyper-V hypervisor which then runs on KVM.
This introduces more VMCS layers (Virtual Machine Control Structure). What this does on a really basic level: Each level is seperated for security reasons. Your hypervisor runs in L0, your normal VM in L1. Normally you are running on L0. If the VM you have needs some CPU time, this calls a VMENTRY command in the VT-x extension of Intel CPUs which results in the L0 state being put away into the Host State Area and loading the L1 state (your VM) from the Guest State Area. Once your time-slice runs out of the operation is finished, it calles a VMEXIT which writes the progress back to the Guest State Area and loads L0 again from the Host State Area.
This is usually pretty fast and you don't really notice it, this is what VT-x is for. Its hardware accelerated.
Here is a graphic that I generated with AI to illustrate this. The entire rest of this forum post here was written by me though:
With Hyper-V enabled, a VMExit from L2 (which now exists, your "normal" Windows is in L2) to L0 is also reflected to L1 which exponentially increases the amount of VMENTRY/EXIT you have to do. When running with VBS and Credential Guard or HVCI, Windows gains two virtual trust levels. VTL 0 and VTL 1. VTL 0 is your "normal" kernel and your user applications. VTL 0 is treated as if it was to eventually get compromised. So some components are in VTL 1 which is a secure stripped down kernel where login hashes, tokens etc. are stored and cannot be accessed from VTL 0.
To keep VTL 0 safe, Memory Integrity (HVCI) enforces a strict rule on memory pages: memory can be writable or executable, never both at the same time. Furthermore, the hypervisor must separate which memory pages can run as User Mode (normal apps like Chrome or games) versus Kernel Mode (high-privilege OS code).
Usually, every time your computer switches back and forth between running a normal app (User Mode) and handling a background OS task (Kernel Mode), the hypervisor has to manually step in, swap memory permission tables, and verify code integrity.
A user reports having 1.2 million VMexits/second across an 8 vCPU Windows 11 guest [1] while watching a Youtube Video. With the KVM feature of eVMCS (Enlightened VMCS) the VMREAD/WRITE commands are emulated which reduces the real amount of ENTRY/EXIT which hit L0 to 200k/s which is a lot less but still way too much.
This is where another Intel Hardware feature steps in, MBEC (Mode-Based Execute Control). On AMD this is called GMET (Guest Mode Execute Trap). This feature is available since Kabylake or Zen 2. This gives the processor two separate hardware permission switches on every memory page, one for user mode and one for kernel mode. So the permission checks are run at hardware speed and not emulated within Windows. Windows emulation for this is called "Restricted User Mode" and basically fakes this in software which results in the atrocious speeds and millions of exits.
With MBEC enabled, the same user [1] reports a 24x reduction in VMEXITs.
So... was I not using MBEC then?
MBEC support for KVM was introduced into the Linux Kernel very recently, see [1] (and [2] as a previous attempt). Proxmox backported the changes to Kernel 7.0.0 and shipped in Proxmox VE 9.2. (BIG FAT THANK YOU PROXMOX!!!) Qemu also needed to learn about this flag, this was introduced to Proxmox with Qemu 11.0.0 and got some fixes, it is now stable for me in 11.0.0+pve2.
So I thought this should work, why doesn't it? Can I check from within windows if MBEC/GMET is supported? Yes you can, and no, it wasn't enabled for my VM.
Check it with this command:
If the "AvailableSecurityProperties" has a "7" (lucky number) in it, MBEC works.
I needed to enable MBEC with another CPU flag on my custom CPU type, +vmx-mbec. After that my performance was basically the same with or without Hyper-V enabled.
I hope this can serve my future self and maybe others here as a reference and guide on how to run Windows with VBS enabled and minimal performance hit.
This text was written by myself and with what I could understand and gather from reading through mailing lists, posts, docs for a day. There may be mistakes in here. If you spot a mistake, please let me know and I will edit this post to keep it accurate and up to date.
[1]: https://lwn.net/Articles/1051782/
[2]: https://lwn.net/Articles/951240/
[3]: https://www.qemu.org/docs/master/system/i386/hyperv.html "The enlightenment is nested specific, it targets Hyper-V on KVM guests. When enabled, it provides HV_X64_MSR_REENLIGHTENMENT_CONTROL (0x40000106), HV_X64_MSR_TSC_EMULATION_CONTROL (0x40000107)and HV_X64_MSR_TSC_EMULATION_STATUS (0x40000108) MSRs allowing the guest to get notified when TSC frequency changes (only happens on migration) and keep using old frequency (through emulation in the hypervisor) until it is ready to switch to the new one. This, in conjunction with hv-frequencies, allows Hyper-V on KVM to pass stable clocksource (Reference TSC page) to its own guests.
Note, KVM doesn’t fully support re-enlightenment notifications and doesn’t emulate TSC accesses after migration so ‘tsc-frequency=’ CPU option also has to be specified to make migration succeed. The destination host has to either have the same TSC frequency or support TSC scaling CPU feature."
This cannot currently be specified in PVE.
Attachments
Last edited: