Boot disk failure recovery

steky9

New Member
May 8, 2023
7
0
1
Sorry for being a newbie on this, but I had a simple homelab system setup using two USB thumb drives using RAID1 as the boot drive, an internal SSD drive as the data drives for VM's, and a NAS network drive for storage of ISO's. I only had 2 VM's in use, so I'm hoping that this should be relatively simple to restore if the SSD drive has not suffered any issue (the wearout value I presume is just garbage). My thinking is that the first priority is getting the VM's restored if possible, and then afterwards I'll look into taking clones of the new boot drives (again 2x USB thumb drives) so that if this issue reoccurs the fix should be a lot simpler.

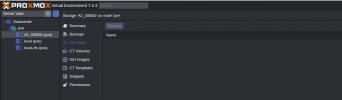
So I've now got Proxmox reinstalled onto the 2 new USB drives, and I can see the internal SSD drive (/dev/sda), but I've no idea what to do next. I've found this previous case

https://forum.proxmox.com/threads/recovery-after-os-drive-failure.81147/

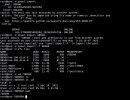
but (a) I don't know the command used to see the VM list shown (2) I don't know for sure how to interpret the command output to know whether I need to add a new LVM or LVM-Thin or something else.. and (c) if I do need to add a new LVM-Thin, it requires the use of a volume group, and I don't know if there's a specific way I need to create one to not impact the VM's on the internal drive.

In short.. if not already obvious, I've no idea what I need to do to rescue this. Any help would be very gratefully received

Disks.jpg
 
So I've made some progress, but hit a problem. I can now see the VM's previously working via a zpool import, but when I import the zpool there doesn't seem to be any data, no matter whether I use CLI or mount the GB500 directory within the GUI.

So is /dev/sda uncoverable as well, or am I making an obvious mistake?
 

Attachments

  • vm_disks.jpg
    vm_disks.jpg
    32.5 KB · Views: 10
  • zpool_import.jpg
    zpool_import.jpg
    109.5 KB · Views: 9
mount the GB500 directory within the GUI.

You need to add it as "ZFS" storage and not as "Directory".

The output of: cat /etc/pve/storage.cfg would be useful, in case you need further help.
 
OK, that worked, thank you. I can now see the two VM disks in the A3_GB500 pool through the GUI. I'll keep reading to try figure out the rest of the recovery from there

root@pve:~# cat /etc/pve/storage.cfg dir: local path /var/lib/vz content vztmpl,backup,iso zfspool: local-zfs pool rpool/data content rootdir,images sparse 1 dir: A2_GB500 path /GB500 content iso,backup,images,snippets,rootdir,vztmpl nodes pve prune-backups keep-all=1 shared 0 zfspool: A3_GB500 pool GB500 content rootdir,images mountpoint /GB500 nodes pve sparse 0
 
If you do not have backups of the VM config files, you need to recreate each VM out of your memories.

Best to use the same VMID (100 and 102) as before for each corresponding vdisk. If you do so, you can run: qm rescan after the VM creation and your vdisks should appear as unused disks in the hardware tab of each VM. Then you can attach it to the VM and adapt the boot order and see, if it boots.
 
Yup, no backups were ever taken, even though it would have been simple to do so to the network share. Harsh lesson learnt, even though I've a reasonable memory of the HW configs used.

I appreciate the help provided.
 
So with some playing around with this, I've now gotten both VM's back up and working. The qm rescan command worked like a charm, and having the dryrun option with it was pretty cool. The Linux VM seems a lot better behaved so far than the Windows Server 2019 VM, but I'm presuming its just a matter of playing around with the new configuration of the VM's to try get them back as close as possible to the previous configuration. The Linux VM was a higher priority restore anyway, so I'm happy with the end result.

This can be marked as solved now (I'd happily do it myself, but I don't see the option to do so). Thanks again for the help provided.
 
Weird thing is that both boot, but both cyclically reboot after 5 mins almost exactly. Very odd.
 
Please set up Proxmox Backup Server on a second server / or you can ad it to your existing pve by:

1. apt install extrepo
2. extrepo enable proxmox-pbs
3. apt update
4. apt install proxmox-backup-server
5. https://YOURSERVER:8007
6. configure with a usb disk or in you nas as storage
7. DO BACKUP ;)

8. I would not use USB Thumb Drives for your Proxmox Server, they are not well suited forlots of writes, if you have to try to disable logging (or log to another server via network).
Better get a small ssd to install proxmox / get a second disk and do a mirrored zfs setup with your existing disk AFTER Backing Up your virtual machines.

apt remove rsyslog
systemctl stop systemd-journald
rm -rf /var/log/journal
systemctl start systemd-journald

/!\ You will not have persistent Logs after this but you can access your logs in ram while the system is running /!\
 
As it was only ever intended as a homelab device to learn on, its very small capacity system (HP T730) and doesn't have the capacity to add a second HD. So, while what you're saying is valid and good advice, for the current system its not really possible.

I'm thinking I could spend more time playing with it, trying to figure out what the 5 min reset trigger is, but its not really a productive use of my time. So I'm beginning to think the smart move might be to

(1) use the 5 mins intervals of stability to copy some data of use off the Linux system, and then scrap both recovered VM's (maybe keep the Windows Server VM for a later time when I've more free time to play with recovery, them licenses cost me real money)
(2) build some new VM's I'd like to play with in the short term, back them up to my NAS regularly, along with recommended proxmox config files
(3) Finish the work on NAS builds that I've been working on for a while, and use the left over HD's in a new larger proxmox system, again learning the lesson from the current mess and backing everything up.
 

About

The Proxmox community has been around for many years and offers help and support for Proxmox VE, Proxmox Backup Server, and Proxmox Mail Gateway.
We think our community is one of the best thanks to people like you!

Get your subscription!

The Proxmox team works very hard to make sure you are running the best software and getting stable updates and security enhancements, as well as quick enterprise support. Tens of thousands of happy customers have a Proxmox subscription. Get yours easily in our online shop.

Buy now!