[TUTORIAL] GPU Passthrough on Proxmox VE - macOS Monterey (Part. 04x04)

asded

Member
Sep 2, 2022
31
66
23
France
asded.fr
This is the last in a series of five articles about installing and configuring VMs (Linux,BSD,Windows and macOS) in PCI Passthrough on Proxmox VE 8.

- Part 0-4 PCI/GPU Passthrough on Proxmox VE Installation and configuration (Part. 00x04)
- Part 1-4 PCI/GPU Passthrough on Proxmox VE: Windows 10,11 (Part. 01x04)
- Part 2-4 PCI/GPU Passthrough on Proxmox VE: Debian 12 (Part. 02x04)
- Part 3-4 PCI/GPU Passthrough on Proxmox VE: OpenBSD 7.3 (Part. 03x04)
- Part 4-4 PCI/GPU Passthrough on Proxmox VE: macOS Montrey (Part. 04x04)

Today, we're back with the configuration of our latest macOS VM. I must point out, however, that Proxmox does not officially support this type of operating system. As you'll notice, the configuration will be a little more "exotic" than for a simple VM running Linux, BSD or Windows. I've also drawn heavily on this article Installing macOS 12 "Monterey" on Proxmox 7, which I find very complete and fairly exhaustive. I've only made minor modifications and tested compatibility with my Proxmox v.8 configuration.

- Original article (FR) on my website
- YouTube video

Host system requirements
Before getting down to business, I'll give you a quick reminder of my hardware configuration:
  • MOTHERBOARD: ASRock 970 Pro3 R2.0
  • CPU: AMD FX 4300 Quad-Core Processor
  • GPU: SAPPHIRE Pulse Radeon RX 580 8 GB GDDR5

Unfortunately my CPU, does not meet the hardware requirements imposed by Apple from macOS Ventura onwards (i.e. AVX2 support). I'm therefore going to fall back on an earlier version of macOS, Monterey in this case, which will pose fewer compatibility problems.

Incidentally, your hardware compatibility is undoubtedly the first thing to check if you want to virtualize a macOS system, as Apple limits the amount of hardware supported. You should take a look at this page 'Hardware limitations - OpenCore' to make sure your hardware is supported.


Build an installation image, for macOS Monterey (under Linux)


Let's start by installing the dependencies:
Code:
apt install -y p7zip-full make dmg2img git

I retrieve the OSX-KVM git project, then execute fetch-macOS-v2 to retrieve the macOS installation DMG:
Code:
git clone https://github.com/thenickdude/OSX-KVM
cd OSX-KVM
$ ./fetch-macOS-v2.py
1. High Sierra (10.13)
2. Mojave (10.14)
3. Catalina (10.15)
4. Big Sur (11.7) - RECOMMENDED
5. Monterey (12.6)
6. Ventura (13)

Choose a product to download (1-6): 5

Then all I have to do is convert the DMG image to ISO, and move the converted image to your dedicated ISO storage directory.
Code:
dmg2img BaseSystem.dmg monterey-basesystem.iso
mv monterey-basesystem.iso /mnt/pve/PVE1/template/iso/
[/code]

I also retrieve the OpenCore ISO and place it in the same directory:
Code:
wget https://github.com/thenickdude/KVM-Opencore/releases/download/v20/OpenCore-v20.iso.gz && gzip -d OpenCore-v20.iso.gz
mv OpenCore-v20.iso /mnt/pve/PVE1/template/iso/

[Creating our macOS VM[/b]


Let's move on to the creation of our VM.
Code:
 qm create 102
    --name mac-102
    --vga vmware
    --memory 8192
    --bios ovmf
    --machine q35 \
    --sockets 1 --cores 4 \
    --cpu Penryn
    --numa 1
    --cpuunits 1024 \
    --net0 virtio,bridge=vmbr0 \
    --scsihw virtio-scsi-pci \
    --boot order='ide2;ide0;virtio0' \
    --ostype other \
    --efidisk0 local-lvm:0 \
    --virtio0 local-lvm:150,cache=unsafe,discard=on, \
    --ide0 PVE1:iso/monterey-basesystem.iso,cache=unsafe \
    --ide2 PVE1:iso/OpenCore-v20.iso,cache=unsafe

Here are some explanations of the key points of this command:
  • ide0 PVE1:iso/monterey-basesystem.iso,cache=unsafe: ide0 contains our macos monterey disk image.
  • ide2 PVE1:iso/OpenCore-v20.iso,cache=unsafe: in ide2 the opencore iso image.
  • boot order='ide2;ide0;virtio0': the opencore image, must be in first position in the boot order.
  • vga vmware: we'll use vmware for the duration of the installation, before letting the GPU manage the display on its own.


We'll need to add a few extra lines to the QEMU configuration, depending on your CPU:


CPU INTEL
Code:
qm set 102 --cpu "host,kvm=on,vendor=GenuineIntel,+kvm_pv_unhalt,+kvm_pv_eoi,+hypervisor,+invtsc -device isa-applesmc,osk='ourhardworkbythesewordsguardedpleasedontsteal(c)AppleComputerInc' -smbios type=2 -device usb-kbd,bus=ehci. 0, port=2 -global nec-usb-xhci.msi=off -global ICH9-LPC.acpi-pci-hotplug-with-bridge-support=off"


CPU AMD
Code:
qm set 102 --cpu "Penryn,kvm=on,vendor=GenuineIntel,+kvm_pv_unhalt,+kvm_pv_eoi,+hypervisor,+invtsc,+pcid,+ssse3,+sse4. 2,+popcnt,+avx,+avx2,+aes,+fma,+fma4,+bmi1,+bmi2,+xsave,+xsaveopt,+rdrand,check -device isa-applesmc,osk='ourhardworkbythesewordsguardedpleasedontsteal(c)AppleComputerInc' -smbios type=2 -device usb-kbd,bus=ehci.0, port=2 -global nec-usb-xhci.msi=off -global ICH9-LPC.acpi-pci-hotplug-with-bridge-support=off"

This makes your AMD CPU look like a Penryn-generation Intel, and adds several features (both required and optional). Features that your host CPU doesn't support will simply be ignored - only SSE4.2 is required and must be supported by your host CPU. To check which features your CPU supports, enter the following command from Proxmox:
Code:
lscpu | grep -o "^Flags: .*"

Installing macOS


Now let's start our virtual machine:
Code:
qm start 102

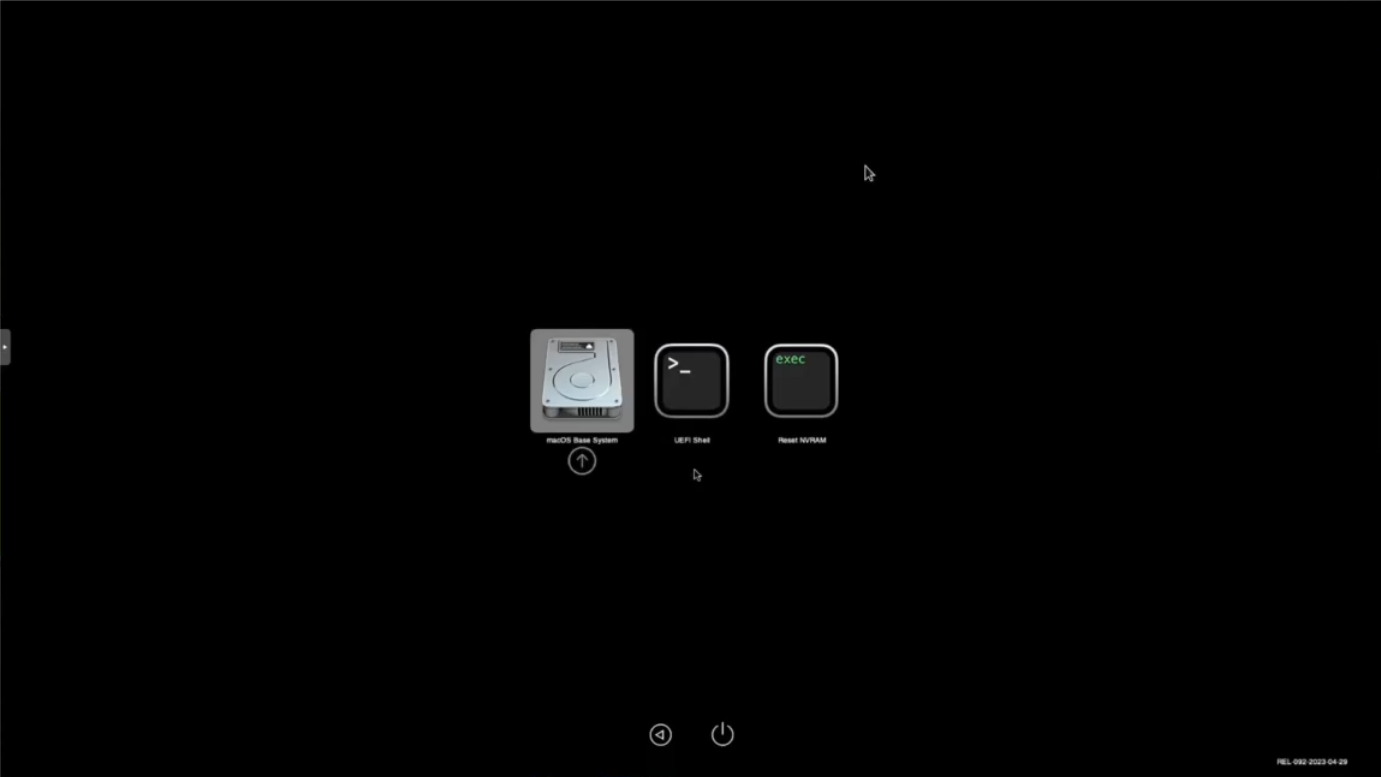
From the Proxmox console (noVNC), press "MacOS Base System".
2024-01-19_01.png


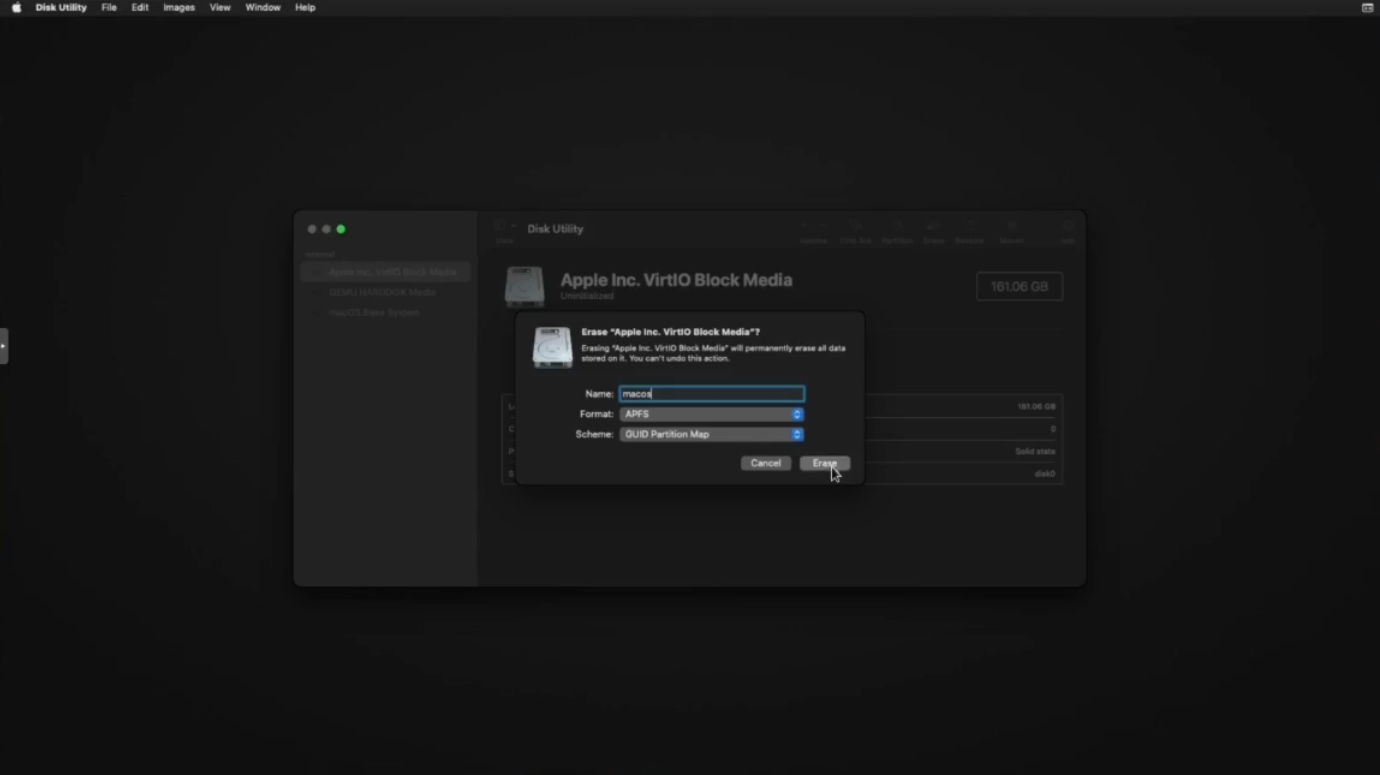
Our destination hard disk must be formatted before we can install the system
2024-01-19_02.png


2024-01-19_03.png


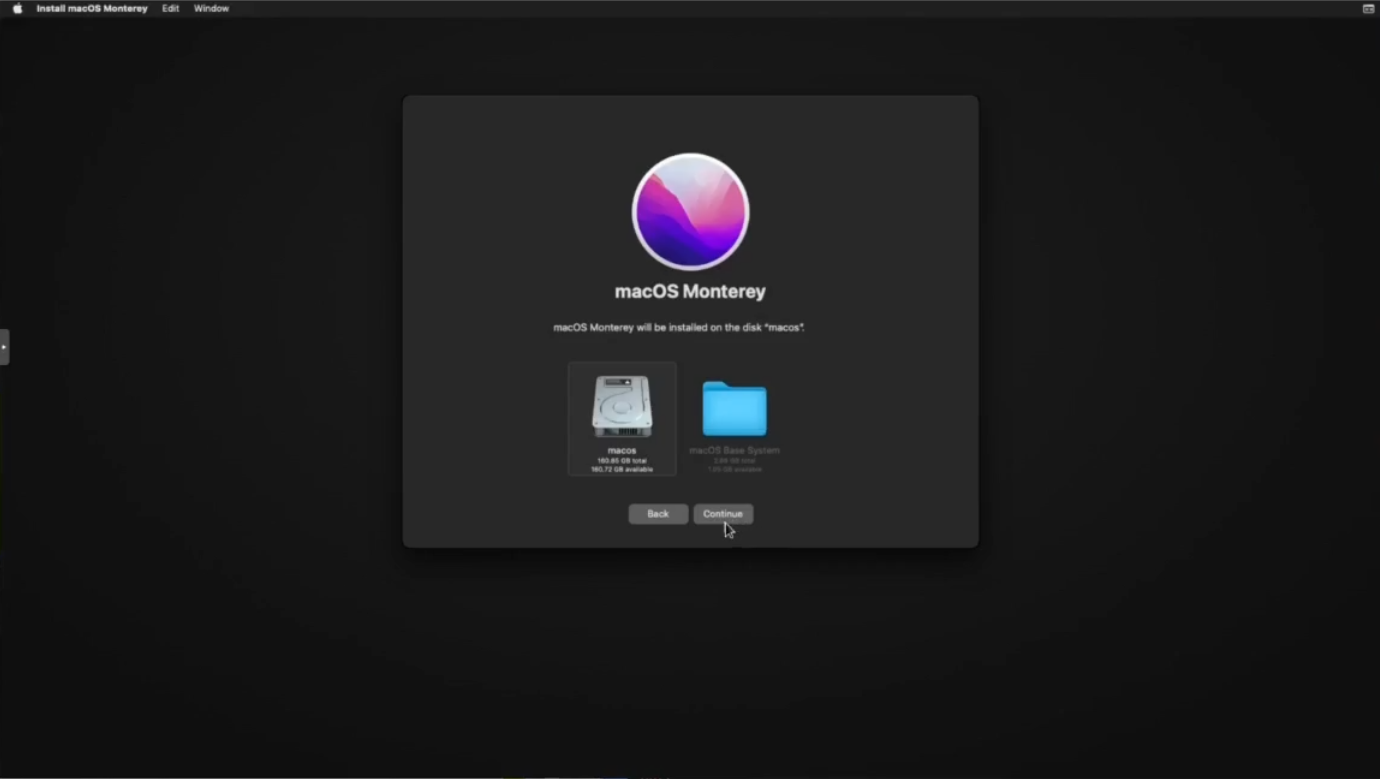
After quitting the Disk Utility, launch the macOS Monterey restore and select the destination disk, and wait (the installation process will be quite long).
2024-01-19_04.png


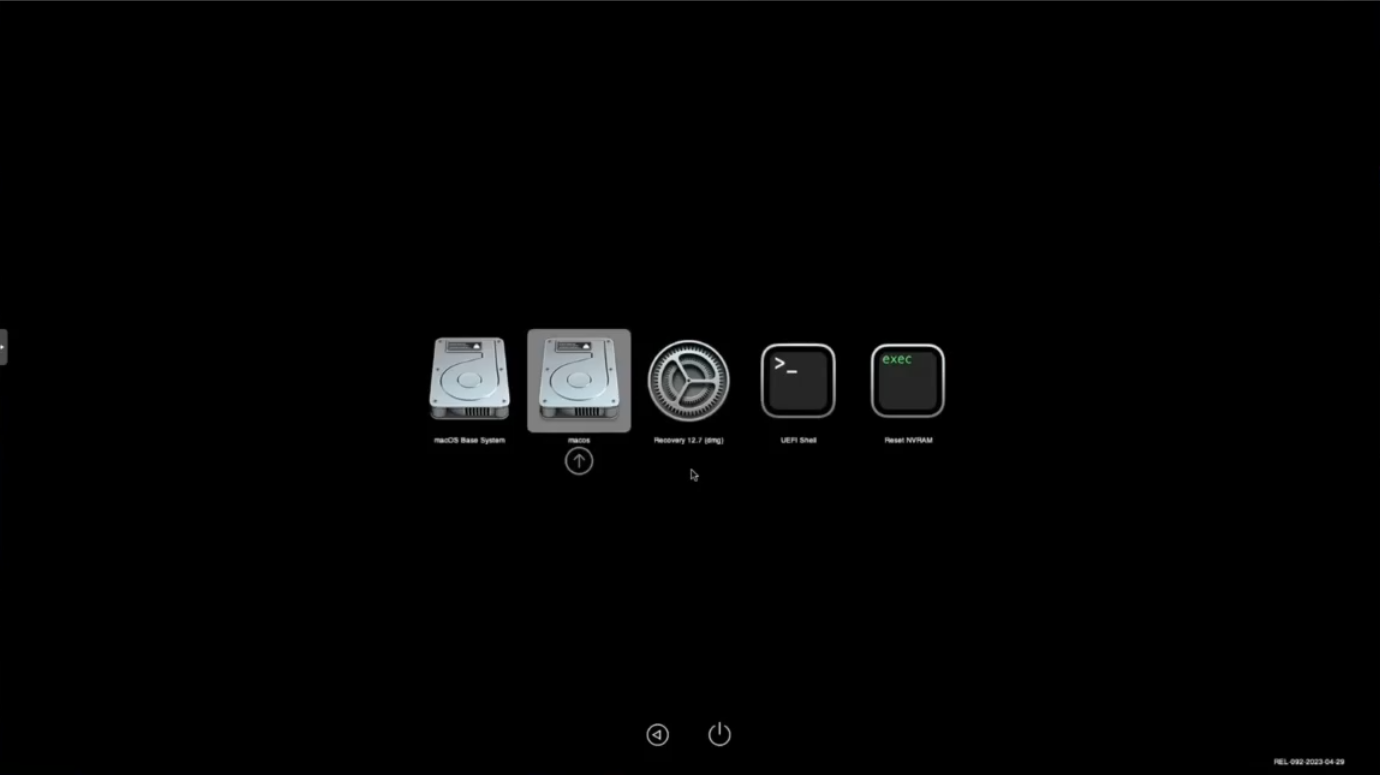
During system installation, the virtual machine will reboot 2 or 3 times in succession, so you'll need to manually select the "macOS Installer" entry each time to continue the process. After the umpteenth reboot, the "macOS Installer" entry disappears, so select the name of your destination disk
2024-01-19_05.png


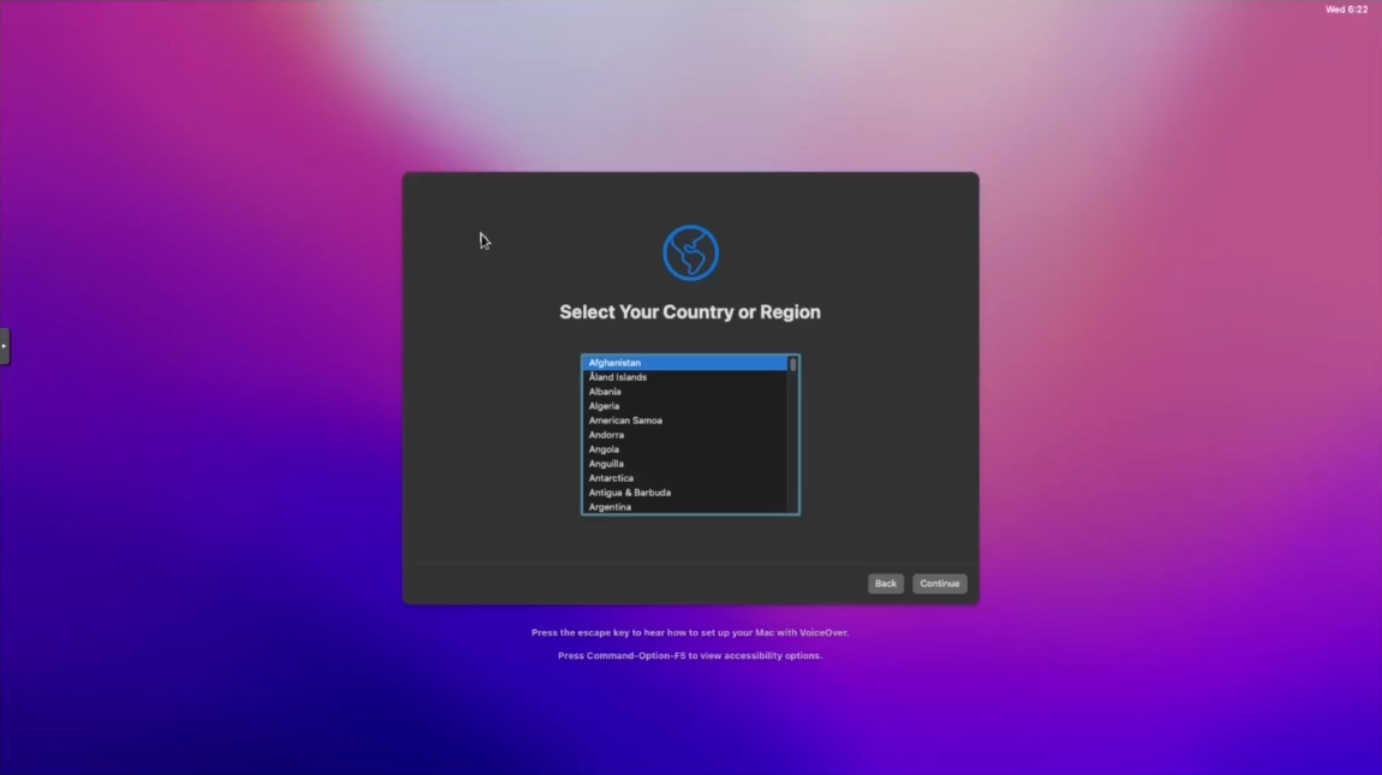
Finally, proceed with the classic post-installation process
2024-01-19_06.png


OpenCore customization and EFI partition


As things stand, when booting up the system we necessarily use the OpenCore image.
import it into the EFI partition of macOS


From your macOS session, open the terminal and run "diskutil list":
Code:
% diskutil list
/dev/disk0 (internal):
   #: TYPE NAME SIZE IDENTIFIER
   0: GUID_partition_scheme 69.8 GB disk0
   1: EFI EFI 209.7 MB disk0s1 #Partition to overwrite
   2: Apple_APFS Container disk3 69.6 GB disk0s2

/dev/disk1 (internal, physical):
   #: TYPE NAME SIZE IDENTIFIER
   0: GUID_partition_scheme *2.1 GB disk1
   1: Apple_HFS macOS Base System 2.0 GB disk1s1

/dev/disk2 (internal, physical):
   #: TYPE NAME SIZE IDENTIFIER
   0: GUID_partition_scheme *157.3 MB disk2
   1: EFI EFI 157.2 MB disk2s1 #Partition to import

/dev/disk3 (synthesized):
   #: TYPE NAME SIZE IDENTIFIER
   0: APFS Container Scheme - +69.6 GB disk3
                                 Physical Store disk0s2
   1: APFS Volume macOS - Data 2.3 GB disk3s1
   2: APFS Volume Preboot 284.6 MB disk3s2
   3: APFS Volume Recovery 623.4 MB disk3s3
   4: APFS Volume VM 1.1 MB disk3s4
   5: APFS Volume macOS 15.3 GB disk3s5
   6: APFS Snapshot com.apple.os.update-... 15.3 GB disk3s5s1

Next, we'll use dd to replace the EFI partition on the hard disk with that of the OpenCore image. OpenCore is the small disk (~ 150 MB) which contains only one EFI partition, and the main hard disk is the one with the "Apple_APFS Container" partition (160 GB). In my case, these EFI partitions are designated disk2s1 and disk0s1 :
Code:
% sudo dd if=/dev/disk2s1 of=/dev/disk0s1

Next we will create a mount point to the EFI partition:
Code:
sudo mkdir /Volumes/EFI
sudo mount -t msdos /dev/disk0s1 /Volumes/EFI

Finally, we will edit the following file "config.plist", to configure a timeout for an automatic boot on the "macOS" disk:
Code:
vim /Volumes/EFI/EFI/OC/config.plist

In the file, search for the value "BlessOverride" and change the value of the Timeout key from 0 to 5
Code:
<key>Misc</key>
(...)
    <key>BlessOverride</key>
    (...)
    <key>Boot</key>
    (...)
        <key>Timeout</key>
        <integer>5</integer>

Before shutting down your VM, set automatic login for your main user, from "System Preferences/Users & Groups". Once the VM is shut down, we can delete the OpenCore and Monterey disks, and make sure that virtio0 is the first disk in the boot order.

Code:
qm set 102 --delete ide2
qm set 102 --delete ide0
qm set 102 --boot order='virtio0'

As I have a KVM Switch to share my mouse and keyboard between my thinkpad and the VMs hosted on the hypervisor, I add the IDs of both devices to my VM :

On the Proxmox host, I search the available USB devices:
Code:
lsusb | grep -E "Logitech|Lite-On"
Bus 001 Device 019: ID 046d:c08b Logitech, Inc. G502 SE HERO Gaming Mouse
Bus 001 Device 018: ID 04ca:007d Lite-On Technology Corp. USB wired keyboard

All that's left is to add the two IDs to my VM:
Code:
qm set 102 --usb0 046d:c08b,usb3=1
qm set 102 --usb1 04ca:007d,usb3=1

Finally I add the graphics card, which I define as the primary GPU, enabling all its features:
Code:
qm set 102 --hostpci0 0000:01:00,pci=1,x-vga=1

If all went well, when the VM is restarted, you should see the OpenCore menu displayed and automatically booted on your macOS disk. I haven't yet found a "clean" way of getting the display to pass through the graphics card alone, as disabling the "VMWare display" prevents the VM from booting. That's why I have to manually define a mirroring between my "real" screen (don't forget to define the latter as the new main screen) and the VMware virtual screen.


Resources:
 
Last edited:
Thanks for the write up! I saw your paragraph on GPU passthrough. I am able to passthrough the GPU, in my case RX 6600 XT, to the VM. Then I am able to change the display from `vmware` setting to `none`. It will boot up the VM and output to my monitor which is directly connected to the graphic card.

In my case I had couple of hurdles to get it working:

- ResizeableBar needed to be disabled for my motherboard (in BIOS) or it can also be done through opencore's latest version apparently. Do that instead if you have some other VMs that can benefit from the feature being turned on, but disabled for the macos VM.
- Had to add `agdmod=pikera` to my opencore `boot-args`. It is also important to clear NVRAM before booting. more info about the boot argument: https://dortania.github.io/GPU-Buyers-Guide/misc/bootflag.html
 
  • Like
Reactions: asded
Thanks for the write up! I saw your paragraph on GPU passthrough. I am able to passthrough the GPU, in my case RX 6600 XT, to the VM. Then I am able to change the display from `vmware` setting to `none`. It will boot up the VM and output to my monitor which is directly connected to the graphic card.

In my case I had couple of hurdles to get it working:

- ResizeableBar needed to be disabled for my motherboard (in BIOS) or it can also be done through opencore's latest version apparently. Do that instead if you have some other VMs that can benefit from the feature being turned on, but disabled for the macos VM.
- Had to add `agdmod=pikera` to my opencore `boot-args`. It is also important to clear NVRAM before booting. more info about the boot argument: https://dortania.github.io/GPU-Buyers-Guide/misc/bootflag.html
Merci beaucoup, je vais tester cela, je ne connaissais pas "agdmod=pikera"
 
Thanks for the writeup, Using Optiplex 5050 i5-7500, I am not having any success with the Igpu630, I'll have to try the time out "BlessOverride" setting you discussed, its on the verge of passingthrough but stops at waiting for debug message.
With rx550 lexa passthrough worked but no kext loaded even though all the kexts are loaded as in WhateverGreen.kext. I am not sure how to set up the EFI file correctly beyond opencore. In opencore configurator in device propeties I am able to locate the RX550 and all the IOMMU devices like baffin rx550 audio, but its a lexa card. I had to add -radcodec for boot args in EFI file. See below, boot args for WhateverGreen.kext.
Now using no machine I get alittle better video accelleration from 3MB to 15MB and audio works, smiles.
I had to pass in the hardware section the USB PCI device to get keyboard and mouse control, I noticed this work around in Ventura and Sonoma. I even added a USB controller, IOMMU group 12, not used. I may have to use a pcie nic card ( possible IOMMU group 13) to isolate out the on board netword device in the igpu630 set up (see IOMMU below), that interferes with the Igpu Audio, ill try that soon.

Note: In the OpenCore Configurator, the "BlessOverride" setting can be found under the "Misc" section. This setting allows you to specify custom boot paths for OpenCore, overriding the default boot behavior.

BlessOveride.jpg

DeviceProperties.jpg


agent: 1
args: -vnc 0.0.0.0:3 -device isa-applesmc,osk="ourhardworkbythesewordsguardedpleasedontsteal(c)AppleComputerInc" -smbios type=2 -device u>
balloon: 0
bios: ovmf
boot: order=virtio0
cores: 4
cpu: host
efidisk0: local-lvm:vm-102-disk-0,efitype=4m,size=4M
hostpci0: 0000:00:02.0
machine: q35
memory: 12288
meta: creation-qemu=7.2.0,ctime=1685711280
name: Monterey127
net0: virtio=BC:24:11:7A:49:58,bridge=vmbr0
numa: 0
ostype: other
scsihw: virtio-scsi-pci
smbios1: uuid=29efb451-d00c-4c5a-9e58-9a4ed7080266
sockets: 1

root@vicpve:~# for d in /sys/kernel/iommu_groups/*/devices/*; do n=${d#*/iommu_groups/*}; n=${n%%/*}; printf 'IOMMU group %s ' "$n"; lspci -nns "${d##*/}"; done
IOMMU group 0 00:02.0 Display controller [0380]: Intel Corporation HD Graphics 630 [8086:5912] (rev 04)
IOMMU group 10 01:00.1 Audio device [0403]: Advanced Micro Devices, Inc. [AMD/ATI] Baffin HDMI/DP Audio [Radeon RX 550 640SP / RX 560/560X] [1002:aae0]
IOMMU group 11 02:00.0 Non-Volatile memory controller [0108]: MAXIO Technology (Hangzhou) Ltd. NVMe SSD Controller MAP1202 [1e4b:1202] (rev 01)
IOMMU group 12 03:00.0 USB controller [0c03]: VIA Technologies, Inc. VL805/806 xHCI USB 3.0 Controller [1106:3483] (rev 01)
IOMMU group 1 00:00.0 Host bridge [0600]: Intel Corporation Xeon E3-1200 v6/7th Gen Core Processor Host Bridge/DRAM Registers [8086:591f] (rev 05)
IOMMU group 2 00:01.0 PCI bridge [0604]: Intel Corporation 6th-10th Gen Core Processor PCIe Controller (x16) [8086:1901] (rev 05)
IOMMU group 3 00:14.0 USB controller [0c03]: Intel Corporation 200 Series/Z370 Chipset Family USB 3.0 xHCI Controller [8086:a2af]
IOMMU group 3 00:14.2 Signal processing controller [1180]: Intel Corporation 200 Series PCH Thermal Subsystem [8086:a2b1]
IOMMU group 4 00:16.0 Communication controller [0780]: Intel Corporation 200 Series PCH CSME HECI #1 [8086:a2ba]
IOMMU group 4 00:16.3 Serial controller [0700]: Intel Corporation Device [8086:a2bd]
IOMMU group 5 00:17.0 SATA controller [0106]: Intel Corporation 200 Series PCH SATA controller [AHCI mode] [8086:a282]
IOMMU group 6 00:1b.0 PCI bridge [0604]: Intel Corporation 200 Series PCH PCI Express Root Port #17 [8086:a2e7] (rev f0)
IOMMU group 7 00:1c.0 PCI bridge [0604]: Intel Corporation 200 Series PCH PCI Express Root Port #7 [8086:a296] (rev f0)
IOMMU group 8 00:1f.0 ISA bridge [0601]: Intel Corporation 200 Series PCH LPC Controller (Q270) [8086:a2c6]
IOMMU group 8 00:1f.2 Memory controller [0580]: Intel Corporation 200 Series/Z370 Chipset Family Power Management Controller [8086:a2a1]
IOMMU group 8 00:1f.3 Audio device [0403]: Intel Corporation 200 Series PCH HD Audio [8086:a2f0]
IOMMU group 8 00:1f.4 SMBus [0c05]: Intel Corporation 200 Series/Z370 Chipset Family SMBus Controller [8086:a2a3]
IOMMU group 8 00:1f.6 Ethernet controller [0200]: Intel Corporation Ethernet Connection (5) I219-V [8086:15d6]
IOMMU group 9 01:00.0 VGA compatible controller [0300]: Advanced Micro Devices, Inc. [AMD/ATI] Lexa PRO [Radeon 540/540X/550/550X / RX 540X/550/550X] [1002:699f] (rev c7)


Heres a list for WhateverGreen.kext for boot arguments:

Boot argument DeviceProperties Description
-cdfon enable-hdmi20 Enable HDMI 2.0 patches on iGPU and dGPU (Not implemented for macOS 11+)
-wegbeta N/A Enable WhateverGreen on unsupported OS versions (14 and below are enabled by default)
-wegdbg N/A Enable debug printing (available in DEBUG binaries)
-wegoff N/A Disable WhateverGreen
Switch GPU
Boot argument DeviceProperties Description
-wegnoegpu disable-gpu property to each GFX0 Disable all external GPUs
-wegnoigpu disable-gpu property to IGPU Disable internal GPU
-wegswitchgpu switch-to-external-gpu property to IGPU Disable internal GPU when external GPU is installed
AMD Radeon
Boot argument DeviceProperties Description
-rad24 N/A Enforce 24-bit display mode
-radcodec N/A Force the spoofed PID to be used in AMDRadeonVADriver
-raddvi N/A Enable DVI transmitter correction (required for 290X, 370, etc.)
-radvesa N/A Disable ATI/AMD video acceleration completely
radpg=15 N/A Disable several power-gating modes (see FAQ Radeon, required for Cape Verde GPUs: Radeon HD 7730/7750/7770/R7 250/R7 250X)
Board-id
Boot argument DeviceProperties Description
agdpmod=ignore agdpmod property to external GPU Disables AGDP patches (vit9696,pikera value is implicit default for external GPUs)
agdpmod=pikera agdpmod property to external GPU Replaces board-id with board-ix
agdpmod=vit9696 agdpmod property to external GPU Disable check for board-id
Nvidia
Boot argument DeviceProperties Description
-ngfxdbg N/A Enable NVIDIA driver error logging
ngfxcompat=1 force-compat Ignore compatibility check in NVDAStartupWeb
ngfxgl=1 disable-metal Disable Metal support on NVIDIA
ngfxsubmit=0 disable-gfx-submit Disable interface stuttering fix on 10.13
Intel HD Graphics
Boot argument DeviceProperties Description
-igfxblr enable-backlight-registers-fix property on IGPU Fix backlight registers on KBL, CFL and ICL platforms
-igfxbls enable-backlight-smoother property on IGPU Make brightness transitions smoother on IVB+ platforms. Read the manual
-igfxblt enable-backlight-registers-alternative-fix property on IGPU An alternative to the Backlight Registers Fix and make Backlight Smoother work on KBL/CFL platforms running macOS 13.4 or later. Read the manual
-igfxcdc enable-cdclk-frequency-fix property on IGPU Support all valid Core Display Clock (CDCLK) frequencies on ICL platforms. Read the manual
-igfxdbeo enable-dbuf-early-optimizer property on IGPU Fix the Display Data Buffer (DBUF) issues on ICL+ platforms. Read the manual
-igfxdump N/A Dump IGPU framebuffer kext to /var/log/AppleIntelFramebuffer_X_Y (available in DEBUG binaries)
-igfxdvmt enable-dvmt-calc-fix property on IGPU Fix the kernel panic caused by an incorrectly calculated amount of DVMT pre-allocated memory on Intel ICL platforms
-igfxfbdump N/A Dump native and patched framebuffer table to ioreg at IOService:/IOResources/WhateverGreen
-igfxhdmidivs enable-hdmi-dividers-fix property on IGPU Fix the infinite loop on establishing Intel HDMI connections with a higher pixel clock rate on SKL, KBL and CFL platforms
-igfxi2cdbg N/A Enable verbose output in I2C-over-AUX transactions (only for debugging purposes)
-igfxlspcon enable-lspcon-support property on IGPU Enable the driver support for onboard LSPCON chips.
Read the manual
-igfxmlr enable-dpcd-max-link-rate-fix property on IGPU Apply the maximum link rate fix
-igfxmpc enable-max-pixel-clock-override and max-pixel-clock-frequency properties on IGPU Increase max pixel clock (as an alternative to patching CoreDisplay.framework
-igfxnohdmi disable-hdmi-patches Disable DP to HDMI conversion patches for digital sound
-igfxnotelemetryload disable-telemetry-load property on IGPU Disables iGPU telemetry loading that may cause a freeze during startup on certain laptops such as Chromebooks
-igfxsklaskbl N/A Enforce Kaby Lake (KBL) graphics kext being loaded and used on Skylake models (KBL device-id and ig-platform-id are required. Not required on macOS 13 and above)
-igfxtypec N/A Force DP connectivity for Type-C platforms
-igfxvesa N/A Disable Intel Graphics acceleration
igfxagdc=0 disable-agdc property on IGPU Disable AGDC
igfxfcms=1 complete-modeset property on IGPU Force complete modeset on Skylake or Apple firmwares
igfxfcmsfbs= complete-modeset-framebuffers property on IGPU Specify indices of connectors for which complete modeset must be enforced. Each index is a byte in a 64-bit word; for example, value 0x010203 specifies connectors 1, 2, 3. If a connector is not in the list, the driver's logic is used to determine whether complete modeset is needed. Pass -1 to disable.
igfxframe=frame AAPL,ig-platform-id or AAPL,snb-platform-id property on IGPU Inject a dedicated framebuffer identifier into IGPU (only for TESTING purposes)
igfxfw=2 igfxfw property on IGPU Force loading of Apple GuC firmware
igfxgl=1 disable-metal Disable Metal support on Intel
igfxmetal=1 enable-metal Force enable Metal support on Intel for offline rendering
igfxonln=1 force-online property on IGPU Force online status on all displays
igfxonlnfbs=MASK force-online-framebuffers property on IGPU Specify indices of connectors for which online status is enforced. Format is similar to igfxfcmsfbs
igfxpavp=1 igfxpavp property on IGPU Force enable PAVP output
igfxrpsc=1 rps-control property on IGPU Enable RPS control patch (improves IGPU performance)
igfxsnb=0 N/A Disable IntelAccelerator name fix for Sandy Bridge CPUs
Backlight
Boot argument DeviceProperties Description
applbkl=3 applbkl property Enable PWM backlight control of AMD Radeon RX 5000 series graphic cards read here.
applbkl=0 applbkl property on IGPU Disable AppleBacklight.kext patches for IGPU.
 
Last edited:
Same situation here, the passthrough is ok i see a second screen and vedor/device ID for my Intel HD 530 inside Sonoma VM, but with message No Kext Loaded.

If i do passthrough with VGA and PCI checked, there is no display and the GPU is visible under Hardware/PCI section.
If i disable PCI and VGA, there is GPU inside Hardware/Displays section, but with No Kext Loaded message.
 
  • Like
Reactions: cristiz1992
Hello,

I'm new to Promox and also new to setting up MacOS VMs, but i have one question, my experience comes with using HyperV to run VMs, and i have found this script (https://github.com/jamesstringerparsec/Easy-GPU-PV) which makes is very easy to have 1 GPU serve multiple VMs. My understanding is i cannot do this for MacOS via HyperV, following the above method, is it possible to do this with Promox?

I dont need to access the VMs via a screen, i prefer to remote into the VMs, however i need them to have GPU access for the taskings on them. Is this something that is possible via Promox, or possible for MacOS at all?

https://gitlab.com/polloloco/vgpu-proxmox

https://github.com/DualCoder/vgpu_unlock
 
Hi Asded,
I did install MacOS Sequoia on Proxmox, everything works but one thing: the vm sticks in the boot process (Apple Logo with the progression bar, but the bar doesn't fill at all).

Hardware:
CPU:
i5 12600k
Motherboard: MSI Z790
GPU: RX6800

Config my Sequoia VM:

Code:
args: -device isa-applesmc,osk="ourhardworkbythesewordsguardedpleasedontsteal(c)AppleComputerInc" -smbios type=2 -device qemu-xhci -device usb-kbd -device usb-tablet -global nec-usb-xhci.msi=off -global ICH9-LPC.acpi-pci-hotplug-with-bridge-support=off -cpu host,vendor=GenuineIntel,+invtsc,+hypervisor,kvm=on,vmware-cpuid-freq=on
bios: ovmf
boot: order=virtio0;net0
cores: 8
cpu: host
efidisk0: local-lvm:vm-500-disk-0,efitype=4m,size=4M
hostpci0: 0000:03:00,x-vga=1
machine: q35
memory: 32768
meta: creation-qemu=8.1.5,ctime=1731059807
name: MacOS-Sequoia
net0: vmxnet3=BC:24:11:A1:7F:92,bridge=vmbr0,firewall=1
numa: 0
ostype: other
scsihw: virtio-scsi-single
smbios1: uuid=c40e46a0-8539-43db-848e-9b6fc94368b5
sockets: 1
usb0: host=046d:c336,usb3=1
usb1: host=1532:004c,usb3=1
vga: none
virtio0: local-lvm:vm-500-disk-1,cache=unsafe,iothread=1,size=512G
vmgenid: 627b3c87-73f8-4918-b4d9-d1601338735c

EFI Config:
boot args in NVRAM
: -v keepsyms=1 agdpmod=pikera npci=0x2000 (tried without npci, with npci=0x3000 no success...)
DeviceProperties: PciRoot(0x0)/Pci(0x3,0x0): agdpmod = pikera | device-id: 73BF (tried BF73 no success..., I got it from Dortania blog) | model: AMD Radeon RX 6800
Kernel: Lilu.kext | VirtualSMC.kext | WhateverGreen.kext | AppleALC.kext

When the VM boots, I get the OpenCode menu from the GPU, then when I choose my Mac HDD, in the logs, I get stuck at PCIConfigurator...
That's it, what am I missing? any idea?

Thank you for you assistance
 

Attachments

  • Screenshot 2024-11-15 at 12.04.26 AM.jpg
    Screenshot 2024-11-15 at 12.04.26 AM.jpg
    152.8 KB · Views: 13
  • Screenshot 2024-11-15 at 12.04.39 AM.jpg
    Screenshot 2024-11-15 at 12.04.39 AM.jpg
    492.1 KB · Views: 22
Hi Asded,
I did install MacOS Sequoia on Proxmox, everything works but one thing: the vm sticks in the boot process (Apple Logo with the progression bar, but the bar doesn't fill at all).

Hardware:
CPU:
i5 12600k
Motherboard: MSI Z790
GPU: RX6800

Config my Sequoia VM:

Code:
args: -device isa-applesmc,osk="ourhardworkbythesewordsguardedpleasedontsteal(c)AppleComputerInc" -smbios type=2 -device qemu-xhci -device usb-kbd -device usb-tablet -global nec-usb-xhci.msi=off -global ICH9-LPC.acpi-pci-hotplug-with-bridge-support=off -cpu host,vendor=GenuineIntel,+invtsc,+hypervisor,kvm=on,vmware-cpuid-freq=on
bios: ovmf
boot: order=virtio0;net0
cores: 8
cpu: host
efidisk0: local-lvm:vm-500-disk-0,efitype=4m,size=4M
hostpci0: 0000:03:00,x-vga=1
machine: q35
memory: 32768
meta: creation-qemu=8.1.5,ctime=1731059807
name: MacOS-Sequoia
net0: vmxnet3=BC:24:11:A1:7F:92,bridge=vmbr0,firewall=1
numa: 0
ostype: other
scsihw: virtio-scsi-single
smbios1: uuid=c40e46a0-8539-43db-848e-9b6fc94368b5
sockets: 1
usb0: host=046d:c336,usb3=1
usb1: host=1532:004c,usb3=1
vga: none
virtio0: local-lvm:vm-500-disk-1,cache=unsafe,iothread=1,size=512G
vmgenid: 627b3c87-73f8-4918-b4d9-d1601338735c

EFI Config:
boot args in NVRAM
: -v keepsyms=1 agdpmod=pikera npci=0x2000 (tried without npci, with npci=0x3000 no success...)
DeviceProperties: PciRoot(0x0)/Pci(0x3,0x0): agdpmod = pikera | device-id: 73BF (tried BF73 no success..., I got it from Dortania blog) | model: AMD Radeon RX 6800
Kernel: Lilu.kext | VirtualSMC.kext | WhateverGreen.kext | AppleALC.kext

When the VM boots, I get the OpenCode menu from the GPU, then when I choose my Mac HDD, in the logs, I get stuck at PCIConfigurator...
That's it, what am I missing? any idea?

Thank you for you assistance
I've had a similar problem, I see on your config that your display is set to none, try switching to vmare ... and see if this unblocks the boot process
 
  • Like
Reactions: Mathieuxx
I've had a similar problem, I see on your config that your display is set to none, try switching to vmare ... and see if this unblocks the boot process
Thank you for getting back, setting the Display to VM Ware unblock the boot process but:
- The noVNC screen proceed to the MacOS desktop.
- The GPU screen blocks in the Proxmox booting screen (Proxmox Logo with Boot Start progress bar in the bottom filled up 100%) -> Attached Screenshot

I attached a screenshot of the 2 graphical devices detected by the OS, I think that the RX6800 is detected but not recognized, am I mistaken?

Again thank you for your time and assistance, I really appreciate it.
 

Attachments

  • IMG_5142.jpg
    IMG_5142.jpg
    340.4 KB · Views: 20
  • Screenshot 2024-11-16 at 12.06.45 PM.png
    Screenshot 2024-11-16 at 12.06.45 PM.png
    855.4 KB · Views: 21
  • Screenshot 2024-11-16 at 12.06.57 PM.png
    Screenshot 2024-11-16 at 12.06.57 PM.png
    767.5 KB · Views: 22
Ok, I see in fact the RX6800 is recognised but simply not used, macOS will consider the VMWare display as the default display. And the fact that you don't have any output from the gpu comes from your old config.plist configuration, more precisely ‘boot args’ and ‘DeviceProperties’. In my case, if you refer to my video at this timecode, I manage to have a video output on the gpu and then mirror the global display on the second screen to ‘force’ the use of the gpu. But in my case, my config.plist was much more archaic.
 
As a workaround, you could try revising your config.plist using my config. By sticking to this relatively basic configuration you should have the same behaviour as I had on boot, and then be able to switch to mirroring
 
I did check my config.plist and edited it to reflect the same config as yours. Unfortunately I get the same behaviour as yours but for in my case, it's the VMWare Display that progress to the Desktop (the opposite of yours where your VMWare blocks in the apple logo loading screen and the GPU going to the desktop). I will continue tweak my config.plist until I succeed. Thanks again
 
I did check my config.plist and edited it to reflect the same config as yours. Unfortunately I get the same behaviour as yours but for in my case, it's the VMWare Display that progress to the Desktop (the opposite of yours where your VMWare blocks in the apple logo loading screen and the GPU going to the desktop). I will continue tweak my config.plist until I succeed. Thanks again
ok, let me know how you get on
 
Spent the whole day yesterday and couldn't figure out what's wrong. so I took the decision to drop this project as the VM works perfectly but without GPU. As I mainly do development, this isn't a deal breaker, and if really needed, I would just purchase a new Mac is my work requires it.
Any way, thank you for the time and assistance. Good continuation
I'm sorry that passthrough didn't work in your case. Obviously there must be something wrong with my tutorial, I'll come back to it when I have time. If you haven't reverted your configuration, post a global summary of your vm+hypervisor configuration, if you have time.
Good luck to you too ;)
 
What kernel are you running on?
I can't get any MacOS sequoia VM with gpu, usb controller, T919 passthrough past kernel 5.15.
Only 5.15 is running rock solid. But all other kernel updates ends up a failure for macOS. Windows/linux passthrough works ok though.
 
Last edited:
I'm sorry that passthrough didn't work in your case. Obviously there must be something wrong with my tutorial, I'll come back to it when I have time. If you haven't reverted your configuration, post a global summary of your vm+hypervisor configuration, if you have time.
Good luck to you too ;)
No, The issue isn't with your tutorial at all but must be with my Setup (somehow). I will provide you the vm & hypervisor config in the coming days.

What kernel are you running on?
I can get any MacOS sequoia VM with gpu, usb controller, T919 passthrough past kernel 5.15.
Only 5.15 is running rock solid. But all other kernel updates ends up a failure for macOS. Windows/linux passthrough works ok though.
by running uname -r I am getting this output: 6.8.4-2-pve so must be 6.8.4, or am I mistaked? (I am using Proxmox 8.2.2)

Thanks
 
  • Like
Reactions: asded
by running uname -r I am getting this output: 6.8.4-2-pve so must be 6.8.4, or am I mistaked? (I am using Proxmox 8.2.2)

Thanks
Sorry, I guess I typed the opposite meaning I want to say. Everything is working fine on proxmox 7 (kernel 5.15). However, after upgraded to proxmox 8, there are lots of issues with kernel versions. (passthrough issues or boot loop on macOS) I can only get it working with 5.15 kernel.

I want to know exact working kernel version the Author is using (for passthrough) so that I can upgrade to.
 
  • Like
Reactions: Mathieuxx