Hello fellow NAS enthusiasts! As an experienced NAS enthusiast, I recently started using the TerraMaster F8 SSD all-flash NAS. Its compact design and extremely low noise levels are truly impressive; I even carry it with me when I'm out shooting! Recently, I successfully installed the Proxmox VE system on this device, and today I'll share the detailed installation process with you. I'll guide you step-by-step on how to make the most of the F8 SSD!
I. Preliminary Preparation: Logistics precede troop movements
1. Tool and Image Preparation
- Install Image: Go to the official Proxmox VE website (https://pve.proxmox.com/wiki/Downloads) to download the latest version of the installation image file, typically in .iso format.
- Burning Tool: Prepare a blank USB drive with a capacity of ≥2GB. It is recommended to use balenaEtcher or Rufus for image burning. Both tools are user-friendly and highly stable; do not use Ventoy to load the Proxmox VE installation image as it has been found to cause boot issues!
- System Support: Linux and MacOS users can refer to the official guide (https://pve.proxmox.com/wiki/Prepare_Installation_Media) to complete the burning process, while Windows users should follow standard procedures.
Hardware check
- Verify that the TeraStation F8 SSD is correctly connected to power and Ethernet cable, ensuring the device is powered on.
- Prepare a USB port for inserting the burned USB drive.
II. BIOS Setup: Key Steps, Laying the Foundation
1. Enter BIOS
After powering on the F8 SSD, quickly press the Del/Delete key repeatedly until the BIOS setup screen appears. If the first attempt fails, restart the device and try multiple times.
2. Disable TOS Boot
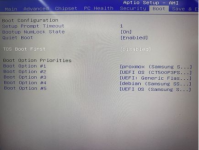
In the BIOS interface, use the arrow keys to find the 'Boot > TOS Boot First' option and set it to 'Disabled'. This step prevents the device from booting into the default TOS system, ensuring that it boots from the USB drive to install Proxmox VE.

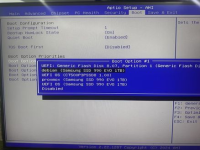
3.Find the 'Boot > Boot Option #1' option and set it to the inserted installation USB drive. The display name may vary by device but is usually the brand and model of the USB drive, such as 'SanDisk Ultra Fit'.

4. Disable Secure Boot (optional)
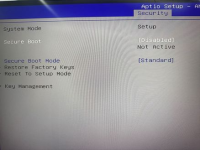
Go to the 'Security' tab and set Secure Boot to 'Disabled'. Users who only install Proxmox VE can skip this step, but disabling it can prevent some compatibility issues, so it is recommended.

5. Save and exit
After completing the above settings, press the F4 key (on some devices, it might be F10 or another key; please follow the on-screen prompts, select 'Save and Exit'). The device will automatically restart and boot from the USB drive, entering the Proxmox VE installation process.
III. Install Proxmox VE: Follow the wizard for easy setup
After booting from a USB drive, the Proxmox VE installation interface will appear. Follow these steps: Select installation language: Choose a language based on personal preference; it is recommended to use 'English' for better compatibility. Set up disk: In the 'Installation Target' screen, select the built-in disk of F8 SSD as the target installation disk. Make sure to confirm the disk capacity and name to avoid mistakes! Configure network: Enter the device's IP address, subnet mask, gateway, and other network information. If you are using DHCP to automatically obtain these settings, click Next directly. Set password: Create a strong password for the Proxmox VE management account to ensure system security. Wait for installation: The installation process takes a few minutes; do not turn off or remove the USB drive during this time. Installation complete: Once the installation is successful, the system will prompt you to restart. Remove the USB drive, and the device will boot the Proxmox VE system from the hard drive.
Post-installation configuration: Embark on your Proxmox VE journey
Log in to the management interface: Enter the device's IP address (set during installation) in your browser, access the Proxmox VE web management interface, and log in using the account and password set during installation.
Update the system: After logging in, it is recommended to update the system first to ensure you have the latest features and security patches.
Create virtual machines/containers: Based on your needs, create virtual machines or LXC containers and start experiencing the powerful capabilities of Proxmox VE!
References
- Image download: https://pve.proxmox.com/wiki/Downloads
- Official installation guide: https://pve.proxmox.com/wiki/Installation
- Media preparation guide: https://pve.proxmox.com/wiki/Prepare_Installation_Media
If you encounter any issues, please feel free to leave a comment below! If you find this tutorial helpful, don't forget to like, save, and share it with other NAS enthusiasts. I look forward to seeing everyone's installation results!
I. Preliminary Preparation: Logistics precede troop movements
1. Tool and Image Preparation
- Install Image: Go to the official Proxmox VE website (https://pve.proxmox.com/wiki/Downloads) to download the latest version of the installation image file, typically in .iso format.
- Burning Tool: Prepare a blank USB drive with a capacity of ≥2GB. It is recommended to use balenaEtcher or Rufus for image burning. Both tools are user-friendly and highly stable; do not use Ventoy to load the Proxmox VE installation image as it has been found to cause boot issues!
- System Support: Linux and MacOS users can refer to the official guide (https://pve.proxmox.com/wiki/Prepare_Installation_Media) to complete the burning process, while Windows users should follow standard procedures.
Hardware check
- Verify that the TeraStation F8 SSD is correctly connected to power and Ethernet cable, ensuring the device is powered on.
- Prepare a USB port for inserting the burned USB drive.
II. BIOS Setup: Key Steps, Laying the Foundation
1. Enter BIOS
After powering on the F8 SSD, quickly press the Del/Delete key repeatedly until the BIOS setup screen appears. If the first attempt fails, restart the device and try multiple times.
2. Disable TOS Boot
In the BIOS interface, use the arrow keys to find the 'Boot > TOS Boot First' option and set it to 'Disabled'. This step prevents the device from booting into the default TOS system, ensuring that it boots from the USB drive to install Proxmox VE.

3.Find the 'Boot > Boot Option #1' option and set it to the inserted installation USB drive. The display name may vary by device but is usually the brand and model of the USB drive, such as 'SanDisk Ultra Fit'.

4. Disable Secure Boot (optional)
Go to the 'Security' tab and set Secure Boot to 'Disabled'. Users who only install Proxmox VE can skip this step, but disabling it can prevent some compatibility issues, so it is recommended.

5. Save and exit
After completing the above settings, press the F4 key (on some devices, it might be F10 or another key; please follow the on-screen prompts, select 'Save and Exit'). The device will automatically restart and boot from the USB drive, entering the Proxmox VE installation process.
III. Install Proxmox VE: Follow the wizard for easy setup
After booting from a USB drive, the Proxmox VE installation interface will appear. Follow these steps: Select installation language: Choose a language based on personal preference; it is recommended to use 'English' for better compatibility. Set up disk: In the 'Installation Target' screen, select the built-in disk of F8 SSD as the target installation disk. Make sure to confirm the disk capacity and name to avoid mistakes! Configure network: Enter the device's IP address, subnet mask, gateway, and other network information. If you are using DHCP to automatically obtain these settings, click Next directly. Set password: Create a strong password for the Proxmox VE management account to ensure system security. Wait for installation: The installation process takes a few minutes; do not turn off or remove the USB drive during this time. Installation complete: Once the installation is successful, the system will prompt you to restart. Remove the USB drive, and the device will boot the Proxmox VE system from the hard drive.
Post-installation configuration: Embark on your Proxmox VE journey
Log in to the management interface: Enter the device's IP address (set during installation) in your browser, access the Proxmox VE web management interface, and log in using the account and password set during installation.
Update the system: After logging in, it is recommended to update the system first to ensure you have the latest features and security patches.
Create virtual machines/containers: Based on your needs, create virtual machines or LXC containers and start experiencing the powerful capabilities of Proxmox VE!
References
- Image download: https://pve.proxmox.com/wiki/Downloads
- Official installation guide: https://pve.proxmox.com/wiki/Installation
- Media preparation guide: https://pve.proxmox.com/wiki/Prepare_Installation_Media
If you encounter any issues, please feel free to leave a comment below! If you find this tutorial helpful, don't forget to like, save, and share it with other NAS enthusiasts. I look forward to seeing everyone's installation results!
Last edited:

