I originally was trying to ask a question here. But in the process of writing my question, I discovered my mistake, and solved my issue.
I think it might be helpful to other people, therefore, I decided to write it down and post it here as a tutorial. Note, the word "LXC" and "container" in this post mean the same thing.
Background:
I have a LXC that is running on Ubuntu 21.04 which is no longer supported as of today (Nov-22-2022). I do not know why I ended up with a non-LTS version. I probably thought 21.04 is another LTS since the last LTS was 20.04.
But anyway, since 21.04 is no longer supported, it became difficult to install and update apps. Therefore I manually upgraded it to 22.04 which is an LTS. The last step of the upgrade is reboot. And voila, the LXC no longer starts. And I was too lazy to backup my data before the upgrade (lessons learned ).
).
For those who are interested, this is the error code from task viewer on webGUI.
If you know what does it mean, please tell me.
Recover data:
Well, I can't fix my container, but I think my data is still there. I'd like to get them out.
The solution is fairly straight forward, but the detail is a little tricky for those who don't work with IT infrastructures on a daily basis (such as myself, I use proxmox for my homelab server). The solution will not work with webGUI. You have to get your hands dirty and use command line.
To access data from the failed LXC, the disk image of the failed LXC needs to be mounted on a new LXC. To do so, go to "/etc/pve/nodes/<node name>/lxc/" of your proxmox host. And you can see all the config files of your LXCs in this folder. There is also a soft link under "/etc/pve/" called "lxc" that will take you to the same place.
Find the config for the failed LXC. In my case, my LXC ID is 110. So the config file is "110.conf".
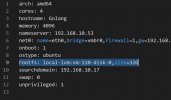
Open/read that file in any method you prefer (cat/vi/nano whatever, I opened it in my vs code editor), and locate the line that starts with "rootfs". That's the disk image. See screenshot below.

You need the "local-lvm:vm-110-disk-0" part.
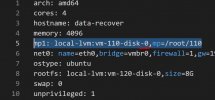
Open/edit the config file for your new LXC that is going to be used to recover the data. Add new line:
That's customized for me. Yours might be different, I'll explain each part.

Now save your config and start your new LXC, and find your data at /root/110
I think it might be helpful to other people, therefore, I decided to write it down and post it here as a tutorial. Note, the word "LXC" and "container" in this post mean the same thing.
Background:
I have a LXC that is running on Ubuntu 21.04 which is no longer supported as of today (Nov-22-2022). I do not know why I ended up with a non-LTS version. I probably thought 21.04 is another LTS since the last LTS was 20.04.
But anyway, since 21.04 is no longer supported, it became difficult to install and update apps. Therefore I manually upgraded it to 22.04 which is an LTS. The last step of the upgrade is reboot. And voila, the LXC no longer starts. And I was too lazy to backup my data before the upgrade (lessons learned
For those who are interested, this is the error code from task viewer on webGUI.
Code:
run_buffer: 314 Script exited with status 255
lxc_init: 798 Failed to run lxc.hook.pre-start for container "110"
__lxc_start: 1945 Failed to initialize container "110"
TASK ERROR: startup for container '110' failed
If you know what does it mean, please tell me.
Recover data:
Well, I can't fix my container, but I think my data is still there. I'd like to get them out.
The solution is fairly straight forward, but the detail is a little tricky for those who don't work with IT infrastructures on a daily basis (such as myself, I use proxmox for my homelab server). The solution will not work with webGUI. You have to get your hands dirty and use command line.
To access data from the failed LXC, the disk image of the failed LXC needs to be mounted on a new LXC. To do so, go to "/etc/pve/nodes/<node name>/lxc/" of your proxmox host. And you can see all the config files of your LXCs in this folder. There is also a soft link under "/etc/pve/" called "lxc" that will take you to the same place.
Find the config for the failed LXC. In my case, my LXC ID is 110. So the config file is "110.conf".
Open/read that file in any method you prefer (cat/vi/nano whatever, I opened it in my vs code editor), and locate the line that starts with "rootfs". That's the disk image. See screenshot below.

You need the "local-lvm:vm-110-disk-0" part.
Open/edit the config file for your new LXC that is going to be used to recover the data. Add new line:
Code:
mp1: local-lvm:vm-110-disk-0,mp=/root/110That's customized for me. Yours might be different, I'll explain each part.
- "mp1" is your mount point, I think it can start with 0. Just make sure it doesn't conflict with existing mount point.
- After "mp1" paste "local-lvm:vm-110-disk-0" from the failed LXC config. Pay special attention that you have the "-0" or whatever number at the end. I forgot this little tiny part and it took me a long time to figure out. The new container won't start without the correct disk image name.
- "mp=/root/110" is the path that you'll access this disk image from your new container. I recommend just mount it on "root" and name it after your failed LXC's ID. In my case it's "110". This way it is easy to find the mounted disk image.

Now save your config and start your new LXC, and find your data at /root/110

