Hallo zusammen,
da es nicht so einfach ist über einen DS-Lite Anschluss von außen das Heimnetz zu erreichen, insbesondere in Bezug auf IPv4, habe ich mich dazu entschieden eine kleine Anleitung zu erstellen.
Vorab:
1. VM erstellen und eine Minimalinstallation durchführen, in meinem Fall Debian-11.5.0-amd64-netinst.iso
Eine feste IP vergeben z.B. 192.168.1.123.
2. IP forwarding aktivieren:
3. Den Befehl
4. curl pgp iptables und iptables-persistent installieren:
5. Von nftables auf iptables wechseln
6. iptables prüfen:
7. Zerotier installieren:
8. Zerotier Netzwerk beitreten:
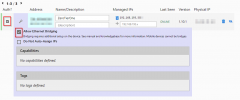
9. Den Client in Zerotier Central akzeptieren und als Bridge definieren

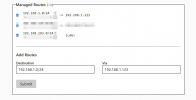
10. Eine Route zum lokalen Netzwerk hinzufügen, welches man mit Zerotier erreichen will
In dem Feld "Destination" das lokale Netzwerk angeben, z.B. 192.168.1.0/24
In dem Feld "Via" die IP Adresse der Zerotier VM angeben, z.B 192.168.1.123

11. Die IPv4 Adresse des Zerotier Netzwerkes festlegen

12. Die iptables Regeln anpassen:
-das Zerotier Netzwerk ist hier 192.168.193.0/24
-die Zerotier VM ist hier 192.168.1.123
-das Netzwerkinterface ist hier eth0
Folgende Zeilen einfügen:
13. iptables aktualisieren:
Für meine Heimanwendungen, beispielsweise Smarthome, funktioniert es sehr gut.
Offene Punkte:
Viele Grüße
Sven
da es nicht so einfach ist über einen DS-Lite Anschluss von außen das Heimnetz zu erreichen, insbesondere in Bezug auf IPv4, habe ich mich dazu entschieden eine kleine Anleitung zu erstellen.
Vorab:
- Eigentlich wollte ich einen Docker erstellen, aber im LXC Debian Buster 11 lief der Befehl
iptables-restore < /etc/iptables/rules.v4nicht durch. Das liegt anscheinend daran, dass im Hostsystem gewisse Module nur 'on demand' geladen werden. Dazu habe ich noch keine Lösung gefunden. - Zudem habe ich iptables anstatt nftables verwendet, da ich es mit nftables noch nicht hinbekommen habe.
1. VM erstellen und eine Minimalinstallation durchführen, in meinem Fall Debian-11.5.0-amd64-netinst.iso
Eine feste IP vergeben z.B. 192.168.1.123.
2. IP forwarding aktivieren:
nano /etc/sysctl.conf und folgende Zeile unkommentieren net.ipv4.ip_forward=13. Den Befehl
sysctl -p ausführen um ip forwarding zu aktivierennet.ipv4.ip_forward=1
4. curl pgp iptables und iptables-persistent installieren:
apt update && apt install curl pgp iptables iptables-persistent5. Von nftables auf iptables wechseln
update-alternatives --set iptables /usr/sbin/iptables-legacyupdate-alternatives --set ip6tables /usr/sbin/ip6tables-legacyupdate-alternatives --config iptablesSelection Path Priority Status
------------------------------------------------------------
* 0 /usr/sbin/iptables-nft 20 auto mode
1 /usr/sbin/iptables-legacy 10 manual mode
2 /usr/sbin/iptables-nft 20 manual mode
Press <enter> to keep the current choice[*], or type selection number: 1
6. iptables prüfen:
iptables-legacy -Viptables v1.8.2 (legacy)
7. Zerotier installieren:
curl -s https://install.zerotier.com | bash8. Zerotier Netzwerk beitreten:
zerotier-cli join <networkid>9. Den Client in Zerotier Central akzeptieren und als Bridge definieren

10. Eine Route zum lokalen Netzwerk hinzufügen, welches man mit Zerotier erreichen will
In dem Feld "Destination" das lokale Netzwerk angeben, z.B. 192.168.1.0/24
In dem Feld "Via" die IP Adresse der Zerotier VM angeben, z.B 192.168.1.123

11. Die IPv4 Adresse des Zerotier Netzwerkes festlegen

12. Die iptables Regeln anpassen:
nano /etc/iptables/rules.v4-das Zerotier Netzwerk ist hier 192.168.193.0/24
-die Zerotier VM ist hier 192.168.1.123
-das Netzwerkinterface ist hier eth0
Folgende Zeilen einfügen:
Code:
*nat
:PREROUTING ACCEPT [0:0]
:INPUT ACCEPT [0:0]
:OUTPUT ACCEPT [0:0]
:POSTROUTING ACCEPT [0:0]
-A POSTROUTING -o eth0 -s 192.168.193.0/24 -j SNAT --to-source 192.168.1.123
COMMIT
*filter
:INPUT ACCEPT [0:0]
:FORWARD DROP [0:0]
-A FORWARD -i zt+ -s 192.168.193.0/24 -d 0.0.0.0/0 -j ACCEPT
-A FORWARD -i eth0 -s 0.0.0.0/0 -d 192.168.193.0/0 -j ACCEPT
:OUTPUT ACCEPT [0:0]
COMMIT
13. iptables aktualisieren:
iptables-restore < /etc/iptables/rules.v4Für meine Heimanwendungen, beispielsweise Smarthome, funktioniert es sehr gut.
Offene Punkte:
- Das Ganze als LXC umsetzen (iptables Fehler)
- nftables anstatt iptables verwenden
Viele Grüße
Sven
Last edited:

