[TUTORIAL] Adding Full Disk Encryption to Proxmox

Javex

New Member
Nov 24, 2023
7
9
3
If you want to encrypt your data, the best way is usually to start at the lowest layer possible to get as much data encrypted as possible. If you run all your VMs on top of Proxmox, then adding encryption to all disks in Proxmox is the natural solution, but there doesn't seem to be an official way. In addition, I haven't found a full guide, but lots of people that wanted to do it and didn't know how. This tutorial is for those people: If you want to add full disk encryption to Proxmox, follow along.

Warning: Here be dragons. This is not officially supported and could break on update (though I've tried my best to avoid it). Make sure you have backups. I will also provide further links in case you get stuck, sometimes you will have to debug things for yourself. If you are a beginner with Linux, be prepared for a steep learning curve. Don't blame me if you lose data or your system ends up broken. I'll try to help, but this is very much at your own risk.

Background​

If you already know Linux & Debian quite well and are familiar with full disk encryption, you can skip this section. If you get stuck later you can always return here.

Is there a TL;DR?​

Yes. apt install cryptsetup-initramfs dropbear-initramfs. If you need more detailed instructions, you probably want this whole guide, because there's a lot of steps, but those two packages are what power the ability to decrypt the root partition remotely.

What is full disk encryption?​

This is the ability to encrypt your entire disk (with some exceptions, see below) meaning that if the system is turned off, nobody can easily read your data by just taking your disk. For me the main benefit is that I can just sell or throw away drives I no longer need. Don't need to wipe it if the data is encrypted. There are many articles out there with more in-depth explanation, for example here.

Is my CPU fast enough for my NVMe drive? What about self-encrypting drives?​

If running cryptsetup benchmark shows that the fastest algorithm can't keep up with the speed of your drive (or you are worried about the CPU load caused by encryption), you might want to look into self-encrypting drives. It's beyond the scope of this tutorial and you might have a hard time doing remote unlock, but if they suit your use case well, it's probably simpler than this tutorial.

How do I create a backup?​

This is a complex question, but I'll give you a very inefficient solution. Warning! I didn't test this method, I had a spare drive so my "backup" was that I didn't modify the old installation. I also had all important data backed up on a different device so worst case I could rebuild everything from backups. The simplest and least efficient solution is simply dd if=/dev/sda of=/mnt/backup/proxmox.img. This will create a bit-for-bit image of your disk (and will naturally be the size of the whole disk). To restore you run the reverse: dd if=/mnt/backup/proxmox.img of=/dev/sda (this overwrites all data on /dev/sda).

How do I add encryption during Proxmox installation?​

This tutorial deals with encryption of an existing installation. If you are starting fresh, my recommendation would be to install Debian with full disk encryption and then add Proxmox to it. This is also an advanced method, but is at least documented officially. You can also just install Proxmox unencrypted and then use this guide. It's a bit cumbersome, but should work.

Why not use reencrypt?​

Because I didn't know about it when I set out to do this. If you have backups you can try this, it might be much faster, esp. for large installations. But do so at your own risk.

Can I test this somehow?​

Yes, actually. Proxmox can run inside Proxmox so before I did everything on the live system, I installed Proxmox inside a VM, gave it two disks, installed it on one and then ran through the steps on the other one. Make sure your boot process reflects your host system: Choose UEFI if your host is also using UEFI (OVMF), BIOS otherwise. If you're not sure, check in the console of the host: ls /sys/firmware/efi/efivars/. If that returns a bunch of values, you're running a UEFI system. One other note: Even with an EFI disk attached, I could not get it to remember boot entries, so if you reboot and notice the boot step wasn't saved properly, press "Esc" during startup of the VM, go into the Boot Maintenance Manager and Boot From File, find the right disk and then EFI/proxmox/grubx64.efi or whatever file is there and boot that. This is just an issue inside the VM and shouldn't affect anything when you're doing it on your host for real.

Where do I go if I get stuck?

Personally, I highly recommend the Arch Linux Wiki. It's a phenomenal resource full of high quality documentation. Beware though, it is a different distribution and sometimes that matters (esp. around boot processes). Unfortunately, Debian's documentation is nowhere near the same quality, but there's lots of resources out there if you search. Using "Ubuntu" as a search term can help as Ubuntu is based on Debian and there's a lot of similarities. I'll try to link resources in each section that provide more detailed explanation and there is a whole references at the end, too.

Goal​

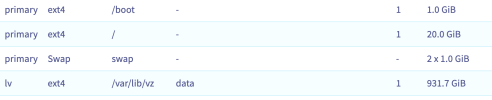
Our goal after this tutorial is the following:

  • Our root (/) partition is an encrypted LVM volume
  • The rest of our LVM storage is availble for VMs (data)
  • Our boot (/boot) and EFI (/boot/efi) partitions are not encrypted
  • We can decrypt our system remotely using SSH
  • Any extra physical drives are also encrypted and upon boot we decrypt them automatically

Assumptions​

  • You are using Grub. I will provide some extra explanation for those that aren't using Grub, but this is all theoretical as my installation used Grub.
  • You boot using UEFI. The instructions below are written with that in mind. Doing a BIOS boot will change quite a few things.
  • Your root partition is on LVM. It's not an issue if it isn't, but you might need to adjust some instructions. If you use ZFS you're on your own, I don't know how that works.
  • You have access to a screen & keyboard attached to your Proxmox server. You will need it.
  • You have enough spare storage to at least create a full backup of your Proxmox installation. Ideally, you have a spare disk that is at least as large as your Proxmox disk, but at the very least create a backup first.
  • Your Proxmox is running on Debian bookworm. If not, that's fine, but some steps might be different.
  • You have a USB stick available large enough for a Debian Live ISO (or some other way of booting a live distro).
  • You have internet access from your Proxmox server, ideally via DHCP or you know how to get extra packages installed for both the Debian live ISO and the Proxmox installation.
  • You are running a 64 bit system. If you are on 32 bit, pay attention during Grub install. Otherwise, I can make no promises anything here will work.

Let's Go!​

You've read the background and are happy to take the risk? Let's get into it then. We will perform the following steps to (hopefully) end up with an encrypted system.

  1. Boot Debian live ISO
  2. Create correct partition layout
  3. Encrypt future root partition & set up LVM
  4. Copy old installation into new encrypted partition
  5. Make new installation bootable
  6. Decrypt other drives
  7. Add SSH unlock
  8. Boot
  9. Troubleshoot
  10. References

Boot Debian live ISO​

To begin we need to get ourselves a live Linux distro to perform all our tasks on. Technically you can accomplish a lot of this from your running proxmox server if you have a separate drive that you want to encrypt, but do so at your own risk. If you get to the step where we copy data from the old to the new installation, it's probably safest to do that from a live disk instead of the running system.

Because Proxmox is based on Debian, I highly recommend choosing Debian as your live system just to be safe. It probably work with others, but why risk it? Find out what debian version you are on:

Bash:
$ cat /etc/os-release | grep VERSION=
VERSION="12 (bookworm)"

In my case we need to download Debian bookworm from https://www.debian.org/CD/live/. I chose the -standard suffix which comes without a GUI. You can definitely choose something else, but everything will be in the terminal and we'll only spend very little time on the screen the server is attached to, if possible.

Copy that onto a USB stick, e.g. using dd or a tool like Rufus or Balena Etcher - the last one is my favourite for Windows. For Linux, plain old dd will do just fine. For more ways see here.

Before you shut off your system, it is also a good idea to update it. I would highly recommend to only run this on currently supported versions of Debian & Proxmox. If you are on older versions, do an upgrade and make sure everything works. You want to make sure that any issues you're facing later on are due to problems with what we're doing here, not other parts.

If everything is up-to-date, working and your USB stick is ready, reboot your system into the Debian live distro. Make sure to shut it down properly to avoid any disk corruption messing up our steps later on.

Once you've booted up Debian you're ready to make changes. However, depending on where your server is, this might not be the most comfortable machine to be working on so I like to enable SSH and then return to my normal computer and do everything else from there. It's also much easier for copy & paste commands in this guide. To set up SSH:

Bash:
# Become root
sudo -i
# Updating apt is important as live ISOs are behind on packages
apt update
# Install SSH
apt install -y ssh
# Start SSH daemon
systemctl start ssh
# Set a password for the regular user (we use this to connect in the next step)
passwd user
# Find out the IP address
ip addr

Remember the password you set and note down the IP address assigned to Debian via DHCP. If you weren't automatically connected to the internet, you might have to set that up manually. Go back to your preferred computer and use SSH to connect:

Bash:
# Enter the user's password
ssh user@x.x.x.x
sudo -i

If you reboot later on, but need to return to the live disk for troubleshooting, come back here and follow these steps again. The live disk does not persist your changes.

Note: If you find during debugging you repeatedly run into SSH warnings after each reboot, it is because the host key changes on each reboot. SSH throws a very angry warning which is usually very important, but here it's not super helpful. If you are on a network you trust enough, you can add -o "UserKnownHostsFile=/dev/null" -o "StrictHostKeyChecking=no" to the ssh command to disable the warnings. However, do so at your own risk and have a look at man 5 ssh_config to understand what these options do. If you're not sure, you can just follow the instructions in SSH's warning and remove the old key and then connect and trust the new fingerprint. The extra paranoid can even compare the fingerprint by getting it from the server's attached screen, but that's beyond scope here.

Now that we're connected let's install the three packages we need during the installation. Remember, these are installed on the live disk, so if you reboot, you need to install them again:

Bash:
apt install dosfstools cryptsetup efibootmgr

Create correct partition layout​

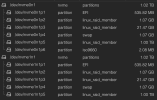
Finally, it's time to make some changes. I hope you have backups, because many of the operations that follow are destructive and will wipe data. First, have a look at the partition layout of your existing installation. For example, if your existing installation is on /dev/sda, run fdisk -l /dev/sda. Mine looked something like this:

Code:
Device           Start        End    Sectors   Size Type
/dev/sda1           34       2047       2014  1007K BIOS boot
/dev/sda2         2048    2099199    2097152     1G EFI System
/dev/sda3      2099200 1953525134 1951425935 930.5G Linux LVM

Because we want to encrypt our root partition (which lives somewhere in /dev/sda3) but not our /boot drive, we need create a separate partition for /boot. We will have both an EFI & boot partition. There's probably better ways, but I didn't want to stray too far from Proxmox' expected setup to minimise future issues so all we'll do is create one new partition.

If you notice that your original installation has more partitions (for example, root and VM data are separate and LVM is not in use), then you might need to adjust your steps below. Try to replicate what is there as closely as you can and pretty much just insert a separate partition for /boot as described below.

We'll do this on a fresh drive /dev/sdX (always replace with the correct name), but if you're trying to resize a disk with existing data instead, make sure to shrink the partition first. This is out of scope for this guide, but have a look at these instructions if you want to do this.

I prefer cfdisk so open your new drive with cfdisk /dev/sdX and create the following setup (make sure to set the disklabel type to gpt!):

Code:
Device           Start        End    Sectors   Size Type
/dev/sdX1           34       2047       2014  1007K BIOS boot
/dev/sdX2         2048    1050623    1048576   512M EFI System
/dev/sdX3      1050624    2074624    1024001   500M Linux filesystem
/dev/sdX4      2074625 1953523711 1951449087 930.5G Linux filesystem

Note: When I attempted to do this, I noticed that the first partition already started at sector 2048. If your experience is the same, you can skip what's labeled as /dev/sdX1 above and start with the EFI System.

While Linux doesn't care too much about partition types set above, it is important that the EFI System is set to EFI System (C12A7328-F81F-11D2-BA4B-00A0C93EC93B) so that the UEFI bootloader can find it.

If everything looks good, select "Write", type "yes" and then quit. Check it all looks good with fdisk -l /dev/sdX. Most important here:
  • There's 2048 sectors free at the start for the bootloader
  • There's an EFI partition with the correct type. 512M is generously sized. Mine currently only uses about 500K (less than 1%!). I just copied what Proxmox did, you can probably go much smaller.
  • There's a separate boot partition. I suggest 500M at least. Mine is currently using 103M so any smaller and it might get crowded here.
If your partition layout looks different to the above, make sure to adjust the below steps accordingly. Always double check.

Let's prepare the two unencrypted partitions now. First, EFI should be FAT, e.g. FAT32 via

Bash:
mkfs.fat -F 32 /dev/sdX2

If this command fails because mkfs.fat doesn't exist, you may have forgotten to install dosfstools.

Then we create the /boot partition:

Bash:
mkfs.ext4 /dev/sdX3

Next, we will set up our encrypted root partition.
 
Last edited:

Encrypt future root partition & set up LVM​

Time to deal with the last (and most important) partition: Our encrypted one, the whole reason we're doing this. Again, if your partition layout looks different, adjust the numbers shown in the steps here. Before you run the following command you might want to run cryptsetup benchmark and have a read of this page as it has a lot of excellent background and details so you can ensure you get maximum performance out of your configuration.

Bash:
cryptsetup luksFormat /dev/sdX4

Enter a secure encryption password here. Store it in your password manager, or write it down. If you forget it, your data is gone. You may also want to have a look at this documentation. The instructions should largely apply to Debian in the same way. Particularly, you might want to add a second passphrase and back up your LUKS header. You can also do this after following the tutorial, but don't forget it. If the header gets corrupted, your data is gone, too. But you have backups, right?

Then open the newly encrypted drive:

Bash:
cryptsetup open /dev/sdX4 cryptlvm

Enter the passphrase and if that succeeded, then /dev/mapper/cryptlvm now represents your partition with encryption wrapped around it.

Next we set up LVM. If your installation didn't use LVM, then you can skip the rest of this section but make sure you've adjusted your partition table correctly. I can't account for every use case here, but if you make sure that a) you have a separate boot partition and b) everything else looks like the old partition table, then you should be able to adjust. To encrypt partitions other than /, check the section "Decrypt other drives".

Bash:
pvcreate /dev/mapper/cryptlvm
vgcreate pve-new /dev/mapper/cryptlvm

These two commands create a new physical volume and add it to a new volume group we call pve-new (for now). Next we create two partitions: root & swap

Bash:
# Create new partitions
lvcreate -L 30G pve-new -n root
lvcreate -L 8G pve-new -n swap
# Format swap
mkswap /dev/pve-new/swap
# Format root drive
mkfs.ext4 /dev/pve-new/root

You can adjust the sizes as you see fit, I won't go into detail about that here. My current installation uses about 8G for root.

If you have any other partitions that are unrelated to VMs, you can create them now, too. If you're unsure run lvs and/or lvdisplay to see what you have. Anything that looks like vm-* isn't important now. Also if you have a thin volume called e.g. data, don't worry about that, we'll deal with those later. Thin volumes have a t attribute as the first item when running lvs (where root should just have -).

Copy old installation into new encryption partition​

Time to copy our old system over to the new. If you've been following along on the running Proxmox host, you might want to switch to a live disk now. You can probably eek out a bit more time by doing a lot of the data copying on the running system, but I really wouldn't recommend it.

Let's get ready for copying data:

Bash:
# Create directories to mount in
mkdir /mnt/{new,old}
# Mount new root drive (note the LVM reference 'pve-new')
mount /dev/pve-new/root /mnt/new
# Create a mountpoint for the new boot partition
mkdir /mnt/new/boot
# Mount the formatted drive into the boot folder. Adjust as necessary.
mount /dev/sdX3 /mnt/new/boot
# Create mountpoint for efi partition
mkdir /mnt/new/boot/efi
# Mount efi partition for new installation
mount /dev/sdX2 /mnt/new/boot/efi
# Mount the old system
mount /dev/pve/root /mnt/old
# Mount old efi partition
mount /dev/sda2 /mnt/old/boot/efi

At this point, it is probably a good idea to check everything looks right:
  • ls -lR /mnt/new should look basically empty
  • mount | grep /mnt/new should return three mounts: root, boot & efi in the correct paths
  • mount | grep /mnt/old should return two mounts: root & efi, in the correct paths
  • ls /mnt/old should show the old installation
  • ls /mnt/old/boot/efi should show at least one folder called EFI
  • df -h can provide another sanity check
If it all looks good, we're ready to copy some data. This is simple, but might take some time depending on your installation. If you have a lot of disk-basked VMs, this will copy them, backups, snapshots and everything else. Once it's running maybe make yourself a cup of tea?

Bash:
rsync -av --progress /mnt/old/ /mnt/new

Once that's finished (and there were no errors), run df -h. For the most part the sizes of the old & new should look similar, although new is slightly smaller due to /boot being separate now.

The next thing we want to do is migrate all existing LVM data drives that we skipped earlier. In my case, I have a thin pool called data and several disks. First we need to re-create this pool. If you run lvdisplay /dev/pve/data (adjust name of the pool) you will see what size it has. In my case I'm going with 500G and leave the rest free (you can't shrink a thin pool, but you can grow it).

Bash:
# -T creates a thin pool
lvcreate -T -L 500G pve-new -n data

Then we need to re-create and re-populate all the data from each disk we have. Technically you could probably do some fancy trickery by opening each and migrating them, but I decided to play it safe and simply mirror the whole thing using dd. Depending on the size of disks, this might take a while, but it's the safest and least complex way.

In this example I'm using a disk called vm-101-disk-1, but running lvs will show you all the disks you have. This step can vary a lot. As long as you make sure that you always have if=/dev/pve/... and of=/dev/pve-new/... you can experiment. But do not get it the wrong way around or you will wipe your data. You have backups, right?

We need to create a new disk of the same size or larger to hold the whole copy. While exact size should work I found that sometimes dd complained that it didn't have quite enough space. This is probably just minor block alignments, but if you want to be safe, add an extra bit of space at the end if you can spare it.

Bash:
# --virtualsize is the size of the disk, I picked 257G to leave extra room for my 256G volume
# -T identifies the thin pool we created earlier
# -n specifies the name of the disk
lvcreate --virtualsize 257G -T pve-new/data -n vm-101-disk-1
# if= is the source data
# of= is the destination
# conv=sparse skips values that are 0 (see below)
dd if=/dev/pve/vm-101-disk-1 of=/dev/pve-new/vm-101-disk-1 status=progress conv=sparse

If you have a thin pool and then checked any of your disks, e.g. lvdisplay /dev/pve/vm-101-disk-1 you'll notice they have a Use % value, usually less than 100%. This is how much space the disk actually uses right now. If you were to run dd without conv=sparse you'd find that the destination drive shows 100% Use. This wouldn't be the end of the world, but you'd lose the benefit of thin pools. If you add that parameter, null bytes (empty values) are skipped and never written, thus not using up the space. I don't understand it super well, but it worked for me.

Repeat the above process for every disk. The dd step can take quite a while (more tea?), because that's where the whole data is copied (and encrypted in the process!). Once you're done with all the disks, you should basically have an exact copy of everything in pve-new.

Now that we're done, we can umount everything:

Bash:
# Make sure you're not in either of the directories
cd /mnt
umount -R /mnt/old
umount -R /mnt/new

Make new installation bootable​

Up until here, it should still be possible to boot into the old Proxmox. If you want you can try to make sure everything is alright. If it isn't, it might be a good time to go into recovery mode and figure out what went wrong. One note though: If you inserted a fresh drive, it might mess with boot order (and sometimes even device naming). If you do reboot, make sure to go back up and install the right packages, then unlock the encrypted drive and run lvscan or lvchange -ay to enable the decrypted LVM volumes.

After you follow the next instructions, you will break your ability to easily boot your old installation, for at least two reasons. First, we will rename our volume group (for LVM) and second we will mess with the UEFI bootloader. Both steps are recoverable so you're not destroying anything. For LVM, Proxmox expects the volume group to be called pve (at least it does for me), so our new installation needs that name. If you want to go back to the old one, just undo the rename and it should boot again.

Make sure you unmounted the drives in the previous step and then rename both volume groups:

Bash:
vgrename pve pve-old
vgrename pve-new pve

And then we mount everything again:

Bash:
mount /dev/pve/root /mnt/new
mount /dev/sdX3 /mnt/new/boot
mount /dev/sdX2 /mnt/new/boot/efi

Now it's time to configure this "new" installation so it actually boots. For that we chroot in, but first we need to mount a bunch of API file systems so that commands work properly.

Bash:
cd /mnt/new
mount -t proc /proc proc/
mount -t sysfs /sys sys/
mount -o bind /dev dev/
mount -o bind /dev/pts dev/pts
mount -o bind /sys/firmware/efi/efivars sys/firmware/efi/efivars/
chroot /mnt/new /bin/bash

After this your shell should display / and you should be in your new Proxmox installation's root directory. First, we install the necessary new packages. Note that we are now installing packages inside Proxmox and so our changes here persist. For all intents and purposes it's like we're inside the running Proxmox system.

Bash:
apt install cryptsetup cryptsetup-initramfs dropbear-initramfs

The dropbear-initramfs package is needed later for SSH unlock. If you don't care about remote unlock you can skip it.

Also the cryptsetup-initramfs package is the secret sauce here. For some reason, I couldn't find it documented in most places that I looked, but it's what ensures that when you boot, you get prompted for a passphrase and decrypts. The official docs are here but it only mentions to look at /usr/share/doc/cryptsetup-initramfs/README.initramfs.gz, not that you need to install that package. So yeah, make sure you have it and then all the following steps will make sure everything just magically works.

We now need to tell Proxmox how to boot up correctly. The first step is to inform it that we'd like to decrypt our root partition:

Bash:
# Adjust sdX4 as necessary again
echo "cryptlvm UUID=$(blkid -s UUID -o value /dev/sdX4 | tr -d '\n') none luks" >> /etc/crypttab

This adds instructions to /etc/crypptab and we identify the drive by UUID. Make sure to run cat /etc/crypttab and that everything looks alright. Especially, that there's a UUID present. I noticed in some of my tests blkid returned an empty value here. If that's the case, run ls -l /dev/disk/by-uuid and find the correct UUID that way and replace it.

Now we need to tell Proxmox about mount points. Because we renamed our new volume group to pve both /dev/pve/root and /dev/pve/swap will continue to work (once decrypted). However, we need to update the UUID for /boot/efi and add a totally new mount for /boot.

Note: Your /etc/fstab may look different. Try to maintain as much of it as possible. You should only need to add the new /boot mount and then update all the UUIDs to their new values.

First we add new lines, then we fix the file:

Bash:
# Adjust drive names
echo "UUID=$(blkid -s UUID -o value /dev/sdX3 | tr -d '\n') /boot ext4 defaults 0 2" >> /etc/fstab
echo "UUID=$(blkid -s UUID -o value /dev/sdX2 | tr -d '\n') /boot/efi vfat defaults 0 1" >> /etc/fstab

Now open /etc/fstab with vim or nano and remove the old /boot/efi line. Again make sure the UUIDs are there (don't worry, the FAT32 one is really short) and also make sure that /boot comes first, then /boot/efi. This should already be the case if you ran the commands above in order.

Before you install Grub in the following step, check if you have a file called /etc/kernel/proxmox-boot-uuids. If yes, then I'm not sure if the following is going to cause you problems. You could remove/backup the file and try or have a look at the shell script and figure it out. I didn't have the file so I bypassed it entirely, but I'm not sure if that works well. According to this page, because I am using UEFI, but not ZFS, it picks Grub. However, the script doesn't seem to account for this case so it's probably not used. If you were to run it, it'll probably try to use systemd-boot on UEFI systems and that's not what we want.

In my case I didn't have the file so that command did nothing. However, if you look at the script (it's really simple), it ends up running a grub-install anyway. I've adjusted the parameters slightly to what I think makes more sense. If you are on a 32 bit system, use --target i386-pc instead.

Bash:
grub-install.real --efi-directory /boot/efi --target x86_64-efi --no-floppy --bootloader-id='proxmox' /dev/sdX

You'll notice that Proxmox has replaced the original grub-install so we need to call this alias.

If you don't care about either decrypting other drives or remote unlocking then you can run the following commands to configure the boot process. If you do want those optional components, skip this step (it doesn't hurt, but we'll need to run it again later anyway).

Bash:
update-grub
update-initramfs -c -k all

See the end of the SSH/remote unlock section for an explanation of why we run those two commands.
 
Last edited:
  • Like
Reactions: Reifide

Decrypt other drives​

In case you have more than just the one drive connected, you might want to encrypt your other storage, but would prefer not to keep entering passphrases for each drive. For this purpose, we can create a /keyfile on / which, once mounted, can be used to decrypt all other drives. Instead of a password, this keyfile will be used. It's incredibly important to keep this file secure: If someone obtains it, they can decrypt your other drives.

First, create such a keyfile:

Bash:
dd bs=512 count=4 if=/dev/random of=/keyfile iflag=fullblock
# Make sure nobody but root can read this file
chmod 600 /keyfile

Now add it as a key to your encrypted drive. How to encrypt existing unencrypted drives is beyond scope here, but it's well documented

Bash:
cryptsetup luksAddKey /dev/sdXY /keyfile

Enter anything else that unlocks the drive. Note that it's highly recommended to also have a passphrase that decrypts the drive, even if it's usually not used. Store it in your password manager. It might come in handy if you lose the keyfile. And again, backup your header after running this command.

Then add a new line to /etc/crypttab with the new drive. This ensures that it gets unlocked automatically:

Bash:
echo "cryptlvm UUID=$(blkid -s UUID -o value /dev/sdXY | tr -d '\n') /keyfile luks" >> /etc/crypttab

Add SSH unlock​

The last step is to allow for remote unlocking. Servers tend to be in places that can't be easily accessed so if you can remotely unlock it, that's a huge boon. We'll use dropbear for this. You should have already installed it earlier. If not go back and follow those steps now. This section is largely based on Vivek's excellent guide and I recommend you check it out, as my instructions here are very condensed while that article has much better explanations.

First, we configure dropbear-initramfs with the following line in /etc/dropbear/initramfs/dropbear.conf

Bash:
DROPBEAR_OPTIONS="-s -c cryptroot-unlock"

We also need to make sure we have an SSH key that's allowed to connect. Add your public key to /etc/dropbear-initramfs/authorized_keys, for example:

Bash:
echo 'ssh-rsa ...' >> /etc/dropbear-initramfs/authorized_keys

Then we ensure we have an IP we can SSH to. You can configure this how you like, I picked a static IP. You want to edit /etc/default/grub and add the ip= kernel parameter, so it looks like this example. Note: Don't delete other parameters if they're there, just add this new one.

Bash:
GRUB_CMDLINE_LINUX_DEFAULT="quiet ip=192.168.1.193:::::enp4s0:none"

Find your interface name by running ip link. In my testing, that worked well, but if the kernel renames interfaces at a later point, you might have more like with eth0 than enp4s0 or whatever ip link tells you.

These two changes should be sufficient, the only other really important change is that you have /etc/crypttab and /etc/fstab set up correctly. If they are incorrect, the next commands will read the wrong values and boot won't work, so maybe double check them now. Does it look correct? You can compare it to the output of mount.

Bash:
update-grub
update-initramfs -c -k all

The first step updates the grub configuration. The second step updates the initramfs. Booting in this setup happens in the following order: UEFI -> Grub -> Initramfs -> Full operating system

To make sure update-grub worked check /boot/grub/grub.cfg. You should see that the first menu entry does not have insmod lvm and instead references a partition directly. For some reason, when I first ran this, it didn't update the file properly so it's good to check. The menu entry below ### BEGIN /etc/grub.d/10_linux ### should have a linux line that includes the ip= kernel parameter. If that's there, you know it's a fresh configuration. If not, maybe create a backup of the file and try again. Then compare.

To ensure that the initramfs is correct, run lsinitramfs /boot/initrd.img-<version> | grep dropbear and similarly search for cryptsetup. None of this guarantees that booting will work, but if either of them don't return output then booting will likely not work so it's good to go back and check first.

Boot​

If you actually made it this far, congratulations! We're almost done. It's time to reboot and if everything went well, you should see a prompt to decrypt. First, run exit to quit the chroot environment. Then cd / and umount -R /mnt/new.

An optional step is replace the old UEFI boot entry because currently both are called "proxmox" which can be confusing. Once everything is working, you probably want to remove the old entry in its entirety, but keep it for now. Since you can't directly rename an entry, you'll have to create a new one and delete the old one. If you didn't install efibootmgr at the start, do it now, if you want to do this.

First, run efibootmgr -v to see what's currently there. Now we create a new entry for the old EFI drive (assumed to be /dev/sda2 in our initial example):

Bash:
# Compare the file path to what efibootmgr -v showed. Note that / gets translated to \ automatically.
efibootmgr --create-only --disk /dev/sda --part 2 --loader /EFI/proxmox/grubx64.efi --label "Proxmox unencrypted" -v

Look at the output and find the new entry, then note the HD(X,GPT,<uuid>) and find the corresponding proxmox entry. There are two named "proxmox". The one that matches is the old one, the one that's different is the new one. Find the boot number (Boot000X) and delete it:

Bash:
efibootmgr -B -b 000X -v

This should only have one entry named "proxmox" now and one labelled "Proxmox unencrypted". Finally, check the BootOrder. If "proxmox" isn't before "Proxmox unencrypted" you can change it in your BIOS/UEFI firmware or by using the --bootorder parameter (see man 8 efibootmgr).

Now run reboot.

When booting, you might want to check the boot order and/or unplug the USB drive. If everything went according to plan, you should be prompted for a passphrase and dropbear should print your IP. Try ssh root@<IP> to see if it worked. If networked unlock didn't work, but you can unlock using the connected keyboard, try that. If that works, you may just end up with a working system and can fix dropbear from inside that. If it didn't, you probably need to go back to the live Debian and debug from there.
 
Last edited:
  • Like
Reactions: Reifide

Troubleshoot​

If something didn't work, it depends on how far you got. Here are some general tips depending on your situation

It tried to boot unencrypted Proxmox or the live OS​

Check the boot order in the BIOS/UEFI firmware. Unplug the USB stick. You can even disable the unencrypted Proxmox as a boot option in many firmwares. If nothing works, you can physically disconnect the drive (turn the computer off first!). We want to know if it just tried the wrong one first or if it didn't find a working boot option and skipped our first choice (the encrypted Proxmox). If fixing the boot order doesn't help and it still doesn't boot, it is likely some part of the boot chain wasn't installed properly so go back to where we installed Grub. Often just running grub-install.real again can fix things, just make sure you run it against the correct drive and with everything properly mounted and chroot-ed into Proxmox.

Grub showed on screen but couldn't boot the OS​

Something is either wrong with grub.cfg or with the initramfs. See if these steps help. The commands for this one are update-grub and update-initramfs from earlier.

The initramfs was loaded but I didn't get a password prompt​

See if there are any error messages. If not, you might need to remove the quiet from the kernel command line (in /etc/default/grub).

I entered the passphrase but then the screen went black​

Try adding nomodeset to the kernel command line in /etc/default/grub. But before you reboot, check if the system isn't actually running (go to the web interface or try to ping it). If you have GPU passthrough enabled for a VM it may well be that everything is working, but when the VM started the video output got handed over.

I see systemd messages after decrypting but then it hangs​

Boot into the live disk and chroot into the Proxmox installation. Run journalctl and check the latest boot logs. Any obvious errors there? Note that -b -1 showed me not the last boot but the one before and -b 0 was empty, but without it, the newest logs were from the boot I was interested in.

References​

References helpful with full disk encryption:
 
Last edited:
  • Like
Reactions: Reifide
One might wonder why basic LUKS could not have been built as an option into the installer. It's just an extra layer and it has no issues with providind options for ZFS and BTRFS, so adding this would have been relatively simple at the time of install.

Good work!
 
Hello Javex,

perfect your instructions are great. I have a question as follows:

I currently have a Proxmox installation (installed by default by the hoster via template).

2 x 960 GB NVME

1st partition 20 GB (Proxmox root /)
2nd partition 960 GB (Proxmox Data /var/lib/vz)
3rd partition 2 GB (SWAP)

Both hard disks are in a RAID 1 array.

I would now like to encrypt the 1 and 2 partitions. Does it also make sense to encrypt the SWAP partition (3 partition)?

No VMs are currently running on the new Proxmox host, it is a default installed system.

It would be great if you could help me. I can also attach a screenshot of my partition tables.

Proxmox 8 is currently installed by default.

Thank you!
 

Attachments

  • Bildschirmfoto 2023-11-27 um 09.59.34.png
    Bildschirmfoto 2023-11-27 um 09.59.34.png
    49.2 KB · Views: 8
  • Bildschirmfoto 2023-11-27 um 10.13.13.png
    Bildschirmfoto 2023-11-27 um 10.13.13.png
    132.7 KB · Views: 11
First of all thank you so incredibly much for your comprehensive and amazing guide.

One thing to notice is that the directory to place the authorized_keys file for dropbear is wrong in your post. It should be in the same directory as the dropbear configuration file (/etc/dropbear/initramfs/authorized_keys).

AND NOW SOME VERY IMPORTANT INFORMATION:

If you follow this along, and at the very end after the final reboot you get stuck on the boot screen after it says "Loading initial ramdisk..." - You might think something didn't work. Let me save you hours of despair: Try to SSH in. It works.

I have no idea why I don't get a line printed on my physical server about dropbear running. There's also no password promt at all on the physical server. But SSH does work, it does unlock the disk and the boot finished just fine.
 
Hello Javex,

perfect your instructions are great. I have a question as follows:

I currently have a Proxmox installation (installed by default by the hoster via template).

2 x 960 GB NVME

1st partition 20 GB (Proxmox root /)
2nd partition 960 GB (Proxmox Data /var/lib/vz)
3rd partition 2 GB (SWAP)

Both hard disks are in a RAID 1 array.

I would now like to encrypt the 1 and 2 partitions. Does it also make sense to encrypt the SWAP partition (3 partition)?

No VMs are currently running on the new Proxmox host, it is a default installed system.

It would be great if you could help me. I can also attach a screenshot of my partition tables.

Proxmox 8 is currently installed by default.

Thank you!
Apologies for the late reply, I missed this message. Yes, you should encrypt Swap if you want to encrypt your disk. The reason is that Swap is used to store what's in your memory if memory is full (or if you "suspend-to-disk" also known as "hibernate"). Since you consider the data on your disk sensitive enough to protect, the same should be true for memory (RAM).
 
AND NOW SOME VERY IMPORTANT INFORMATION:

If you follow this along, and at the very end after the final reboot you get stuck on the boot screen after it says "Loading initial ramdisk..." - You might think something didn't work. Let me save you hours of despair: Try to SSH in. It works.

I have no idea why I don't get a line printed on my physical server about dropbear running. There's also no password promt at all on the physical server. But SSH does work, it does unlock the disk and the boot finished just fine.

Thank you! I wasn't following this process, I installed a fresh debian with whole-disk encryptions and then, following the guide, installed the proxmox kernel and rebooted ... and it sat there after "loading initial ramdisk" forever. I tried typing in my disk password even though no prompt was printed and it worked.
 
dd if=/dev/sda of=/mnt/backup/proxmox.img. This will create a bit-for-bit image of your disk (and will naturally be the size of the whole disk).
Better use this to compress size:

Code:
dd if=/dev/sda status=progress conv=sync,noerror | gzip -c > mnt/backup/proxmox.img.gz

And the reverse to restore:

Code:
gunzip -c /mnt/backup/proxmox.img.gz | dd of=/dev/sda


Anyway, thanks for tutorial, I have a lot to read up on!
 

About

The Proxmox community has been around for many years and offers help and support for Proxmox VE, Proxmox Backup Server, and Proxmox Mail Gateway.
We think our community is one of the best thanks to people like you!

Get your subscription!

The Proxmox team works very hard to make sure you are running the best software and getting stable updates and security enhancements, as well as quick enterprise support. Tens of thousands of happy customers have a Proxmox subscription. Get yours easily in our online shop.

Buy now!