Replace 512GB SSD's with 500GB SSD's

pspfreak

New Member
Mar 10, 2024
9
0
1
Hello, I'm running Proxmox 8.1.4 with the default rpool. The drives are 512.11GB drives, and I plan to replace them with ~500GB SSD's that have cache. My usage is only 159GB on the default rpool. How do I go about shrinking the pool and copying to new SSD's? I've searched but I haven't found anything that fits my situation. I'd rather not have to rebuild my entire host as I don't have a cluster.

Edit: The drives I want to replace them with are 500.11GB.

Thanks!
 
Last edited:
The drives are 512.11GB drives, and I plan to replace them with ~500GB SSD's that have cache. My usage is only 159GB on the default rpool. How do I go about shrinking the pool and copying to new SSD's? I've searched but I haven't found anything that fits my situation. I'd rather not have to rebuild my entire host as I don't have a cluster.
It's not possible to shrink a vdev with ZFS. You could create a new pool. copy everything over using zfssend/receive and rename the old rpool and rename the new one to rpool, but it's tricky. My advise would be to reinstall. Personally, I would install Proxmox in a VM (with a small rpool), configure it and then move the virtual rpool to the new drives (fix the bootloader) and use the remaining space as a separate ZFS pool.

EDIT: Thank you @UdoB; removing a vdev is indeed recently possible, so that might work.
 
Last edited:
  • Like
Reactions: Kingneutron
How is your ZPool layout? If it is just a single device (not recommended) or it consists of mirrors you can just add the new device as a top level vdev (zpool add) and then "zpool remove" the old one. See man zpool-remove:

Code:
NAME
     zpool-remove — remove devices from ZFS storage pool

DESCRIPTION
     zpool remove [-npw] pool device…
             Removes the specified device from the pool.  This command supports removing hot
             spare, cache, log, and both mirrored and non-redundant primary top-level vdevs, in‐
             cluding dedup and special vdevs.

As this is your boot device (?) you need to follow "Changing a failed bootable device" ( https://pve.proxmox.com/pve-docs/pve-admin-guide.html#chapter_zfs ) to prepare some partitions and install the bootloader.

Good luck :)
 
  • Like
Reactions: leesteken
How is your ZPool layout? If it is just a single device (not recommended) or it consists of mirrors you can just add the new device as a top level vdev (zpool add) and then "zpool remove" the old one. See man zpool-remove:

Code:
NAME
     zpool-remove — remove devices from ZFS storage pool

DESCRIPTION
     zpool remove [-npw] pool device…
             Removes the specified device from the pool.  This command supports removing hot
             spare, cache, log, and both mirrored and non-redundant primary top-level vdevs, in‐
             cluding dedup and special vdevs.

As this is your boot device (?) you need to follow "Changing a failed bootable device" ( https://pve.proxmox.com/pve-docs/pve-admin-guide.html#chapter_zfs ) to prepare some partitions and install the bootloader.

Good luck :)
Will this work when I'm replacing with a smaller device? That was the issue last time I tried.

It's not possible to shrink a vdev with ZFS. You could create a new pool. copy everything over using zfssend/receive and rename the old rpool and rename the new one to rpool, but it's tricky. My advise would be to reinstall. Personally, I would install Proxmox in a VM (with a small rpool), configure it and then move the virtual rpool to the new drives (fix the bootloader) and use the remaining space as a separate ZFS pool.
I was hoping to avoid a reinstall as everything is set up how it should be. Could you tell me more about creating the new pool and copying everything?
 
Don't replace the drive, add it as a stripe (instead of a mirror). And then remove the old (larger) one. That ought to work on newer ZFS versions.
To make it more clear:
1.) follow the wiki article on how to "replace a failed bootable device" to copy the partition table and sync the bootloader from the old to the new disk. But skip that "zpool replace" command.
2.) add partition 3 of the new disk as a new vdev (so creating a raid0/stripe if it was a single disk before) using the "zpool add" command
3.) remove the old disk using the "zpool remove" command
 
Last edited:
To make it more clear:
1.) follow the wiki article on how to "replace a failed bootable device" to copy the partition table and sync the bootloader from the old to the new disk. But skip that "zpool replace" command.
2.) add partition 3 of the new disk as a new vdev (so creating a raid0/stripe if it was a single disk before) using the "zpool add" command
3.) remove the old disk using the "zpool remove" command
Thank you for the clarification. I'm just getting a little stuck in my understanding, apologizes, i'm pretty new to working with ZFS.

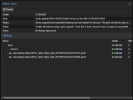
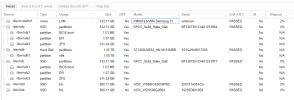
If my current setup is as follows:

1710159332888.png

1710159525723.png

What do I need to do exactly? Create a new Zpool, and then what?

*note I have not added the new drives physically to the system yet.
 
Last edited:
No. And all has to be done via CLI. See the linked wiki article and ZFS documentation. We can't help with commands without the new disks installed.

Then its a mirror you will have to temporarily turn into a striped mirror.
1710191438338.png

I've got the two disks connected via USB since I don't enough internal sata to connect them, let me know if that will be an issue and I may have a workaround for that. The two WD drives at the end are the drives I want to replace the SPCC SSD's with.

Sorry I don't see anything about adding them as a stripe in that linked documentation.
 
The two WD drives at the end are the drives I want to replace the SPCC SSD's with.
Not a great choice for ZFS.

Sorry I don't see anything about adding them as a stripe in that linked documentation.
Yes, because your usecase isn't documented. You have to combine all the 3 links.

Whats the output of ls -la /dev/disk/by-id?
And I hope you got recent backups (as everyone always should)?
 
  • Like
Reactions: pspfreak
Not a great choice for ZFS.
Yeah I know, I'd get better SSD's if I had the money for it. Anything is better than my current dramless SSD's though.
Whats the output of ls -la /dev/disk/by-id?
Code:
root@pve1:~# ls -la /dev/disk/by-id
total 0
drwxr-xr-x 2 root root 1160 Mar 11 17:09 .
drwxr-xr-x 8 root root  160 Mar  9 17:23 ..
lrwxrwxrwx 1 root root    9 Mar  9 17:23 ata-SPCC_Solid_State_Disk_BF3307351C4401231977 -> ../../sdc
lrwxrwxrwx 1 root root   10 Mar  9 17:23 ata-SPCC_Solid_State_Disk_BF3307351C4401231977-part1 -> ../../sdc1
lrwxrwxrwx 1 root root   10 Mar  9 17:23 ata-SPCC_Solid_State_Disk_BF3307351C4401231977-part2 -> ../../sdc2
lrwxrwxrwx 1 root root   10 Mar  9 17:23 ata-SPCC_Solid_State_Disk_BF3307351C4401231977-part3 -> ../../sdc3
lrwxrwxrwx 1 root root    9 Mar  9 17:23 ata-SPCC_Solid_State_Disk_BF3307351C4401231984 -> ../../sda
lrwxrwxrwx 1 root root   10 Mar  9 17:23 ata-SPCC_Solid_State_Disk_BF3307351C4401231984-part1 -> ../../sda1
lrwxrwxrwx 1 root root   10 Mar  9 17:23 ata-SPCC_Solid_State_Disk_BF3307351C4401231984-part2 -> ../../sda2
lrwxrwxrwx 1 root root   10 Mar  9 17:23 ata-SPCC_Solid_State_Disk_BF3307351C4401231984-part3 -> ../../sda3
lrwxrwxrwx 1 root root    9 Mar  9 17:23 ata-ST1000LM024_HN-M101MBB_S31QJ9AH613365 -> ../../sdb
lrwxrwxrwx 1 root root   10 Mar  9 17:23 ata-ST1000LM024_HN-M101MBB_S31QJ9AH613365-part1 -> ../../sdb1
lrwxrwxrwx 1 root root    9 Mar 11 17:09 ata-WDC_WDBNCE5000PNC_200721A00ACA -> ../../sdd
lrwxrwxrwx 1 root root    9 Mar 11 17:09 ata-WDC_WDS500G2B0A_19255D801958 -> ../../sde
lrwxrwxrwx 1 root root   11 Mar  9 17:23 dm-name-local--nvme-vm--100--disk--0 -> ../../dm-20
lrwxrwxrwx 1 root root   11 Mar  9 17:23 dm-name-local--nvme-vm--100--disk--1 -> ../../dm-19
lrwxrwxrwx 1 root root   10 Mar  9 17:23 dm-name-local--nvme-vm--101--disk--0 -> ../../dm-4
lrwxrwxrwx 1 root root   10 Mar  9 17:23 dm-name-local--nvme-vm--101--disk--1 -> ../../dm-6
lrwxrwxrwx 1 root root   10 Mar  9 17:23 dm-name-local--nvme-vm--102--disk--0 -> ../../dm-5
lrwxrwxrwx 1 root root   11 Mar  9 17:23 dm-name-local--nvme-vm--103--disk--0 -> ../../dm-22
lrwxrwxrwx 1 root root   11 Mar  9 17:23 dm-name-local--nvme-vm--103--state--before--redoing--nics -> ../../dm-21
lrwxrwxrwx 1 root root   10 Mar  9 17:23 dm-name-local--nvme-vm--104--disk--0 -> ../../dm-8
lrwxrwxrwx 1 root root   10 Mar  9 17:23 dm-name-local--nvme-vm--104--disk--1 -> ../../dm-9
lrwxrwxrwx 1 root root   11 Mar  9 17:23 dm-name-local--nvme-vm--107--disk--0 -> ../../dm-23
lrwxrwxrwx 1 root root   11 Mar  9 22:22 dm-name-local--nvme-vm--107--disk--1 -> ../../dm-24
lrwxrwxrwx 1 root root   11 Mar  9 17:23 dm-name-local--nvme-vm--107--disk--2 -> ../../dm-25
lrwxrwxrwx 1 root root   10 Mar 10 21:07 dm-name-local--nvme-vm--110--disk--0 -> ../../dm-7
lrwxrwxrwx 1 root root   11 Mar  9 17:23 dm-name-local--nvme-vm--111--disk--0 -> ../../dm-13
lrwxrwxrwx 1 root root   11 Mar  9 21:10 dm-name-local--nvme-vm--113--disk--0 -> ../../dm-16
lrwxrwxrwx 1 root root   11 Mar  9 21:10 dm-name-local--nvme-vm--113--disk--1 -> ../../dm-17
lrwxrwxrwx 1 root root   11 Mar  9 22:28 dm-name-local--nvme-vm--113--disk--2 -> ../../dm-18
lrwxrwxrwx 1 root root   10 Mar 10 21:07 dm-uuid-LVM-ngVF3rcgDuGyW4Lo5WpRpjFkdq7Af33j2gkUHasHWcoA65dGcALCr3M4yu87H4LB -> ../../dm-7
lrwxrwxrwx 1 root root   11 Mar  9 17:23 dm-uuid-LVM-ngVF3rcgDuGyW4Lo5WpRpjFkdq7Af33j4h1X5WUVNx4YekoQw6lXsZ0b1PXu47ml -> ../../dm-21
lrwxrwxrwx 1 root root   11 Mar  9 22:28 dm-uuid-LVM-ngVF3rcgDuGyW4Lo5WpRpjFkdq7Af33j4VZP7B8idWF1xSVftMX58MpuT42yMbRc -> ../../dm-18
lrwxrwxrwx 1 root root   11 Mar  9 17:23 dm-uuid-LVM-ngVF3rcgDuGyW4Lo5WpRpjFkdq7Af33j91VxA2W8B5bBZU2V6ZtXxI0JGhamFGpW -> ../../dm-25
lrwxrwxrwx 1 root root   11 Mar  9 17:23 dm-uuid-LVM-ngVF3rcgDuGyW4Lo5WpRpjFkdq7Af33jcvEbyikYBBgaLJuQFoSs8myoNI4VJDl1 -> ../../dm-13
lrwxrwxrwx 1 root root   11 Mar  9 21:10 dm-uuid-LVM-ngVF3rcgDuGyW4Lo5WpRpjFkdq7Af33jE33NRtkhNfU5RD7VPYqeIDOgOpXFDgoh -> ../../dm-17
lrwxrwxrwx 1 root root   11 Mar  9 21:10 dm-uuid-LVM-ngVF3rcgDuGyW4Lo5WpRpjFkdq7Af33jefp3zy0MJLLmXYwz1MCqaDxhMV4vsFp9 -> ../../dm-16
lrwxrwxrwx 1 root root   11 Mar  9 17:23 dm-uuid-LVM-ngVF3rcgDuGyW4Lo5WpRpjFkdq7Af33jGLyWhvzljCkSF5z3dn8UKKZNjo7inNiG -> ../../dm-23
lrwxrwxrwx 1 root root   10 Mar  9 17:23 dm-uuid-LVM-ngVF3rcgDuGyW4Lo5WpRpjFkdq7Af33jgPjmVMzRLmMthddww9gv1QL4WKV9Rs2O -> ../../dm-9
lrwxrwxrwx 1 root root   11 Mar  9 17:23 dm-uuid-LVM-ngVF3rcgDuGyW4Lo5WpRpjFkdq7Af33jGs7QO0E9a9UwdbgtgwR1RaSQeLddCHLb -> ../../dm-19
lrwxrwxrwx 1 root root   11 Mar  9 22:22 dm-uuid-LVM-ngVF3rcgDuGyW4Lo5WpRpjFkdq7Af33jGtD3j1QvwkRoS0kvKfaPscmTC2OSTyWG -> ../../dm-24
lrwxrwxrwx 1 root root   10 Mar  9 17:23 dm-uuid-LVM-ngVF3rcgDuGyW4Lo5WpRpjFkdq7Af33jRHYQT3MHAD38nrJBqhiQrgPsDgGYz0tx -> ../../dm-5
lrwxrwxrwx 1 root root   11 Mar  9 17:23 dm-uuid-LVM-ngVF3rcgDuGyW4Lo5WpRpjFkdq7Af33juVvdLiKmrbmRjbVHpa8pSCuMBmA1wCBv -> ../../dm-20
lrwxrwxrwx 1 root root   11 Mar  9 17:23 dm-uuid-LVM-ngVF3rcgDuGyW4Lo5WpRpjFkdq7Af33jvPOFm0549zU2drr5OCsLmw3Xb2CelsNa -> ../../dm-22
lrwxrwxrwx 1 root root   10 Mar  9 17:23 dm-uuid-LVM-ngVF3rcgDuGyW4Lo5WpRpjFkdq7Af33jwTaSp2blkGLjeo00vbXQ4fOtxGSGFCao -> ../../dm-8
lrwxrwxrwx 1 root root   10 Mar  9 17:23 dm-uuid-LVM-ngVF3rcgDuGyW4Lo5WpRpjFkdq7Af33jwTje8DnPergHcJ5WEe7RLWAB5rAy9cm4 -> ../../dm-6
lrwxrwxrwx 1 root root   10 Mar  9 17:23 dm-uuid-LVM-ngVF3rcgDuGyW4Lo5WpRpjFkdq7Af33jZrQKu3WS6vc6aov9LCmpXdyjf7AZZSOy -> ../../dm-4
lrwxrwxrwx 1 root root   13 Mar 10 21:09 lvm-pv-uuid-ypZ8av-tDS8-40GW-UW0d-MUvL-quGn-lo8dFY -> ../../nvme0n1
lrwxrwxrwx 1 root root   13 Mar 10 21:09 nvme-eui.344754304db038470025384600000001 -> ../../nvme0n1
lrwxrwxrwx 1 root root   13 Mar 10 21:09 nvme-PM981a_NVMe_Samsung_512GB_______S4GTNF0MB03847 -> ../../nvme0n1
lrwxrwxrwx 1 root root   13 Mar 10 21:09 nvme-PM981a_NVMe_Samsung_512GB_______S4GTNF0MB03847_1 -> ../../nvme0n1
lrwxrwxrwx 1 root root    9 Mar 11 17:09 usb-Sabrent_Dual_SATA_Bridge_00000000000000000000-0:0 -> ../../sdd
lrwxrwxrwx 1 root root    9 Mar 11 17:09 usb-Sabrent_Dual_SATA_Bridge_00000000000000000000-0:1 -> ../../sde
lrwxrwxrwx 1 root root    9 Mar  9 17:23 wwn-0x50004cf212368c97 -> ../../sdb
lrwxrwxrwx 1 root root   10 Mar  9 17:23 wwn-0x50004cf212368c97-part1 -> ../../sdb1
lrwxrwxrwx 1 root root    9 Mar 11 17:09 wwn-0x5001b448b541a445 -> ../../sdd
lrwxrwxrwx 1 root root    9 Mar 11 17:09 wwn-0x5001b448b8a1da25 -> ../../sde

And I hope you got recent backups (as everyone always should)?
Yep. All VM's are on that NVME drive currently and I'm backing up to a seperate unraid server for my vm disk images. Only thing that is even on Local/Local-ZFS is local backups of the vm disks (2nd copy) and isos... all replaceable.
 
Output of proxmox-boot-tool status?
Code:
root@pve1:~# proxmox-boot-tool status
Re-executing '/usr/sbin/proxmox-boot-tool' in new private mount namespace..
System currently booted with uefi
BA27-30BE is configured with: uefi (versions: 6.2.16-20-pve, 6.5.11-7-pve, 6.5.11-8-pve)
BA27-A72D is configured with: uefi (versions: 6.2.16-20-pve, 6.5.11-7-pve, 6.5.11-8-pve)
 
1.) follow the wiki article on how to "replace a failed bootable device" to copy the partition table and sync the bootloader from the old to the new disk. But skip that "zpool replace" command.
Code:
sgdisk <healthy bootable device> -R <new device>
sgdisk -G <new device>
proxmox-boot-tool format <new disk's ESP>
proxmox-boot-tool init <new disk's ESP>
so
Code:
sgdisk /dev/disk/by-id/ata-SPCC_Solid_State_Disk_BF3307351C4401231977 -R /dev/disk/by-id/ata-WDC_WDBNCE5000PNC_200721A00ACA
sgdisk -G /dev/disk/by-id/ata-WDC_WDBNCE5000PNC_200721A00ACA
proxmox-boot-tool format /dev/disk/by-id/ata-WDC_WDBNCE5000PNC_200721A00ACA-part2
proxmox-boot-tool init /dev/disk/by-id/ata-WDC_WDBNCE5000PNC_200721A00ACA-part2

sgdisk /dev/disk/by-id/ata-SPCC_Solid_State_Disk_BF3307351C4401231984 -R /dev/disk/by-id/ata-WDC_WDS500G2B0A_19255D801958
sgdisk -G /dev/disk/by-id/ata-WDC_WDS500G2B0A_19255D801958
proxmox-boot-tool format /dev/disk/by-id/ata-WDC_WDS500G2B0A_19255D801958-part2
proxmox-boot-tool init /dev/disk/by-id/ata-WDC_WDS500G2B0A_19255D801958-part2
But not sure how well that will work because you are cloning the partition table to a smaller disk. You might need to manually partition the new disks with same sized first and second partitions but smaller third ones and then run the proxmox-boot-tool commands.

2.) add partition 3 of the new disk as a new vdev (so creating a raid0/stripe if it was a single disk before) using the "zpool add" command
Code:
zpool    add [-fgLnP] [-o property=value] pool vdev…
so
Code:
zpool add rpool mirror /dev/disk/by-id/ata-WDC_WDBNCE5000PNC_200721A00ACA-part3 /dev/disk/by-id/ata-WDC_WDS500G2B0A_19255D801958-part3

3.) remove the old disk using the "zpool remove" command
Code:
zpool    remove [-npw] pool device…
so
Code:
zpool remove rpool mirror-0
 
Last edited:
  • Like
Reactions: pspfreak
Code:
sgdisk <healthy bootable device> -R <new device>
sgdisk -G <new device>
proxmox-boot-tool format <new disk's ESP>
proxmox-boot-tool init <new disk's ESP>
so
Code:
sgdisk /dev/disk/by-id/ata-SPCC_Solid_State_Disk_BF3307351C4401231977 -R /dev/disk/by-id/ata-WDC_WDBNCE5000PNC_200721A00ACA
sgdisk -G /dev/disk/by-id/ata-WDC_WDBNCE5000PNC_200721A00ACA
proxmox-boot-tool format /dev/disk/by-id/ata-WDC_WDBNCE5000PNC_200721A00ACA-part2
proxmox-boot-tool init /dev/disk/by-id/ata-WDC_WDBNCE5000PNC_200721A00ACA-part2

sgdisk /dev/disk/by-id/ata-SPCC_Solid_State_Disk_BF3307351C4401231984 -R /dev/disk/by-id/ata-WDC_WDS500G2B0A_19255D801958
sgdisk -G /dev/disk/by-id/ata-WDC_WDS500G2B0A_19255D801958
proxmox-boot-tool format /dev/disk/by-id/ata-WDC_WDS500G2B0A_19255D801958-part2
proxmox-boot-tool init /dev/disk/by-id/ata-WDC_WDS500G2B0A_19255D801958-part2
But not sure how well that will work because you are cloning the partition table to a smaller disk. You might need to manually partition the new disks with same first and second partition but smaller third one.


Code:
zpool    add [-fgLnP] [-o property=value] pool vdev…
so
Code:
zpool add rpool mirror /dev/disk/by-id/ata-WDC_WDBNCE5000PNC_200721A00ACA-part3 /dev/disk/by-id/ata-WDC_WDS500G2B0A_19255D801958-part3


Code:
zpool    remove [-npw] pool device…
so
Code:
zpool remove rpool mirror-0
Thank you!

First step however errors out. Can I resize the partition that is too large?

Code:
root@pve1:~# sgdisk /dev/disk/by-id/ata-SPCC_Solid_State_Disk_BF3307351C4401231977 -R /dev/disk/by-id/ata-WDC_WDBNCE5000PNC_200721A00ACA
Caution! Secondary header was placed beyond the disk's limits! Moving the
header, but other problems may occur!

Warning! Secondary partition table overlaps the last partition by
23442048 blocks!
You will need to delete this partition or resize it in another utility.

Problem: partition 3 is too big for the disk.
Aborting write operation!
Aborting write of new partition table.
 
Last edited:
Then you have to read the manual of the partitioning tool of your choice (for example sgdisk) to:
1.) create a GPT
2.) create a 1MiB first partition
3.) create a 1GiB second ESP partition
4.) create a third partition using the remaining space
And then run the proxmox-boot-tool commands.

I'm not that fit with sgdisk but probably something similar to:
sgdisk -g -n 1:0:+1M -n 2:0:+1G -n 3:0:0 -t 1:8300 -t 2:EF00 -t 3:BF01 -p /dev/disk/by-id/yourNewDisk
 
  • Like
Reactions: pspfreak
Then you have to read the manual of the partitioning tool of your choice (for example sgdisk) to:
1.) create a GPT
2.) create a 1MiB first partition
3.) create a 1GiB second ESP partition
4.) create a third partition using the remaining space
And then run the proxmox-boot-tool commands.

I'm not that fit with sgdisk but probably something similar to:
sgdisk -g -n 1:0:+1M -n 2:0:+1G -n 3:0:0 -t 1:8300 -t 2:EF00 -t 3:BF01 -p /dev/disk/by-id/yourNewDisk
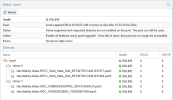
Okay, I've got it, almost. I'm now at the point where my rpool looks like this:

1710199351709.png

So before I run the 'zpool remove rpool mirror-0' command, will zfs just automatically move everything over to the new drives when i remove the olds ones/mirror-0 from the pool, or is there a command first to do that?

Also at the end of the proxmox boot tool init i got this warning: WARN: /dev/disk/by-uuid/FEAA-08F6 does not exist - clean '/etc/kernel/proxmox-boot-uuids'! - skipping

I'm assuming nothing to worry about?

Code:
root@pve1:~# proxmox-boot-tool init /dev/disk/by-id/ata-WDC_WDBNCE5000PNC_200721A00ACA-part2
Re-executing '/usr/sbin/proxmox-boot-tool' in new private mount namespace..
UUID="1E74-FF09" SIZE="1073741824" FSTYPE="vfat" PARTTYPE="c12a7328-f81f-11d2-ba4b-00a0c93ec93b" PKNAME="sdd" MOUNTPOINT=""
Mounting '/dev/disk/by-id/ata-WDC_WDBNCE5000PNC_200721A00ACA-part2' on '/var/tmp/espmounts/1E74-FF09'.
Installing systemd-boot..
Created "/var/tmp/espmounts/1E74-FF09/EFI/systemd".
Created "/var/tmp/espmounts/1E74-FF09/EFI/BOOT".
Created "/var/tmp/espmounts/1E74-FF09/loader".
Created "/var/tmp/espmounts/1E74-FF09/loader/entries".
Created "/var/tmp/espmounts/1E74-FF09/EFI/Linux".
Copied "/usr/lib/systemd/boot/efi/systemd-bootx64.efi" to "/var/tmp/espmounts/1E74-FF09/EFI/systemd/systemd-bootx64.efi".
Copied "/usr/lib/systemd/boot/efi/systemd-bootx64.efi" to "/var/tmp/espmounts/1E74-FF09/EFI/BOOT/BOOTX64.EFI".
Random seed file /var/tmp/espmounts/1E74-FF09/loader/random-seed successfully written (32 bytes).
Created EFI boot entry "Linux Boot Manager".
Configuring systemd-boot..
Unmounting '/dev/disk/by-id/ata-WDC_WDBNCE5000PNC_200721A00ACA-part2'.
Adding '/dev/disk/by-id/ata-WDC_WDBNCE5000PNC_200721A00ACA-part2' to list of synced ESPs..
Refreshing kernels and initrds..
Running hook script 'proxmox-auto-removal'..
Running hook script 'zz-proxmox-boot'..
WARN: /dev/disk/by-uuid/02B8-CA80 does not exist - clean '/etc/kernel/proxmox-boot-uuids'! - skipping
Copying and configuring kernels on /dev/disk/by-uuid/1BCB-AF66
        Copying kernel and creating boot-entry for 6.2.16-20-pve
        Copying kernel and creating boot-entry for 6.5.11-7-pve
        Copying kernel and creating boot-entry for 6.5.11-8-pve
Copying and configuring kernels on /dev/disk/by-uuid/1E74-FF09
        Copying kernel and creating boot-entry for 6.2.16-20-pve
        Copying kernel and creating boot-entry for 6.5.11-7-pve
        Copying kernel and creating boot-entry for 6.5.11-8-pve
Copying and configuring kernels on /dev/disk/by-uuid/BA27-30BE
        Copying kernel and creating boot-entry for 6.2.16-20-pve
        Copying kernel and creating boot-entry for 6.5.11-7-pve
        Copying kernel and creating boot-entry for 6.5.11-8-pve
Copying and configuring kernels on /dev/disk/by-uuid/BA27-A72D
        Copying kernel and creating boot-entry for 6.2.16-20-pve
        Copying kernel and creating boot-entry for 6.5.11-7-pve
        Copying kernel and creating boot-entry for 6.5.11-8-pve
WARN: /dev/disk/by-uuid/FEAA-08F6 does not exist - clean '/etc/kernel/proxmox-boot-uuids'! - skipping
 
Last edited:
So before I run the 'zpool remove rpool mirror-0' command, will zfs just automatically move everything over to the new drives when i remove the olds
yes

Also at the end of the proxmox boot tool init i got this warning: WARN: /dev/disk/by-uuid/FEAA-08F6 does not exist - clean '/etc/kernel/proxmox-boot-uuids'! - skipping
Yes, just a warning but will still work. You could run proxmox-boot-tool clean to remove old entries.
 
  • Like
Reactions: pspfreak
yes


Yes, just a warning but will still work. You could run proxmox-boot-tool clean to remove old entries.
Cool, looks like it's in the progress now of moving data over:

Code:
root@pve1:~# zpool status rpool
  pool: rpool
 state: ONLINE
status: Some supported and requested features are not enabled on the pool.
        The pool can still be used, but some features are unavailable.
action: Enable all features using 'zpool upgrade'. Once this is done,
        the pool may no longer be accessible by software that does not support
        the features. See zpool-features(7) for details.
  scan: scrub repaired 0B in 00:06:03 with 0 errors on Sun Mar 10 00:30:04 2024
remove: Evacuation of mirror in progress since Mon Mar 11 19:54:11 2024
        50.8G copied out of 149G at 208M/s, 34.08% done, 0h8m to go
config:

        NAME                                                      STATE     READ WRITE CKSUM
        rpool                                                     ONLINE       0     0     0
          mirror-0                                                ONLINE       0     0     0  (removing)
            ata-SPCC_Solid_State_Disk_BF3307351C4401231977-part3  ONLINE       0     0     0  (non-allocating)
            ata-SPCC_Solid_State_Disk_BF3307351C4401231984-part3  ONLINE       0     0     0  (non-allocating)
          mirror-1                                                ONLINE       0     0     0
            ata-WDC_WDBNCE5000PNC_200721A00ACA-part3              ONLINE       0     0     0
            ata-WDC_WDS500G2B0A_19255D801958-part3                ONLINE       0     0     0

errors: No known data errors

That was way easier than reinstalling, Thank you very much!
 

About

The Proxmox community has been around for many years and offers help and support for Proxmox VE, Proxmox Backup Server, and Proxmox Mail Gateway.
We think our community is one of the best thanks to people like you!

Get your subscription!

The Proxmox team works very hard to make sure you are running the best software and getting stable updates and security enhancements, as well as quick enterprise support. Tens of thousands of happy customers have a Proxmox subscription. Get yours easily in our online shop.

Buy now!